Table of Contents
- Getting Started
- Important Classes of the API
-
How to use the API
- Choose the GAMS system
- Export data to GDX
- Import data from GDX
- Run a GAMSJob from file
- Specify the solver
- Run a job with a solver option file
- Use include files
- Read data from string and export to GDX
- Run a job using data from GDX
- Run a job using implicit database communication
- Define data using C++ data structures
- Prepare a GAMSDatabase from C++ data structures
- Initialize a GAMSCheckpoint by running a GAMSJob
- Initialize a GAMSJob from a GAMSCheckpoint
- Run multiple GAMSJobs in parallel using a GAMSCheckpoint
- Create a GAMSModelInstance from a GAMSCheckpoint
- Modify a parameter of a GAMSModelInstance using GAMSModifier
- Modify a variable of a GAMSModelInstance using GAMSModifier
- Use a queue to solve multiple GAMSModelInstances in parallel
- Fill a GAMSDatabase by reading from MS Access
- Fill a GAMSDatabase by reading from MS Excel
- Create and use a save/restart file
- How to use the pre configured example projects
The goal of this tutorial is to provide a compact overview of the basic functionality of the GAMS C++ API. It allows the user to start working immediately with the API by providing a set of small examples based on the well-known transportation problem. These examples introduce several API features step by step. The GAMS distribution comes with a pre compiled binary version of the GAMS C++ API on Windows, macOS and Linux. Furthermore, the C++ API itself and the provided examples are published under MIT license and are hosted at the GAMS GitHub organization. Therefore it is possible to compile the library manually (e.g. if a certain compiler is required) The GAMS C++ API is implemented and compatible with C++17.
- Getting Started A quick introduction about how to create and configure a C++ project using Qt Creator
- Important Classes of the API Overview of some fundamental classes of the GAMS C++ API
- How to use the API An extensive set of examples on how to use API components
Getting Started
This section guides you through the basic steps of compiling and running a program from scratch using either Qt Creator, Microsoft Visual Studio or Xcode. If you want to have a look at the API itself you can directly start with the How to use the API section instead. While this tutorial uses Qt Creator, Microsoft Visual Studio and Xcode, other IDE's can be used as well.
- Note
- When using the pre compiled binary distribution of the GAMS C++ API as done in this section, one needs to use a compiler that is compatible with the one that was used during compilation of the library. Depending on the platform, different versions of the pre build binaries can be found under
<GAMS system directory>/apifiles/C++/lib. In GAMS versions before 25.0 the binaries can be found under<GAMS system directory>. The distributed libraries use the following compilers:- Windows: MSVC2017 and MSVC2019
- MacOS (x86_64): GCC and Clang
- MacOS (ARM64): Clang
- Linux: GCC
Note that the compiler needs at least full C++17 support in order to be able to use the GAMS C++ API.
Getting Started using Qt Creator
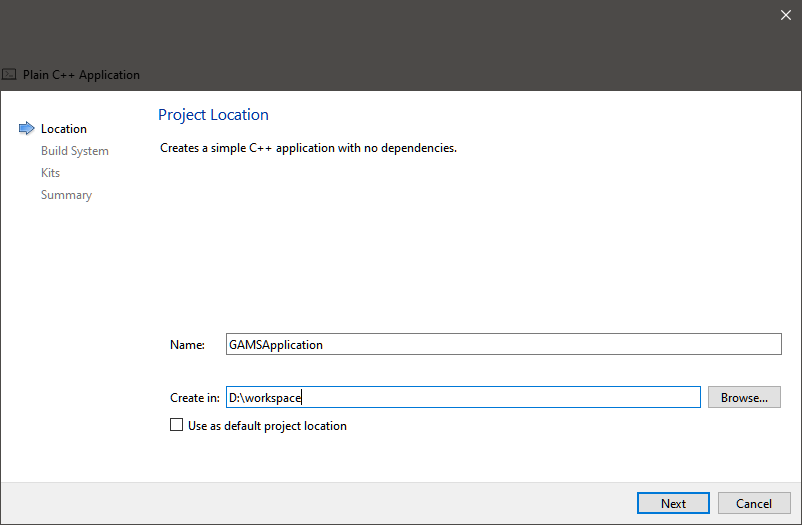
After opening Qt Creator click on File > New File or Project. Choose Non-Qt Project > Plain C++ Application and click on Choose.... On the next page fill in the name and the location of the new project and click Next.
As a build system we recommend using CMake, which should be the default for recent Qt Creator versions. Afterwards, select the kits you want to use for the project and click again on Next. If you use the precompiled library on Windows, you need to use MSVC2017 or MSVC2019. Confirm the creation of the new project by clicking on Finish.

As soon as the project is created open the file CMakeLists.txt located in the root folder of your project. Add the following lines to the file:
- Note
- Depending on your operating system and the location of your GAMS system you might need to adjust the path to GAMS and Visual Studio version. Furthermore, all pre build binaries are always located at
<GAMS system directory>\apifiles\C++\lib, if GAMS 25.0 (or higher) is used. This location may contain additional sub directories, like<GAMS system directory>\apifiles\C++\lib\vs2019. In case a previous version of GAMS is used the binaries are located at<GAMS system directory>.
Save the changes, right click on the project and choose Run CMake.
The last step of creating a first small example is to write code that makes use of the GAMS C++ API. Open the file main.cpp and replace the content of the file with the following lines of code:
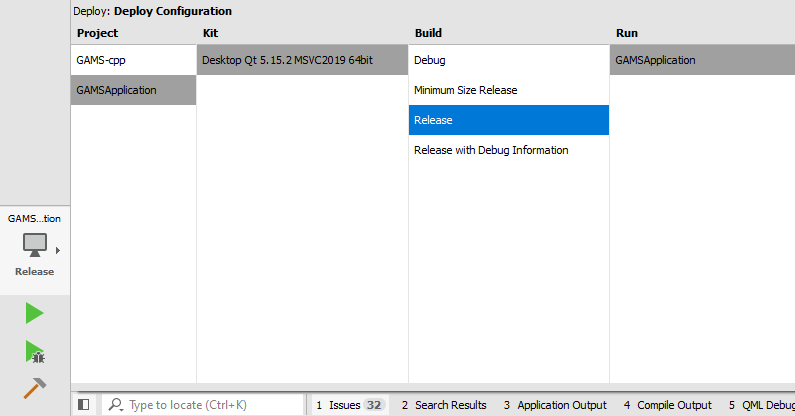
Make sure that MSVC2019 64bit is chosen as kit using the Release mode.
Click on the play button below to run (and compile) the small example. If everything works, you should see the output of the example displaying results of the solved transportation problem.
Getting Started using Visual Studio 2019
After opening Visual Studio click on File > New > Project ....
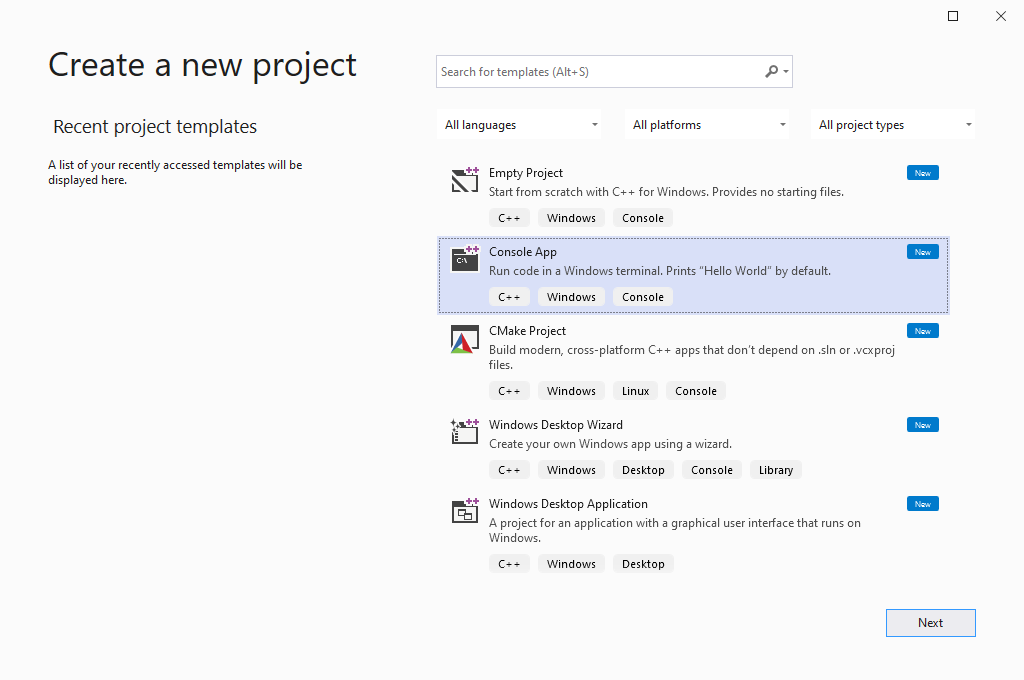
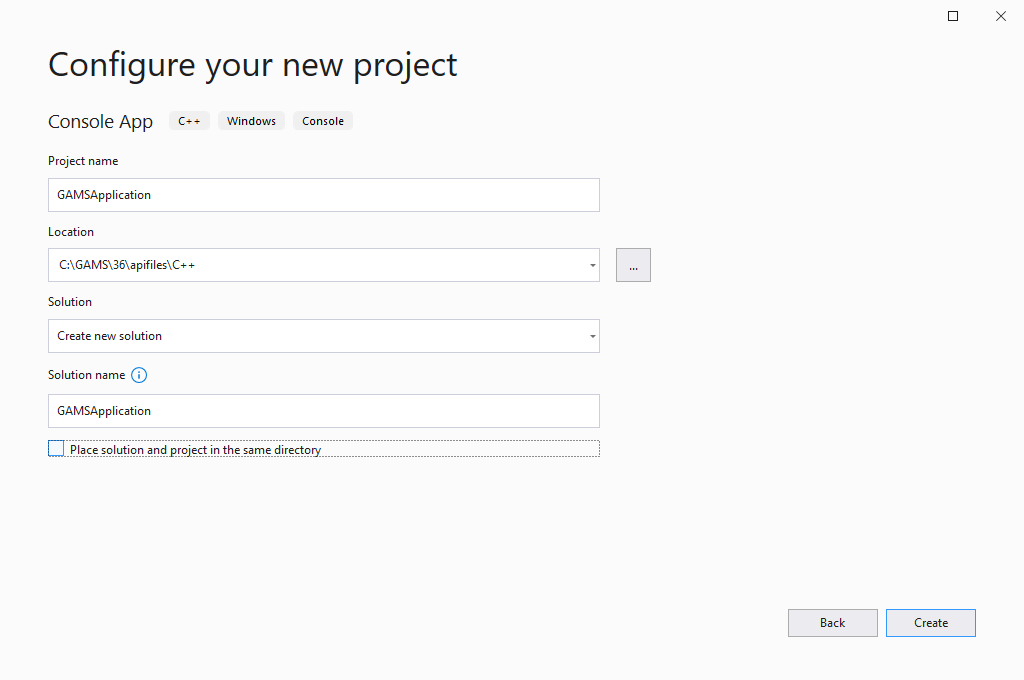
Choose Console App and fill in the name and the location of the project and click on Ok.
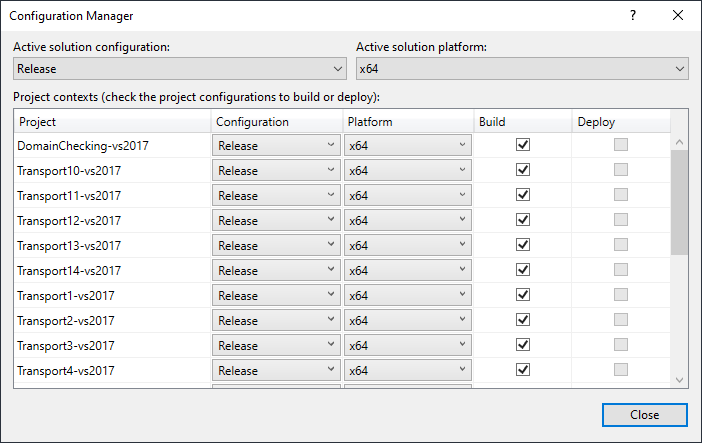
As soon as the project is loaded, open the Configuration Manager:
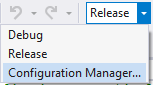
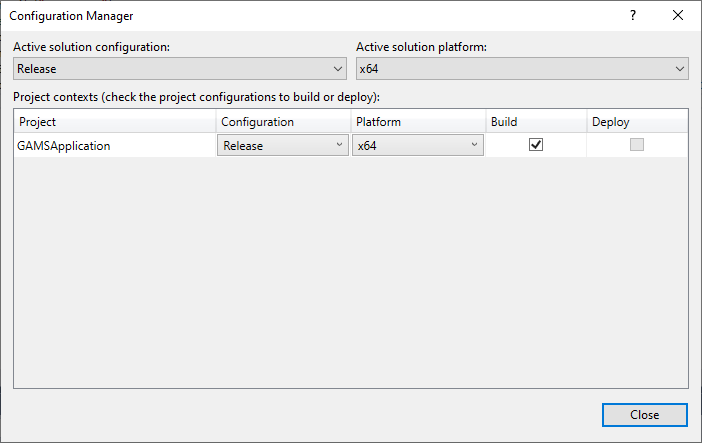
Change the Active solution configuration to Release and the Active solution platform to x64.
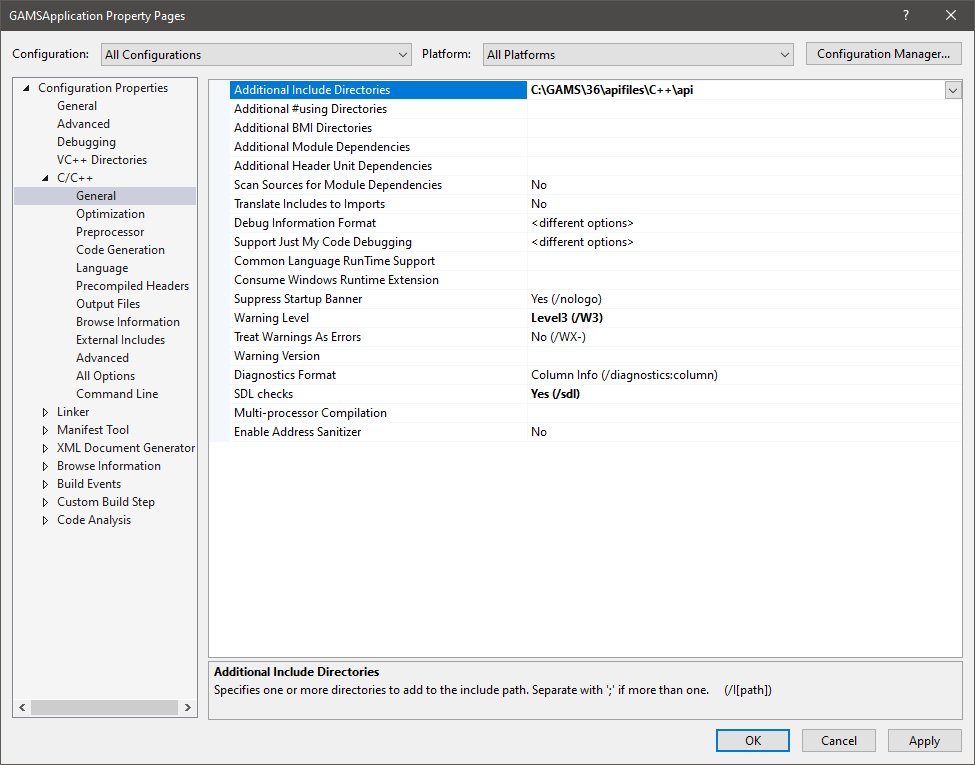
The next step is to configure the project to find the GAMS C++ API. Rigth click on the project and choose Properties from the context menue. Go to Configuration Properties > C/C++ > General and add <GAMS system directory>\apifiles\C++\api to Additional Include Directories.
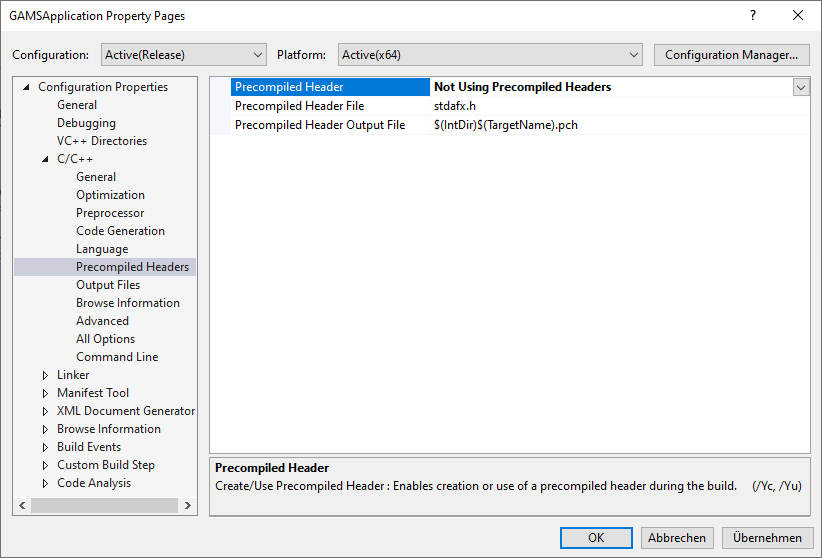
Select Configuration Properties > C/C++ > Precompiled Headers on the left. On the right open the dropdown of Precompiled Header and select Not Using Precompiled Headers.
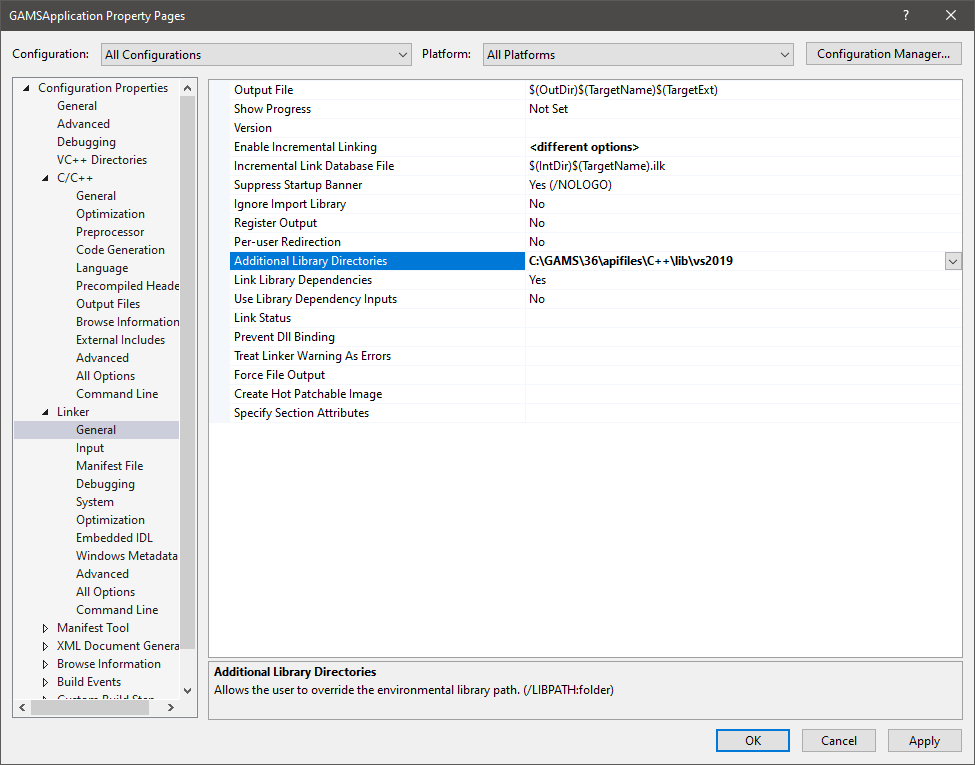
Go to Configuration Properties > Linker > General and add the apifiles path to the matching version of your Visual Studio (e.g. <GAMS system directory>\apifiles\C++\lib\vs2017) to Additional Library Directories:
- Note
- Please mind that the pre build binaries for older GAMS versions (before GAMS 25.0) are located at
<GAMS system directory>.
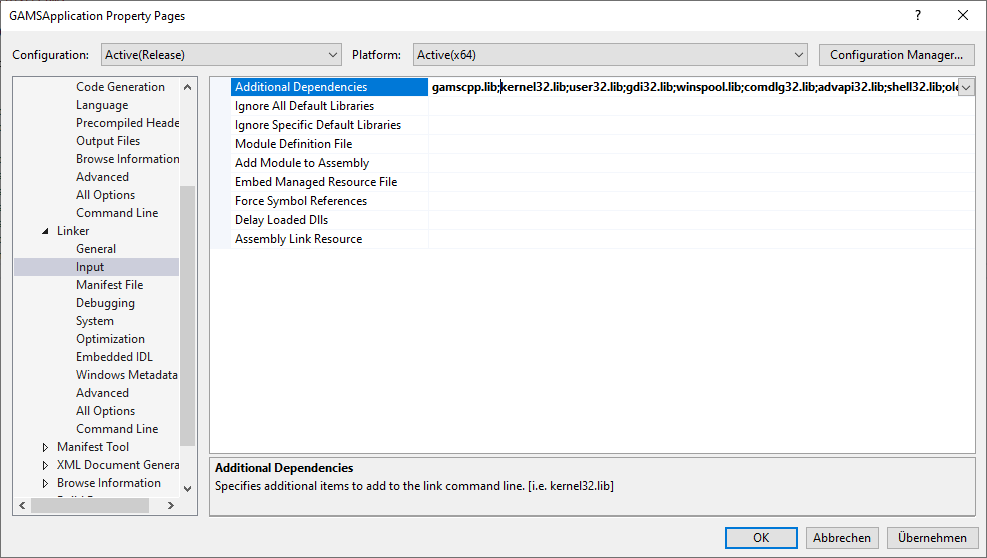
Choose Input and add gamscpp.lib; to Additional Dependencies. Make sure that all previous entries including %(AdditionalDependencies) are present as well.
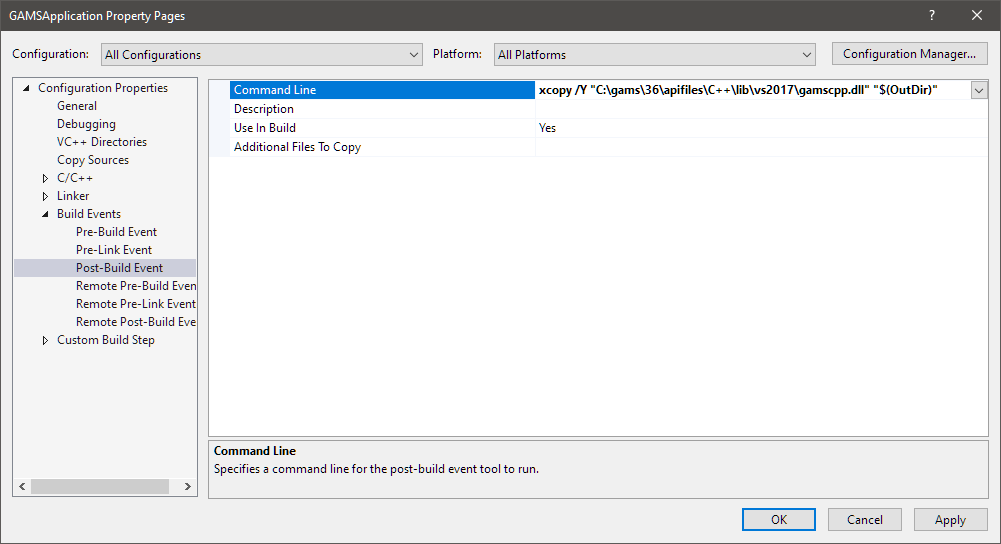
The last required configuration step is to add a post-build event that copies required files next to the generated executable. Click on Build Events > Post-Build Event and add the following code to Command Line. It is helpful to select <Edit...> from the dropdown box as there are two command lines. Note that you might need to adjust the used path depending on the location of your GAMS installation:
Open the file GAMSApplication.cpp and replace its content by the following code:
Click on Debug > Start Without Debugging in order to compile and run the example. If everything works, you should see the output of the example displaying results of the solved transportation problem.
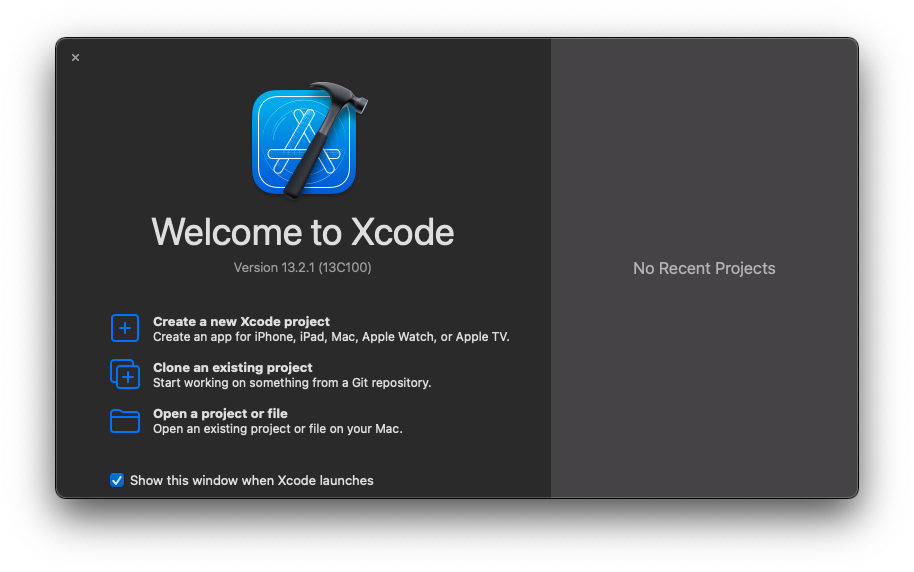
Getting Started using Xcode
After starting Xcode select "Create a new Xcode project" in the welcome screen.
As a platform pick macOS and "Command Line Tool" as Application type.
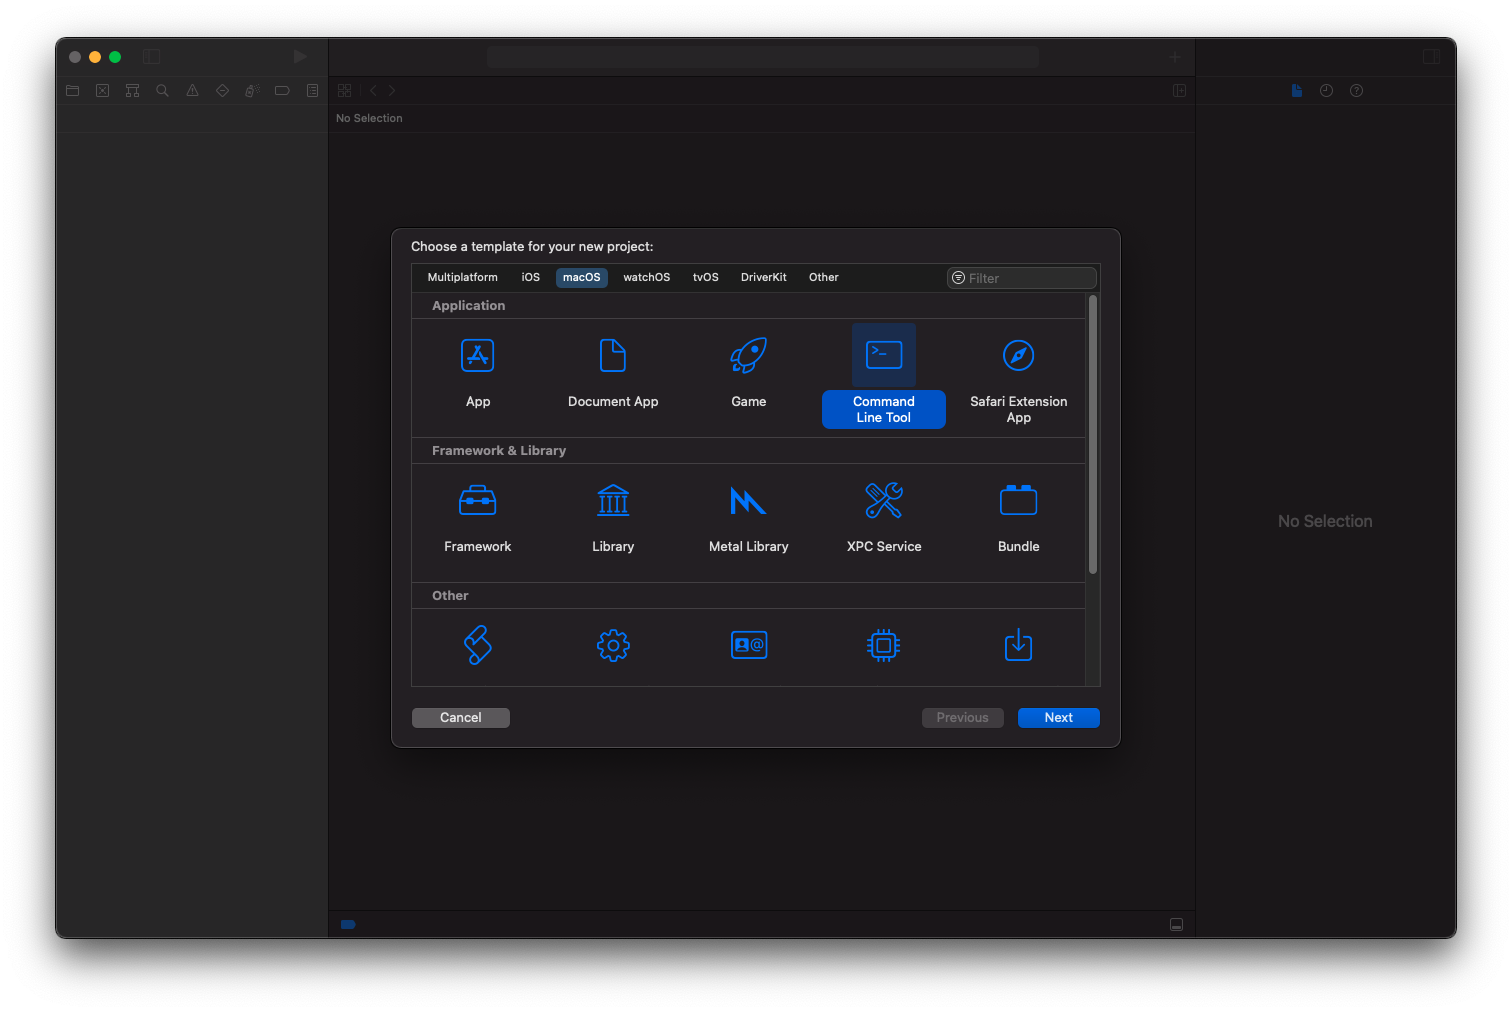
Give your application a name, an organization identifier and select "C++" as language.
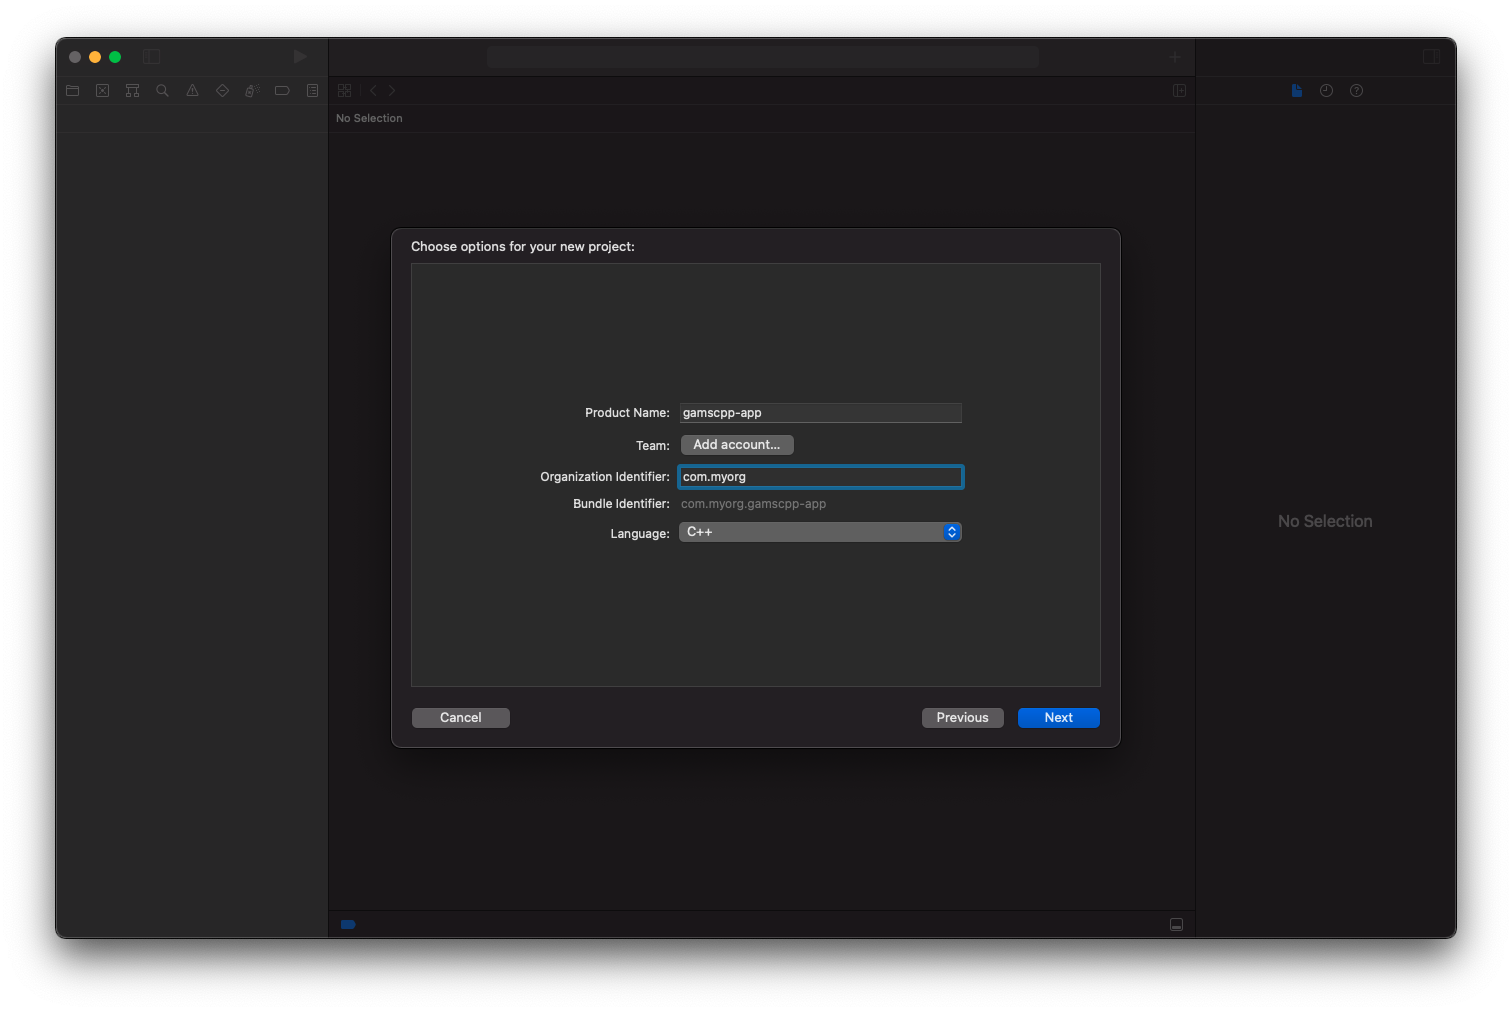
On the next screen pick a location for your new project.
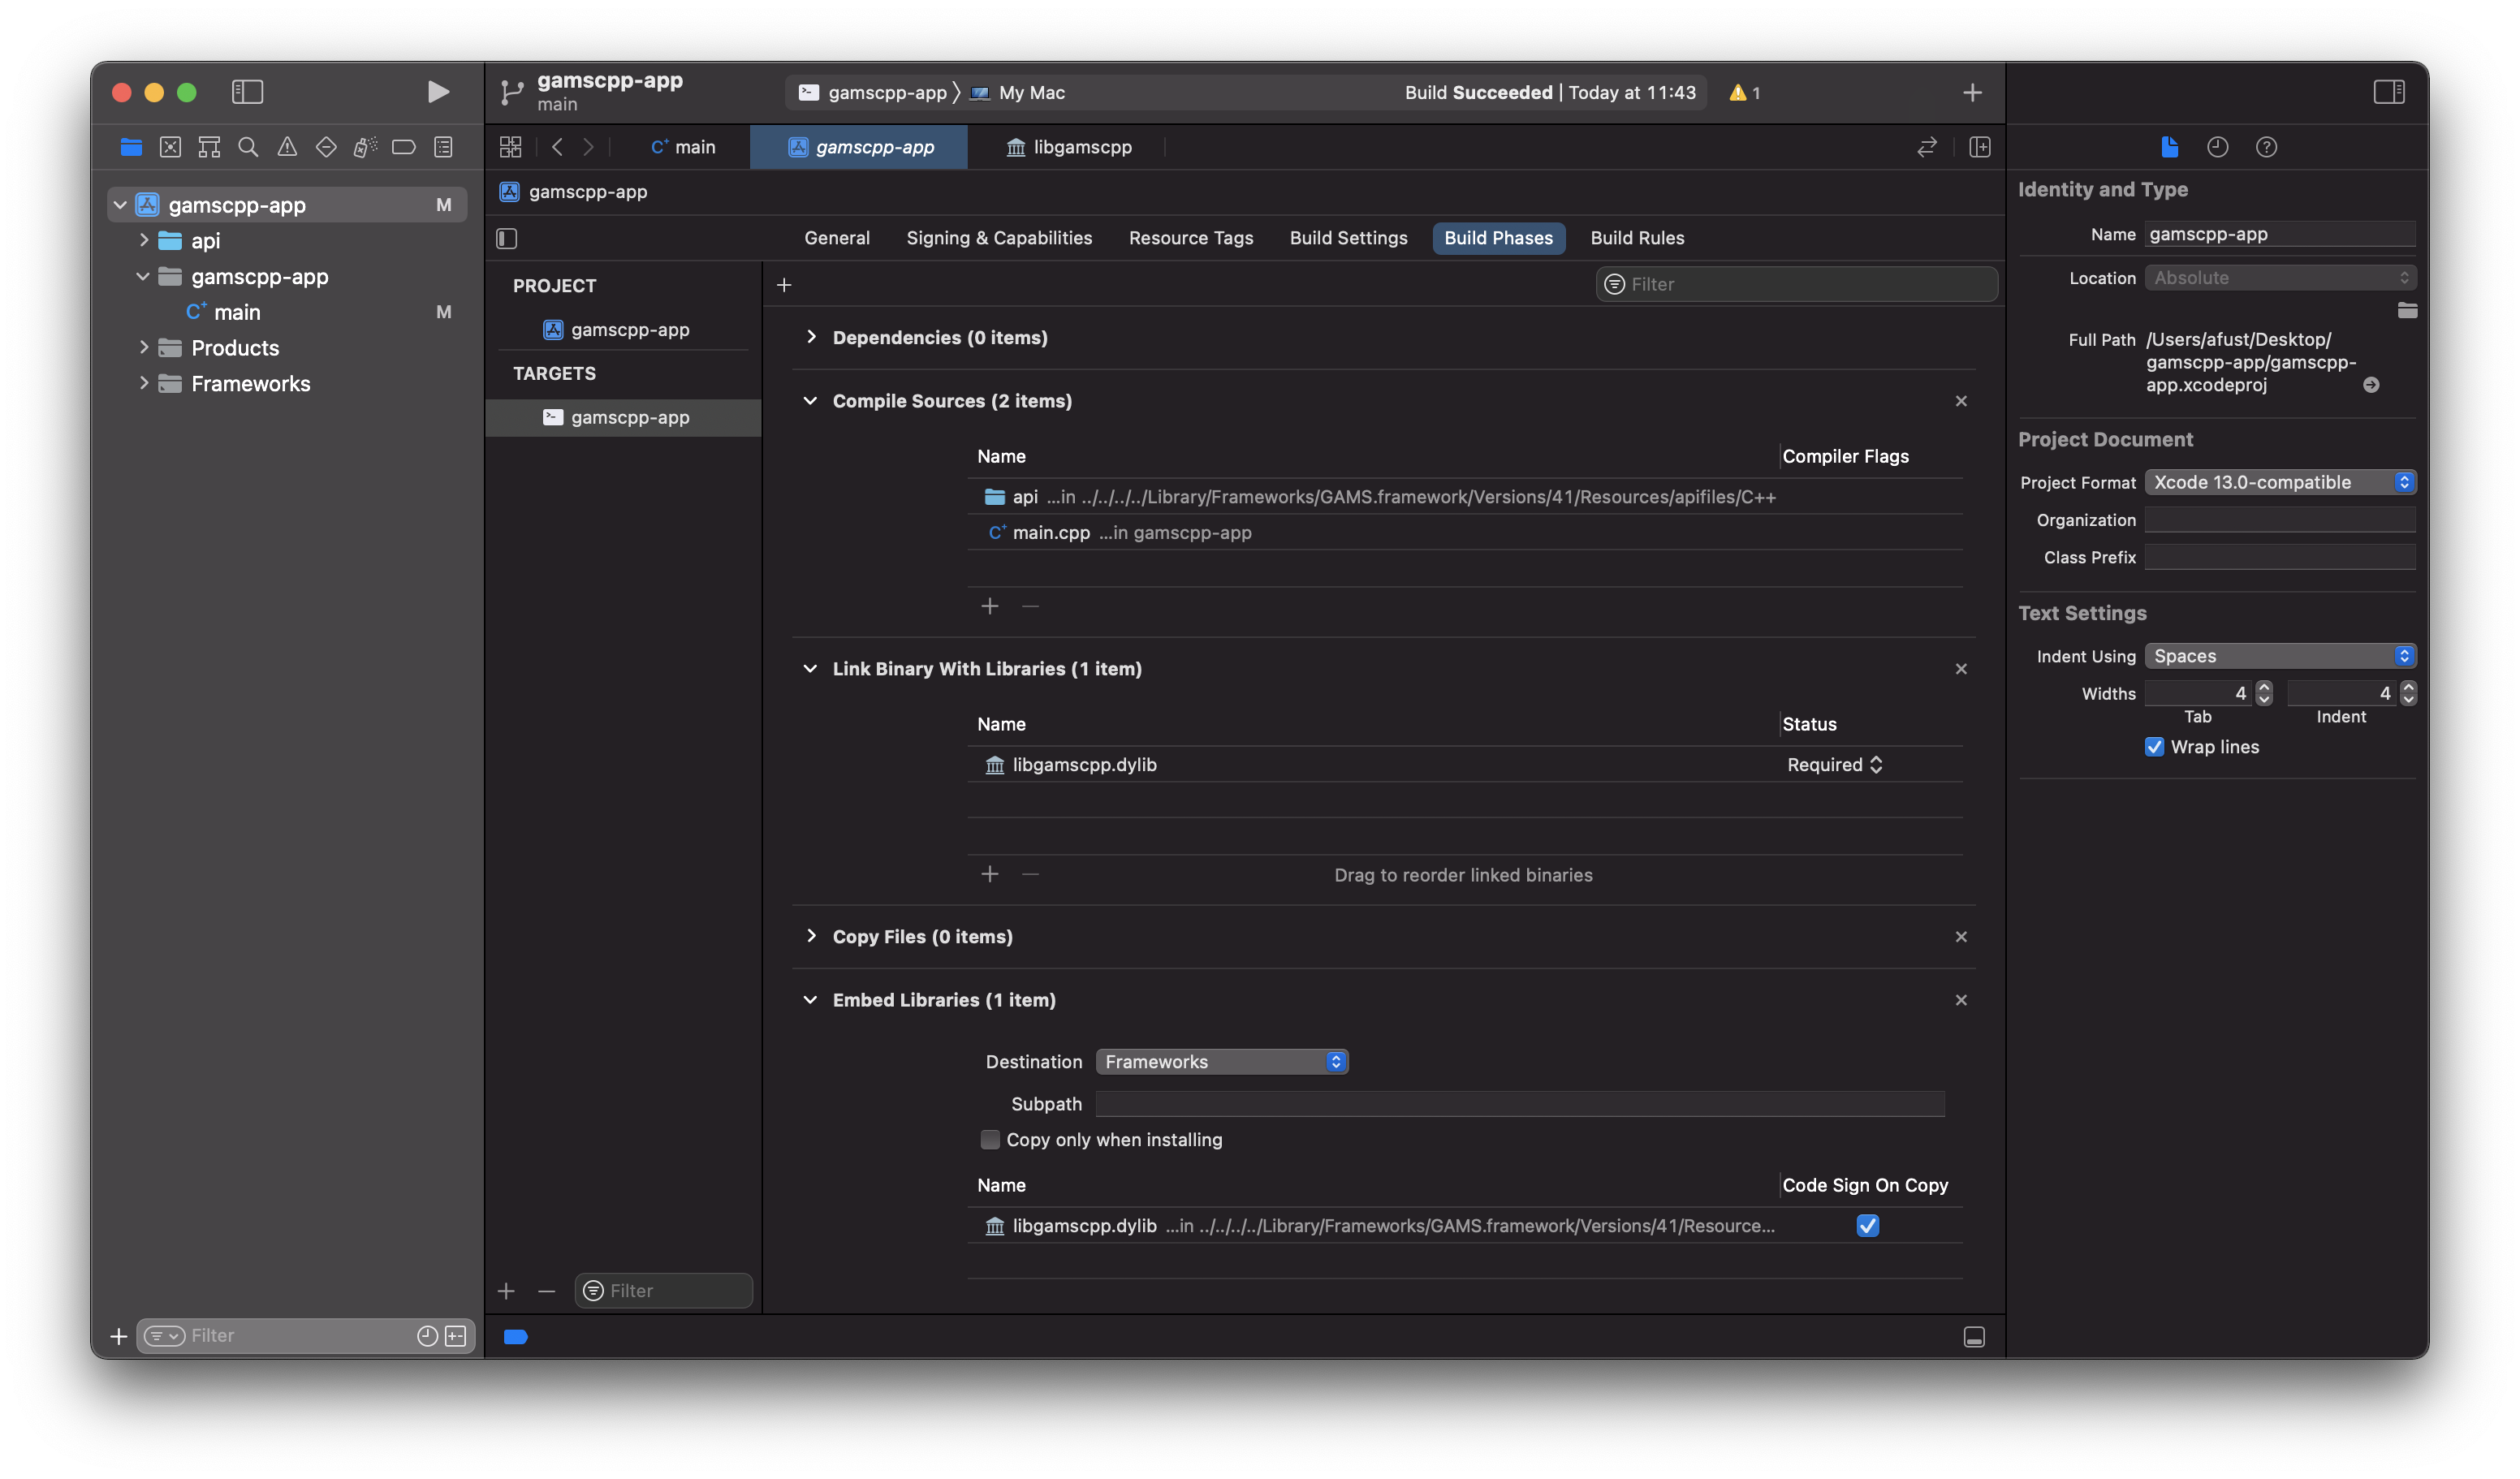
In your project settings go to the "Build Phases" tab add the following entry for "Compile Sources":
/Library/Frameworks/GAMS.framework/Versions/Current/Resources/apifiles/C++/api
Then, under "Link Binary With Libraries" add libgamscpp.dylib. On the system for x86_64, this library is shipped in two versions, a GCC and a Clang version:
- The GCC library can be found in the
/Library/Frameworks/GAMS.framework/Versions/Current/Resources/apifiles/C++/apidirectory. - The Clang version is only supported from macOS 10.15 onwards and can be found at
/Library/Frameworks/GAMS.framework/Versions/Current/Resources/apifiles/C++/api/Clang.
On the system for ARM64, only the Clang version is available and can be found at /Library/Frameworks/GAMS.framework/Versions/Current/Resources/apifiles/C++/api.
Open the file main.cpp and replace its content by the following code:
Important Classes of the API
This section provides a quick overview of some fundamental classes of the gams namespace. Their usage is demonstrated by an extensive set of examples.
- gams Namespace
- gams::GAMSWorkspace Class
- gams::GAMSJob Class
- gams::GAMSDatabase Class
- gams::GAMSOptions Class
- gams::GAMSModelInstance Class
- gams::GAMSSymbol Class
How to use the API
In the GAMS system directory there are some examples provided that illustrate the usage of the C++ API. <GAMS system directory>\apifiles\C++ contains several Visual Studio solutions for different versions of Visual Studio (e.g. examples-vs2017.sln, examples-vs2019.sln). The code snippets that are explained in this tutorial are taken from these examples. Furthermore there is a CMakeLists.txt file that can be used for building the examples using CMake.
- Note
- When using CMake on macOS the Clang library is used by default. There is an option to switch to the GCC library: Add
-D USE-GCC="ON"to your CMake command.
The well-known transportation problem is discussed step by step and each example introduces new elements of the GAMS C++ API.
We recommend to open the aforementioned files to gain a complete overview of the examples. Down below we explain the examples with the help of selected code snippets.
- Choose the GAMS system
- Export data to GDX
- Import data from GDX
- Run a GAMSJob from file
- Specify the solver
- Run a job with a solver option file
- Use include files
- Read data from string and export to GDX
- Run a job using data from GDX
- Run a job using implicit database communication
- Define data using C++ data structures
- Prepare a GAMSDatabase from C++ data structures
- Initialize a GAMSCheckpoint by running a GAMSJob
- Initialize a GAMSJob from a GAMSCheckpoint
- Run multiple GAMSJobs in parallel using a GAMSCheckpoint
- Create a GAMSModelInstance from a GAMSCheckpoint
- Modify a parameter of a GAMSModelInstance using GAMSModifier
- Modify a variable of a GAMSModelInstance using GAMSModifier
- Use a queue to solve multiple GAMSModelInstances in parallel
- Fill a GAMSDatabase by reading from MS Access
- Fill a GAMSDatabase by reading from MS Excel
- Create and use a save/restart file
Choose the GAMS system
Example: Transport1
By default the GAMS system is determined automatically. In case of having multiple GAMS systems on your machine, the desired system can be specified via an additional argument when the workspace is created. When running the examples, we can provide an additional command line argument in order to define the GAMS system directory that should be used. By executing Transport1.exe with C:/GAMS/51 we use GAMS 51 to run Transport1 even if our default GAMS system might be a different one. This is managed by the following code:
Remember that the bitness of the GAMS system has to match the bitness of your C++ program.
Export data to GDX
Example: TransportGDX
Although the Object-oriented C++ API offers much more than exchanging data between C++ and GDX, a common use case is the export and import of GDX files. The central class for this purpose is GAMSDatabase. We assume that the data to be exported is available in C++ data structures.
Different GAMS symbols are represented using different C++ data structures. The data for the GAMS sets is represented using vectors of strings (e.g. plants and markets). On the other hand, GAMS parameters are represented by maps (e.g. capacity and demand). Note that the representation of the two dimensional parameter distance uses tuples for storing the keys. The choice of data structures can also be different, but the used structures in this example fit well for representing GAMS data with C++ data structures.
A new GAMSDatabase instance can be created using GAMSWorkspace.addDatabase.
We start adding GAMS sets using the method GAMSDatabase.addSet which takes the name and the dimension as arguments. The third argument is an optional explanatory text. A for-loop iterates through plants and adds new records to the recently created GAMSSet instance i using GAMSSet.addRecord.
GAMSParameter instances can be added by using the method GAMSDatabase.addParameter. It has the same signature as GAMSDatabase.addSet. Anyhow, in this example we use an overload of the method which takes a list of GAMSSet instances instead of the dimension for creating a parameter with domain information.
As soon as all data is prepared in the GAMSDatabase, the method GAMSDatabase.doExport can be used to create a GDX file.
Import data from GDX
Example: TransportGDX
Data can be imported from a GDX file using GAMSWorkspace.addDatabaseFromGDX. The method takes a path to a GDX file and creates a GAMSDatabase instance.
Reading the data from the GAMSSet i into a vector can be done as follows:
A new vector iNew is created. i is retrieved by calling GAMSDatabase.getSet on db2. The returned GAMSSet object can be iterated using a for-loop to access the records of the set. Each record is of type GAMSSetRecord and can be asked for its keys.
You can do the same for GAMSParameters. Instead of creating a vector, we want to have the data in the form of a map. GAMSParameterRecords can not only be asked for their keys, but also for their value. The following code snippet shows how to read the one dimensional parameter a into a map<string, double>.
For multi dimensional symbols, we choose the map keys to be tuples instead of string. We access the individual keys by index and generate a tuple using make_tuple.
Scalars can be read into a variable of type double by accessing the value of the first and only record.
Run a GAMSJob from file
Example: Transport1
At first we create a GAMSWorkspace. Afterwards we load the model trnsport from the GAMS Model Library. In doing so it is made available in the current working directory and can be loaded by the GAMSWorkspace.AddJobFromFile Method afterwards. Apparently this method also works with any other gms file you might have created on your own as long as it is located in the current working directory. Then the GAMSJob t1 is defined from that file and run by the GAMSJob.run method. The following lines create the solution output and illustrate the usage of the GAMSJob.outDB method to get access to the GAMSDatabase created by the run method. To retrieve the content of variable x we use the GAMSVariableRecord class and the GAMSDatabase.getVariable method.
Specify the solver
Example: Transport1
The solver can be specified via the GAMSOptions class and the GAMSWorkspace.addOptions method. The GAMSOptions.setAllModelTypes method sets xpress as default solver for all model types which the solver can handle.
Run a job with a solver option file
Example: Transport1
At first create the file xpress.opt with content algorithm=barrier which will be used as solver option file and is stored in the current working directory. We choose xpress as solver just like in the preceding example and call GAMSOptions.setOptFile in order to tell the solver to look for a solver option file.
Use include files
Example: Transport2
In this example, as in many succeeding, the data text and the model text are separated into two different strings. Note that these strings provided by the methods getDataText and getModelText are using GAMS syntax.
At first we write an include file tdata.gms that contains the data but not the model text:
Afterwards we create a GAMSJob using the GAMSWorkspace.addJobFromString method. The GAMSOptions.setDefine method is used like the 'double dash' GAMS parameters, i.e. it corresponds to --incname=tdata on the command line.
Note that the string provided by getModelText contains the following lines to read in the data.
Read data from string and export to GDX
Example: Transport3
We read the data from the string provided by getDataText as we did in the preceding example. Note that this contains no solve statement but only data definition in GAMS syntax. By running the corresponding GAMSJob a GAMSDatabase is created that is available via the GAMSJob.outDb method. We can use the GAMSDatabase.doExport method to write the content of this database to a gdx file tdata.gdx.
Run a job using data from GDX
Example: Transport3
This works quite similar to the usage of an include file explained in Transport2 - Use include files.
Note that there are some changes in getModelText due to the usage of a GDX file instead of an include file.
Run a job using implicit database communication
Example: Transport3
This example does basically the same as the two preceding examples together. We create two GAMSJobs t3a and t3b where the first one contains only the data and the second one contains only the model without data. After running t3a the corresponding outDB can be read in directly just like a gdx file. Note that the database needs to be passed to the GAMSJob.run method as additional argument.
Define data using C++ data structures
Example: Transport4
We use the vector<T> and map<Key, Value> to define C++ data structures that correspond to the sets, parameters and tables used for the data definition in GAMS.
Prepare a GAMSDatabase from C++ data structures
Example: Transport4
At first we create an empty GAMSDatabase db using the GAMSWorkspace.addDatabase method. Afterwards we prepare the database. To add a set to the database we use the GAMSSet class and the GAMSDatabase.addSet method with arguments describing the identifier, dimension and explanatory text. To add the records to the database we iterate over the elements of our C++ data structure and add them by using the GAMSSet.addRecord method. We do pretty much the same thing for the parameters.
Note that the table that specifies the distances in GAMS can be treated as parameter with dimension 2 and that the scalars can be treated as parameter with dimension 0.
The GAMSJob can be run like explained in the preceding example about implicit database communication.
Initialize a GAMSCheckpoint by running a GAMSJob
Example: Transport5
The following two lines of code conduct several operations. While the first line simply creates a GAMS checkpoint, the second one uses the GAMSWorkspace.addJobFromString method to create a GAMSJob containing the model text and data but no solve statement. In contrast to the preceding examples it runs the job immediately using the GAMSJob.run method. Furthermore, it passes an additional checkpoint argument to the run method. That means the GAMSCheckpoint cp captures the state of the GAMSJob.
Initialize a GAMSJob from a GAMSCheckpoint
Example: Transport5
Note that the string returned from function getModelText() contains the entire model and data definition plus an additional demand multiplier and scalars for model and solve status but no solve statement:
We create a vector with eight different values for this demand multiplier.
For each entry of the vector we create a GAMSJob t5 using the GAMSWorkspace.addJobFromString method. Besides the string which resets the demand multiplier bmult, specifies the solve statement and assigns values to the scalars ms and ss we pass the checkpoint cp as additional argument. This results in a GAMSJob combined from the checkpoint plus the content provided by the string.
We run the GAMSJob and echo some interesting data from the outDB using the GAMSDatabase.getParameter and GAMSDatabase.getVariable methods, the GAMSParameter.findRecord and GAMSVariable.findRecord methods plus the GAMSParameterRecord.value and the GAMSVariableRecord.level methods.
- Note
- Some of demand multipliers cause infeasibility. Nevertheless, GAMS keeps the incumbent objective function value. Therefore the model status and the solve status provide important information for a correct solution interpretation.
Run multiple GAMSJobs in parallel using a GAMSCheckpoint
Example: Transport6
This example illustrates how to run the jobs we already know from Transport5 in parallel. We create a GAMSCheckpoint cp and initialize it by running a GAMSJob. Furthermore we introduce a demand multiplier as we did before.
Furthermore, we introduce a new object ioMutex that will be used to avoid mixed up output from the parallel jobs. For each element b from the vector of demand multipliers we create a thread executing the runScenario method.
In function runScenario a GAMSJob is created and run just like in the preceding example of Transport5. The output section is also the same except for the fact that it is locked by using a lock_guard on the ioMutex. That means the threads of runScenario are running in parallel but the output block of different threads cannot be executed in parallel since it is locked using the same ioMutex.
While the output in Transport5 is strictly ordered subject to the order of the elements of bmultlist, in Transport6 the output blocks might change their order but the blocks describing one scenario are still appearing together due to the lock_guard mechanism.
If you want a further impression of the impact of the lock_guard, just rerun Transport6 but comment out the lock_guard as follows and compare the output.
Create a GAMSModelInstance from a GAMSCheckpoint
Example: Transport7
In Transport7 the usage of gams::GAMSModelInstance is demonstrated.
At first we create a checkpoint cp as in the preceding examples. Then we create the GAMSModelInstance mi using the GAMSCheckpoint.addModelInstance method. Note that the GAMSJob again contains no solve statement and the demand multiplier is already included with default value 1.
Modify a parameter of a GAMSModelInstance using GAMSModifier
Example: Transport7
A GAMSModelInstance uses a syncDB to maintain the data. We define bmult as GAMSParameter using the GAMSDatabase.addParameter method and specify cplex as solver. Afterwards the GAMSModelInstance is instantiated with three arguments: the solve statement, the GAMSOptions object opt and bmult. The GAMSModifier means that bmult is modifiable while all other parameters, variables and equations of GAMSModelInstance mi stay unchanged.
We use the GAMSParameter.addRecord method to assign a value to bmult that can be varied afterwards using the GAMSParameter.firstRecord method to reproduce our well-known example with different demand multipliers.
Modify a variable of a GAMSModelInstance using GAMSModifier
Example: Transport7
We create a GAMSModelInstance and define x as GAMSVariable and its upper bound as GAMSParameter xup. At the following instantiate method GAMSModifier has three arguments. The first one says that x is modifiable, the second determines which part of the variable (lower bound, upper bound or level) can be modified and the third specifies the GAMSParameter that holds the new value.
In the following loops we set the upper bound of one link of the network to zero, which means that no transportation between the corresponding plant and market is possible, and solve the modified transportation problem.
Use a queue to solve multiple GAMSModelInstances in parallel
Example: Transport8
We initialize a GAMSCheckpoint cp from a GAMSJob. Then we define a vector that represents the different values of the demand multiplier. While ioMutex is used to avoid messed up output, vectorMutex synchronizes the access to the vector. Then we start multiple thread executing the method scenSolve. The number of parallel executed threads is specified by nrThreads. All trheads share the same vector that provides the different values for bmult.
In scenSolve we create and instantiate a GAMSModelInstance as in the preceding examples and make bmult modifiable. As long as bmultVector is not empty, an elements is taken and removed from the vector. The value is used for the scalar bmult. Note that we chose cplex as solver because it is thread safe (gurobi would also be possible). Once the vector is empty the loop terminates.
Fill a GAMSDatabase by reading from MS Access
Example: Transport9
This example illustrates how to import data from Microsoft Access to a GAMSDatabase. It can only be run on Windows since it makes use of the Microsoft Access Driver. Furthermore the example makes use of the Qt SQL module. Note that you need to have Microsoft Access installed and that its bitness needs to match the bitness of your GAMS version. In the example we call a function readFromAccess that finally returns a GAMSDatabase as shown below.
The data we are going to read can be found in <GAMS system directory>\apifiles\Data\transport.accdb. It might be helpful to open this file for a better understanding. The function begins with the creation of an empty GAMSDatabase. Afterwards we create a QSqlDatabase, specify the connection string and open the connection to the database. If opening the connection was successful, data is read from the database into the GAMSDatabase using the methods readSet and readParameter.
The function readSet creates a QSqlQuery that reads data from a table of the Access database. A GAMSSet is created and populated with the data.
Once we read in all the data we can create a GAMSJob from the GAMSDatabase and run it as usual. Finally the results are written to transport.accdb.
Fill a GAMSDatabase by reading from MS Excel
Example: Transport10
This example illustrates how to read data from Excel, or to be more specific, from <GAMS system directory>\apifiles\Data\transport.xlsx. It can only be run on Windows. Note that you need to have Microsoft Excel installed and that its bitness needs to match the bitness of your GAMS version. The model is given as string without data like in in many examples before. At first we have to add
to be able to use the QAxObject class, which serves as a wrapper for COM objects. Furthermore we include Windows.h to access the functions CoInitialize and CoUninitialize. In the main function we open the aforementioned file to get access to its content. Note that we need to call CoInitialize(0) first in order to initialize ActiveX. We create an instance of the class QAxObject and use the querySubObject method multiple times to get to the sheets of the workbook.
The method sheetToParameter is used in order to transfer data from the workbook into GAMSParameter instances. In order to determine from which sheet the actual data needs to be read, the method takes the QAxObject instance referring to the sheets and the actual sheet name. A new GAMSParameter is added to the GAMSDatabase object db using set1 and set2 as domains. The next step is to determine the number of columns and the number of rows used. The for loop reads the actual data, adds the records to the new GAMSParameter and sets their values.
After all required data was read from the workbook, we need to close it and quit the Excel application.
Now we can create und run the GAMSJob using the created GAMSDatabase as usual.
Finally we need to call ‘CoUninitialize’ in order to close the COM library.
Create and use a save/restart file
Example: Transport11
In Transport11 we demonstrate how to create and use a save/restart file. Usually such a file should be supplied by an application provider but in this example we create one for demonstration purpose. Note that the restart is launched from a GAMSCheckpoint. We start by creating the save/restart file by calling createSaveRestart.
In function createSaveRestart we choose the checkpointName as relative path to the current directory in order to create a GAMSWorkspace. Then we create a GAMSJob from a string. Note that the string given via getBaseModelText() contains the basic definitions of sets without giving them a content (that is what $onempty is used for). Afterwards we specify a GAMSOption to only compile the job without executing it. Then we create a checkpoint cp that is initialized by the following run of the GAMSJob and stored in the file given as argument to the function. This becomes possible because the addCheckpoint method accepts identifiers as well as file names as argument.
So what you should keep in mind before we return to further explanations of the main function is, that now the file tbase in folder tbase contains a checkpoint. Now in the main function we define some data using C++ data structures as we already did in Transport4 before we create another GAMSWorkspace.
Afterwards we set up the GAMSDatabase like we already did in Transport4. Once this is done we run a GAMSJob using this data plus the checkpoint stored in file tbase.
Note that the string from which we create job t4 is different to the one used to prepare the checkpoint stored in tbase and is only responsible for reading in the data from the GAMSDatabase correctly. The entire model definition is delivered by the checkpoint cpBase which is equal to the one we saved in tbase.
How to use the pre configured example projects
Depending on the operating system, the GAMS C++ API comes with example project configurations for CMake and Visual Studio. They provide an easy way of building and running the distributed GAMS C++ examples and are located in <GAMS system directory>\apifiles\C++.
CMake
Windows:
Create build directory
cd <GAMS system directory>\apifiles\C++
mkdir build && cd build
Run CMake and build project
cmake -G "Visual Studio 16 2019" -DCMAKE_BUILD_TYPE=Release -DVSVERSION:STRING=vs2019 ..
msbuild.exe examples.sln /p:Configuration=Release
- Note
- For other Visual Studio versions, the generator-name (-G) needs to be adjusted (see cmake documentation).
All generated executables can now be found in the CMake build directory. The exact path depends on the project name and the config setting. Assuming the solution was build with -config Release, a transport1.exe executable is located in <GAMS system directory>\apifiles\C++\build\transport1\Release. Therefore you can use the following commands to execute the transport1 example:In order to execute an example (e.g. transport1) run the following commands:
cd transport1\Release
set PATH=%PATH%;<GAMS system directory>\apifiles\C++\lib\vs2019
transport1.exe
Linux:
Create build directory
cd <GAMS system directory>/apifiles/C++
mkdir build && cd build
Run CMake and build project
cmake ..
make
All generated executables can now be found in the CMake build directory. For every project a subdirectory is created. Assuming you want to execute the transport1 example, use the following commands:
cd transport1
export LD_LIBRARY_PATH=$LD_LIBRARY_PATH:<GAMS system directory>/apifiles/C++/lib
./transport1
macOS:
Create build directory
cd <GAMS system directory>/apifiles/C++
mkdir build && cd build
Run CMake and build project.
- Note
- By default, Clang is used as a compiler. If GCC was used to build the gamscpp library, then use
-D USE-GCC="ON"to select the correct gamscpp library from your GAMS folder. Otherwise, the build will fail.
cmake ..
make
All generated executables can now be found in the CMake build directory. For every project a subdirectory is created. Assuming you want to execute the transport1 example, use the following commands:
cd transport1
export DYLD_LIBRARY_PATH=$DYLD_LIBRARY_PATH:<GAMS system directory>/apifiles/C++/lib
./transport1
Microsoft Visual Studio
The Visual Studio solutions are available for Windows only. Open the solution file that matches the version of your Visual Studio installation (e.g. <GAMS system directory>\apifiles\C++\examples-vs2017.sln).
As soon as the solution is loaded, click on Build > Configuration Manager and adjust the Active solution configuration and the Active solution platform. The solution configuration needs to be set to Release for using the distributed binaries of the GAMS C++ API. Note that the platform needs to match the version of your GAMS installation.
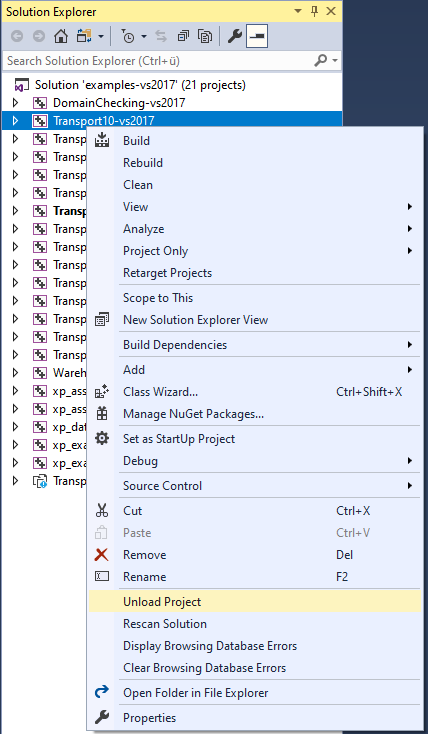
The examples Transport9 and Transport10 require a Qt installation. If you do not have one, you need to disable these projects. Right click on a project in the Solution Explorer and choose Unload Project from the context menu.
Click on Build > Build Solution in order to compile and link the examples.
- Note
- In some cases the build might return with
xcopyerrors. Just build the project again. Make sure that you don't do a rebuild.
In order to run an example, click on Debug > Start Without Debugging. This will execute the current StartUp project. Changing the StartUp project can be achieved by right clicking on a project in the Solution Explorer and choosing Set as StartUp Project.
