GAMS Engine One is currently only supported on x86_64 and ARM64 Linux distributions that are supported by Docker!
Installation & Licensing
GAMS Engine One
GAMS Engine One is our single-node job and user management solution for running GAMS optimization models on your own hardware, whether on-premise or in the cloud. It provides a Docker-based installation managed via a Docker Compose stack.
Installation
You can download the latest Engine One installation scripts here. The general installation instructions are given below. However, keep in mind that the installation is highly dependent on your setup. Since Engine is a server application, the concepts of ports, SSL, certificates, etc. are omnipresent. Setting up such a system is a common task for a server administrator. If you have problems with the installation, please do not hesitate to contact us by mail at support@gams.com.
For more information about the third-party software included in Engine and their licenses, see here.
Note:
- Install Docker from https://docs.docker.com/engine/install/. Start docker afterwards. We further recommend to configure Docker to start on boot.
- Extract gams_engine.zip. This will create a subfolder gams_engine.
- Open a terminal and cd into that folder.
- Run the script ./up.sh with admin privileges. The
following arguments can be used:
- -a: Admin password (optional)
The password of the admin user. By default, admin is used. If Engine is exposed to the Internet, it is recommended to install Engine with a different password so that there is no time window for logging in and changing the default password. - -p: Engine port (optional)
If no certificate files are provided (see below), this option can be used to specify the port through which you want to reach Engine. Port 80 is used per default. For the encrypted setup (certificate files are provided), port 443 is always used. - -w: Number of workers
Specifies how many GAMS workers should be enabled, i.e. how many GAMS jobs Engine should process in parallel. If all GAMS workers are occupied, incoming jobs are queued and started as soon as workers are available again. - -c: Certificate file (optional)
For the SSL setup, the path to the certificate file must be specified here. - -k: Certificate key file (optional)
For the SSL setup, the path to the certificate key file must be specified here.Note:Note that when using the encrypted setup, port 80 and port 443 must be available!
- -u: worker container access internet y
or n (optional, default: n ).
By default, workers are not allowed to access the Internet for security reasons. If you want to change this, you can specify y and workers can access the Internet.Note:Note that when using network licenses -u must be set to y!
- -m: Mount path (optional)
By default, Engine is mounted under /. To change this, specify the mount path here (e.g. -m engine to mount the UI on /engine and the API on /engine/api). Note that there must not be a leading slash in the mount path specification. - -C: CPU limit/reservation for worker containers (e.g., '0.5'), as number of cores (optional).
- -M: Memory limit/reservation for worker containers (e.g., '512m'). Supported are kb (kilo bytes), mb (mega bytes) and gb (giga bytes) (optional).
The script downloads and initializes all required Engine files. This may take a moment.
- -a: Admin password (optional)
- Once the script is finished, GAMS Engine should be running. Depending on
whether the SSL or the unencrypted setup has been selected, Engine and
Engine UI can be reached via:
- SSL setup: Open http(s)://mydomain.com in your browser (replace mydomain with your URL).
- Unencrypted setup: Engine runs on the port you selected before (default is port 80). Open http://192.168.178.184:80 in your browser (replace IP and port accordingly).
This will open the Engine UI. Login with the default credentials username: admin and password: admin (in case you set the command line switch -a, the password will be different). Make sure you change the default admin password after installation.
Stop / Update / Uninstallation
Start
To start a stopped instance of GAMS Engine, navigate to the directory where you installed GAMS Engine and execute
> docker compose up -d
--scale worker=<number_workers>
where <number_workers> is the number of workers you want to run in parallel.
StopTo stop a running instance of GAMS Engine, navigate to the directory where you installed GAMS Engine and execute
> docker compose
down
Update
To update GAMS Engine to the latest version, simply execute the ./up.sh script from the same directory where you originally installed Engine, with the same arguments you used when you installed GAMS Engine.
NOTE: A warning may be displayed during the update that databases need to be upgraded. Read here for more information about how to upgrade databases.
UninstallTo remove GAMS Engine including all its data (this data will be lost if you did not make backups!) from your server, navigate to the directory where you installed GAMS Engine and execute
> docker compose down
-v
Additionally, you can remove the directory where you extracted the GAMS Engine configuration files.
Database Upgrades
Certain GAMS Engine releases (see release notes) will upgrade the internal databases (PostgreSQL, MongoDB, RabbitMQ) for performance and security.
When you update GAMS Engine using the ./up.sh script, a warning will be displayed if a database upgrade is required. The upgrade will typically continue, and GAMS Engine will still work with the old database versions, but we highly recommend that you upgrade as soon as possible.
The upgrade is as easy as running the ./upgrade-db.sh script, which is placed inside your Engine installation directory after updating.
If the upgrade was not successful, you can roll back easily.
Once the upgrade has been successful and you have thoroughly checked that everything is working, you may want to perform a cleanup to free up disk space.
How it Works & Critical Warning
- Before running the upgrade, the system must be idle.
- PostgreSQL & MongoDB: The script creates a full backup of the database and restores it into the new database version.
- RabbitMQ: The queue service is upgraded, but all messages in the queues will be lost.
- System Idle: This means no jobs must be running and no jobs should have run for at least 10-15 minutes prior to the upgrade.
Attention: Job priorities
- If you use job priorities, please ensure that you first deactivate the feature after the upgrade and then reactivate it. Otherwise, the priorities will not work as expected.
Rollback
The Docker volumes of the old databases are not removed. Rolling back in case of a failed update is as easy as replacing the docker-compose.yml file in your Engine installation directory with the backup file: docker-compose.yml.pre-upgrade-bak.Cleaning Up Old Volumes (Optional)
After a successful upgrade, the old Docker volumes are kept to allow for rollback. Once you have verified that the new version is working correctly, you can reclaim disk space by removing them.
Warning: This is permanent and prevents easy rollback.
The upgrade-db.sh script will print the exact command to run for cleanup at the end of a successful upgrade.
Licensing
General
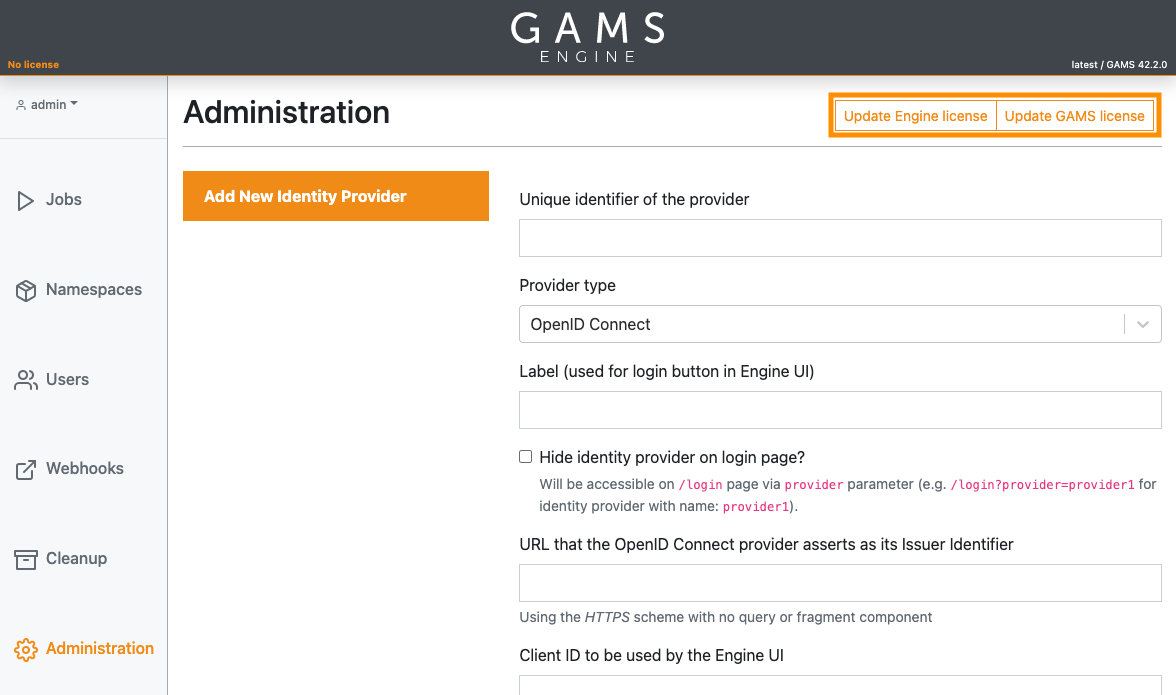
For a GAMS Engine setup, both a tailored GAMS license and an Engine license are required. The license keys can be entered directly in the Engine UI in the Administration section by clicking on the corresponding buttons.
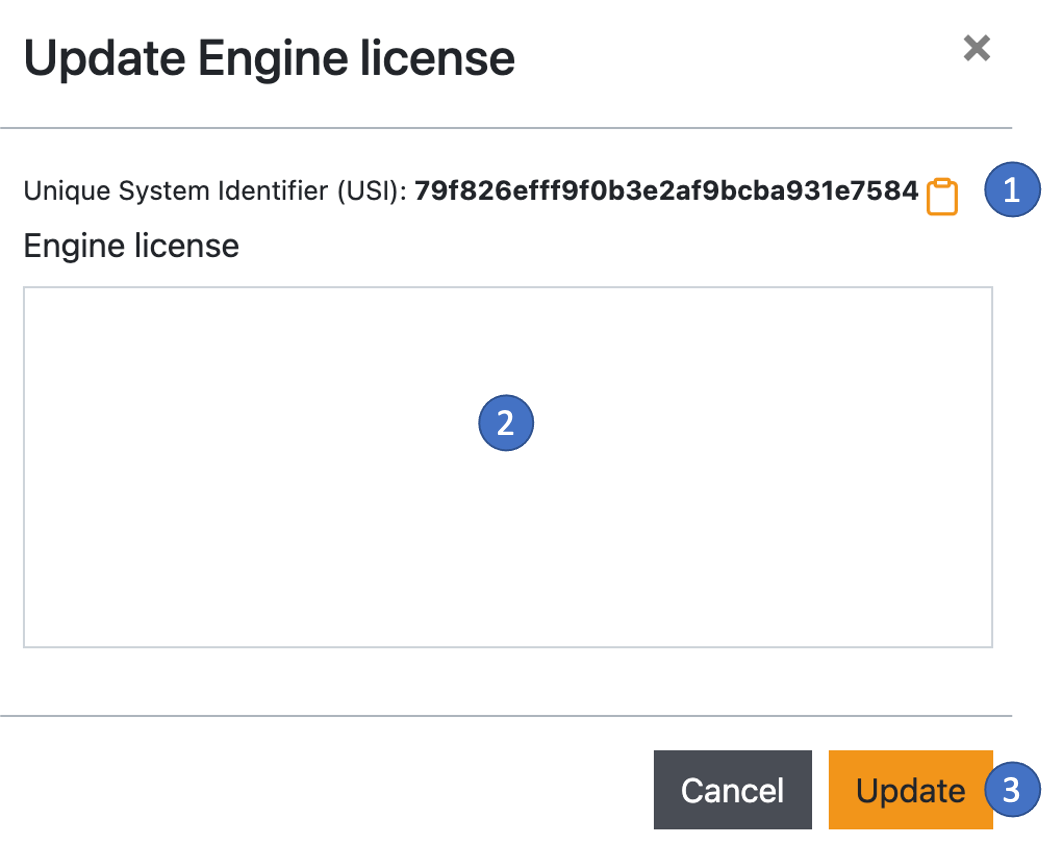
installation. An Engine installation is identified by a so-called Unique System Identifier (USI). You can find the USI by clicking on the Update Engine license button. A new dialog for updating your Engine license opens. The USI is located at the top of the dialog (1). Please send this identifier to sales@gams.com to receive your license key (this step is not required for normal licenses). As a last step, paste the license key you received into the field (2) and click on the Update button (3).
A GAMS license can be specified system-wide or user-specific.
- System-wide means that all users of the running Engine instance use the same license when solving their GAMS models. The system-wide license can be entered at the top of the page via the Update GAMS license button, right next to the Update Engine license button.
- A user-specific GAMS license is only valid for the individual owners of the
license. If a user has such a license, this will always be used for GAMS
jobs instead of the system-wide license. Also, if an inviter with such a
license invites another person to use GAMS Engine, the invitee automatically
inherits the license of the inviter.
User licenses are entered in the user list under Actions → Update license.
Gurobi license
If you want to use the Gurobi solver, you must provide Engine with the Gurobi license. This license must be either a Web License Service (WLS) license, a license for a Gurobi Compute Server, a Gurobi Cloud license, or a license from a Gurobi Token Server. Standard Gurobi license types (NODE, Academic) do not work with Engine.
To use Gurobi with Engine, you must first generate a Gurobi client license file (gurobi.lic) and place it in your Engine directory. You also need to generate a short gamsconfig.yamlfile with the following content:
environmentVariables:
   - GRB_LICENSE_FILE:
      value: /etc/gurobi.lic
This file should also be located in your Engine directory.
As a final step, open the docker-compose.yml file with a text editor and modify it as follows:
  worker:
    image: gams/engine-worker:latest
    restart: unless-stopped
[...]
+   volumes:
+     - ./gurobi.lic:/etc/gurobi.lic
+     - ./gamsconfig.yaml:/etc/xdg/GAMS/gamsconfig.yaml
    networks:
      - worker-network
+     - worker-ext-network
Note that we have added the worker-ext-network network to the worker containers. This causes the worker containers to be able to access the external network, which is required for Gurobi to contact the license server.
For these changes to take effect, restart the GAMS Engine.
GAMS Engine K
GAMS Engine K is our enterprise-grade job and user management system for running GAMS optimization models on Kubernetes. It is built for high-demand environments that require maximum scalability, flexibility, and resilience.
- Deployment: Deployable to on-premise or cloud-based Kubernetes environment, easily installed and managed via Helm charts.
- Precision Scaling: Supports heterogeneous workers. Users can request specific CPU and RAM resources for a particular job, ensuring heavy models get the power they need while smaller jobs stay lean.
- Governance: Administrators can set granular limits, controlling exactly how many resources specific users or groups can request.
Installation
GAMS Engine can be installed on a Kubernetes cluster using our official Helm Chart. The source code and configuration files for the chart are available in our Helm Chart Repository. Before installing Engine K, ensure your environment meets the necessary requirements.
Minimum System Requirements
- Kubernetes: 1.29.0-0 or newer. Please note that OpenShift environments are not officially supported at this time.
- Helm: v3.0.0 or later installed locally
- Compute: Suggested resource requirements for Engine K components in production environments are provided below:
| Component | CPU Request | Memory Request | Memory Limit |
|---|---|---|---|
| broker (uwsgi) | 600m | 1000Mi | 1000Mi |
| broker (nginx) | 100m | 100Mi | 200Mi |
| forwardProxy | 50m | 100Mi | 100Mi |
| eventManager | 100m | 100Mi | 100Mi |
| cleaner | 100m | 1000Mi | 1000Mi |
| dependencyChecker | 50m | 250Mi | 250Mi |
| hypercubeAppender | 50m | 100Mi | 100Mi |
| hypercubeUnpacker | 50m | 100Mi | 100Mi |
| jobCanceler | 50m | 400Mi | 400Mi |
| jobSpawner | 100m | 500Mi | 500Mi |
| jobWatcher | 50m | 250Mi | 250Mi |
| pgBouncer | 100m | 200Mi | 300Mi |
| mongoDB | 500m | 5Gi | 6Gi |
| rabbitMQ | 500m | 5Gi | 6Gi |
| postgreSQL | 500m | 2Gi | 3Gi |
Please note that additional resources will be required for the GAMS worker pods, depending on the complexity of your models and the number of parallel jobs scheduled.
Note:
The resource limits and requests listed above are optimized for high-demand production environment. If you are initially deploying Engine K for testing purposes, or have lower-demand requirements, you can reduce these values in your custom values.yaml file (e.g. reducing postgreSQL, mongoDB, and rabbitMQ requests to 500m CPU and 512Mi memory). You can view the complete list of default configurations in the official values.yaml on our Helm Chart.
Installing the Helm Chart
To install the chart with the release name my-engine into a new namespace called gams:
# 1. Add the GAMS Helm repository
helm repo add gams https://charts.gams.com/
helm repo update

# 2. Install the chart
helm install my-engine gams/gams-engine -f my-values.yaml --namespace gams --create-namespace
After the Helm installation completes successfully with a welcoming message, it may take a few moments for the pods to initialize. Following the instructions on the welcoming message, you can log in to Engine UI.
Retrieving Generated Passwords
By default, the Helm chart automatically generates secure passwords for Engine K. After the installation is complete, you can retrieve these credentials from the generated Kubernetes secret.
To view the secret for your my-engine release in the gams namespace (to retrieve the plaintext passwords afterwards echo "ENCODED_STRING" | base64 --decode):
> kubectl get secret -n gams my-engine-secret -o yaml
Network Policies
Network Policies in Kubernetes act as an internal firewall, ensuring that pods only communicate with authorized pods and resources.
The Engine K Helm chart comes with strict Network Policies enabled by default. If your cluster's CNI (Container Network Interface) does not support them, or if you prefer to manage them externally, you can toggle them off in your custom values.yaml:
global:
  # Set to false to disable default network policies
  useNetworkPolicies: true
If you keep them enabled but need to allow Engine components to communicate with outside services, you can add extraEgress or extraIngress rules to specific components that allow this feature. For configuration settings, please refer to values.yaml.
If you use network licenses, you must allow your workers (pods that run your GAMS jobs) to access internet or configure an on-prem GAMS license server and give your workers access to that license server. You can grant this access by adding custom egress rules to the jobSpawner configuration in your custom values.yaml:
jobSpawner:
  workerNetworkPolicy:
    extraEgress: []
Accessing the Engine UI
All communication with Engine K is routed through the Broker component, which hosts both the Engine API and the web-based Engine UI.
For a demonstration or local testing, you can immediately expose the UI using port-forwarding:
> kubectl port-forward -n gams svc/my-engine-broker 8080:80
This will make Engine UI available at http://localhost:8080 . You can then log in by following the instructions provided in the Helm welcoming message. Once you have successfully logged into the Engine UI, you must change your admin password.
Production Ingress Configuration
For production environments, we highly recommend utilizing an Ingress controller. You can enable and configure this directly in your custom values.yaml. Here is a standard example using NGINX:
ingress:
  enabled: true
  ingressClassName: "nginx"
  annotations:
    nginx.ingress.kubernetes.io/rewrite-target: /
  path: /
  pathType: "Prefix"
  hosts:
    - engine.yourcompany.com
  tls:
    - hosts:
        - engine.yourcompany.com
      secretName: chart-example-tls
For further details, please refer to the Helm Chart repository.
For comprehensive instructions on administration and management, please refer to Administration.
Upgrade
To upgrade your existing Engine K deployment, you can use the standard helm upgrade command.
First, update your local Helm repository cache to ensure you have access to the newest releases published by GAMS:
> helm repo update gams
If you no longer have your custom values.yaml file, or to verify your current settings before upgrading, you can extract the deployment configuration directly from the cluster and save it to a new yaml file:
> helm get values my-engine --namespace gams > config-values.yaml
Run the helm upgrade command to upgrade your existing release (my-engine) in the gams namespace. Make sure to specify your configuration file with -f config-values.yaml:
> helm upgrade my-engine gams/gams-engine -f config-values.yaml --namespace gams
Note:
If you do not want to change anything in your configs but only upgrade to the newer version, then you can also use the --reuse-values flag to upgrade with your existing configurations:
helm upgrade my-engine gams/gams-engine --reuse-values --namespace gamsDatabase Upgrades
Certain GAMS Engine releases (see release notes) will require upgrading the internal databases (PostgreSQL, MongoDB, RabbitMQ) for performance and security.
The Engine K Helm chart is built with pre-upgrade Helm hooks that automatically execute all necessary database migrations with Kubernetes Jobs before the new Engine pods are rolled out. The helm upgrade command is all needed and ensures a seamless and safe upgrade to the new version without requiring any administrator intervention.
Advanced Features of Engine K
Engine K is built to take full advantage of Kubernetes-native capabilities, ensuring your GAMS optimization environment remains resilient, highly available, and deeply observable.
Horizontal Pod Autoscaling (HPA)
To ensure the Engine UI and API remain responsive under heavy submission loads or high-traffic days, you can enable Horizontal Pod Autoscaling (HPA) for the Broker component. This allows Kubernetes to dynamically scale the number of Broker pods up and down based on resource utilization.
You can configure the scaling limits directly in your custom values.yaml:
broker:
  # maxReplicas sets the maximum pod replica limit for the broker HPA
  # minReplicas is 1 by default
  maxReplicas: 3 #by default
Alerting & Monitoring via PodMonitors
If you are running a Prometheus monitoring stack (such as kube-prometheus-stack) in your cluster, the Engine K Helm chart natively supports enabling PodMonitor resources. This allows Prometheus to automatically scrape and collect real-time performance metrics from both the Engine Broker and RabbitMQ components.
broker:
  monitoring:
    metricsEnabled: true
    # Requires an installed Prometheus Operator in the cluster
    podMonitorEnabled: true
For instance, once metrics and podMonitors are enabled, you can define a custom PrometheusRule to trigger an alert if there is an unusually high number of failed login attempts (HTTP 401 errors) and receive messages/emails if such anomaly occurs:
apiVersion: monitoring.coreos.com/v1
kind: PrometheusRule
metadata:
  labels:
    prometheus: k8s
    role: alert-rules
  name: broker-failed-login-attempts
  namespace: monitoring
spec:
  groups:
  - name: broker-example.rules
    rules:
    - alert: BrokerFailedLoginAttempts
      annotations:
        description: High rate of 401s detected
        summary: More than 50 failed login attempts in last 5 minutes
      expr: |
        sum(increase(flask_http_request_total{status="401"}[5m])) > 50
      for: 1m
      labels:
        alertname: BrokerFailedLoginAttempts
        severity: critical
Once you have enabled Prometheus metrics via the PodMonitors, you can visualize your Engine K metrics and system health using Grafana dashboards.
Licensing
For information related to Engine K licensing, please contact our sales team sales@gams.com.