

Background
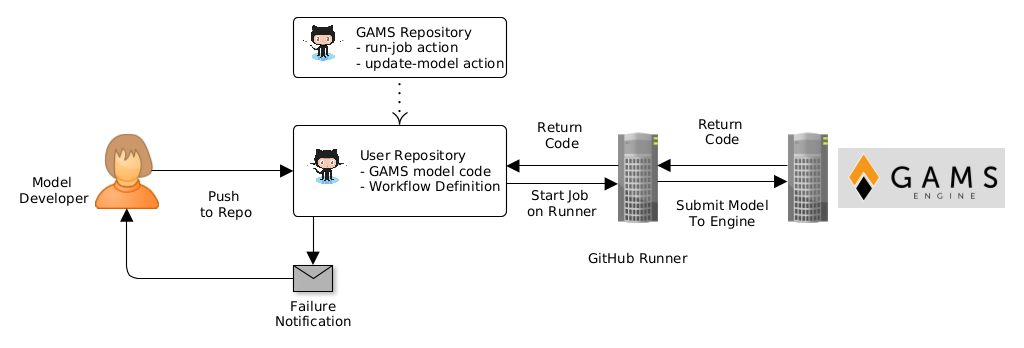
Professional software development relies heavily on test automation and continuous integration (CI) to make sure that mistakes are caught early in the development process. Jenkins was the first open source automation server to see massive uptake, and is one of the tools used every day at GAMS. With GitLab CI/CD and GitHub Actions, the two major repository platforms have also added their own continuous integration products in recent years. For developers of GAMS models, the CI capabilities of Jenkins, GitHub and GitLab have not been easily usable, because it was difficult for the build processes to communicate with a GAMS installation that could be used to run the test code.
Fortunately, this has now changed with our latest product GAMS Engine. For those who do not know it yet, GAMS Engine provides a REST API that can be used to submit and run GAMS jobs to a central location.

Below we outline how any GAMS model developer on GitHub can easily use Engine to run automated tests for their models. The same principles apply to GitLab and Jenkins.
A GitHub Example
Prerequisites
- A GitHub repository with your GAMS model code.
- Credentials to access a GAMS Engine instance.
Open source developers please contact us at support@gams.com to get free access to one of our Engine instances.
How it’s done
The concept behind “GitHub Actions” is straightforward. In a nutshell:
- Any event that happens in your code repository (e.g. pushing a new commit), can trigger a workflow
- A workflow contains one or more jobs, which are executed on compute resources called runners. Everything that happens in a job runs sequentially on the same runner, and multiple jobs by default run concurrently on multiple runners. You can choose runners based on Linux, Windows, or macOS. There are quite generous free quotas of runner time offered by GitHub, which should be sufficient for most projects (see https://github.com/features/actions#pricing-details) .
- Each job contains one or more steps. Typical steps can be “checkout the latest version from the repository to the runner”, “compile the source”, “deploy something to a server”, and so on.
- Each step calls actions or executes shell commands. Actions are the things that actually DO something.
To demonstrate how Engine can be used for running automated tests for GAMS models, Freddy from our development team created two GitHub actions at https://github.com/GAMS-dev/actions .
- The “run-job” action allows you to run a model on a GAMS Engine instance.
- The “update-model” action allows you to register or update a GAMS model on a GAMS Engine instance. This is not relevant to automated testing, but useful for controlling model deployment on GAMS Engine, and outside of the scope of this article. We will cover model deployment in another article.
How do you use GitHub actions?
To define a workflow, you have to create a YAML file in .github/workflows/ inside your source repository. The following workflow runs when a new commit is pushed to the repository. It checks out the latest commit to a new runner, prepares the model for submission to GAMS Engine, and then runs the model in compile-only mode on Engine:
# The name of the workflow
name: Test Demo

# Which event should trigger the workflow?
on: [push]

# Job definitions
jobs:
    Test-Model-On-Engine:

        # Choose the operating system of the runner
        runs-on: ubuntu-latest

        # Define all the steps for the job
        steps:

        # first step: checkout repository to runner
        - uses: actions/checkout@v2

        # second step: create a zip file
        - run: |
            zip -r model.zip PATH1 PATH2

        # third step (with name): use run-job action
        # and pass parameters to submit job to GAMS/Engine instance
        - name: Submit demo job
        uses: GAMS-dev/actions/run-job@v1
        with:
            url: ${{ secrets.ENGINE_URL }}
            namespace: ${{ secrets.ENGINE_NS }}
            username: ${{ secrets.ENGINE_USER }}
            password: ${{ secrets.ENGINE_PASSWORD }}
            run: 'model.gms'
                arguments: 'a=c,idir1=PATH1,idir2=PATH2'
                model_data: '${{ github.workspace }}/model.zip'
A few things should be explained regarding the arguments that can be passed to the ‘run-job’ action:
- You can see that we use a few variables of the form
${{ secrets.xyz }}. These variables can be stored in encrypted form in the model repository (https://docs.github.com/en/actions/security-guides/encrypted-secrets) . You will need to set these secrets to point to theURLof your Engine instance of choice, and provide theUSERandPASSWORDas well. - The
${{ github.workspace }}variable used in the last line contains the path inside the runner where your code is checked out by the ‘checkout’ action in the very first step of the job. - The argument
a=ccauses the model to just be compiled by the GAMS worker, but not executed. This is sufficient for catching syntax errors, and makes sure the workflow will finish quickly.
Once you add this workflow file to your repository and modify it to suit your model, each push to the repository will trigger a run of the model on Engine. If the model fails to compile, the run will fail and a notification email will be sent.
How do actions work?
Here is an explanation for those who would like to understand what happens when one of our GitHub action runs:
- Our GAMS-dev/actions repository contains separate metadata YAML files for each action, which configure inputs and outputs of the action (e.g. https://github.com/GAMS-dev/actions/blob/main/run-job/action.yml ).
- The metadata definitions are read by the “actions toolkit” provided by GitHub (https://docs.github.com/en/actions/creating-actions/creating-a-javascript-action ), which creates the scaffolding of an ‘index.js’ file. This scaffolding had to be completed to implement the actual logic, i.e. using the Engine REST API to submit and schedule the model, and receive the results.
- The JavaScript code you can see in our repository was compiled into a single, self-contained file including all dependencies using ncc (https://github.com/vercel/ncc ).