Table of Contents
- Getting Started
- Important Classes of the API
-
How to use the API
- Choose the GAMS system
- Export data to GDX
- Import data from GDX
- Run a GAMSJob from file
- Specify the solver
- Run a job with a solver option file and capture its log output
- Use include files
- Read data from string and export to GDX
- Run a job using data from GDX
- Run a job using implicit database communication
- Define data using C# data structures
- Prepare a GAMSDatabase from C# data structures
- Initialize a GAMSCheckpoint by running a GAMSJob
- Initialize a GAMSJob from a GAMSCheckpoint
- Run multiple GAMSJobs in parallel using a GAMSCheckpoint
- Create a GAMSModelInstance from a GAMSCheckpoint
- Modify a parameter of a GAMSModelInstance using GAMSModifier
- Modify a variable of a GAMSModelInstance using GAMSModifier
- Use a queue to solve multiple GAMSModelInstances in parallel
- Fill a GAMSDatabase by reading from MS Access
- Fill a GAMSDatabase by reading from MS Excel
- Create and use a save/restart file
The goal of this tutorial is to provide a compact overview of the basic functionality of the GAMS C# API. It allows the user to start immediately working with the API by providing a set of small examples based on the well-known transportation problem. These examples introduce several API features step by step.
- Getting Started A quick introduction about how to create and configure C# project
- Important Classes of the API Overview of some fundamental classes of the GAMS C# API
- How to use the API An extensive set of examples on how to use API components
Getting Started
This section illustrates the basic steps of creating and configuring a C# project in Visual Studio Code for use with the GAMS C# API.
Install the C# extension in Visual Studio Code
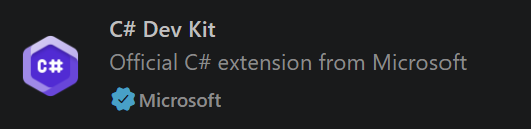
To develop .NET applications in Visual Studio Code, first install the official C# tooling from Microsoft. Visual Studio Code is a lightweight editor by default, with many extensions one can install for personal preferences.
- Open Visual Studio Code.
- Open the Extensions sidebar by clicking the Extensions icon on the Activity Bar on the left side of the window, or press
Ctrl+Shift+X(Cmd+Shift+Xon macOS). - In the search box, type
C# Dev KitorC#. - Select C# Dev Kit (published by Microsoft) and click Install.
Create a new project
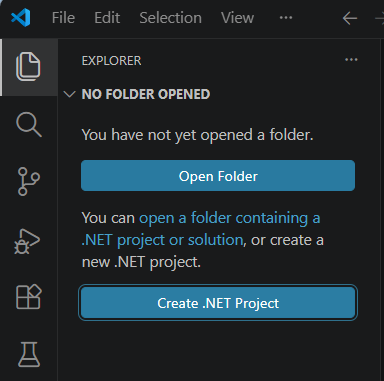
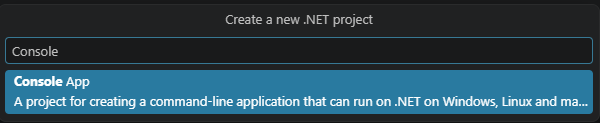
After opening Visual Studio Code, create a new .NET project. To do this, open the Explorer sidebar by clicking the File icon or pressing Ctrl+Shift+E. Then, click the "Create .NET Project" button and choose a Project Template (e.g. Console App). Finally, set a project name, such as GAMSApplication.
Add a reference to the GAMS.net10.dll assembly
The simplest way to reference the GAMS assembly is by adding the following ItemGroup section into the Project section of GAMSApplication.csproj:
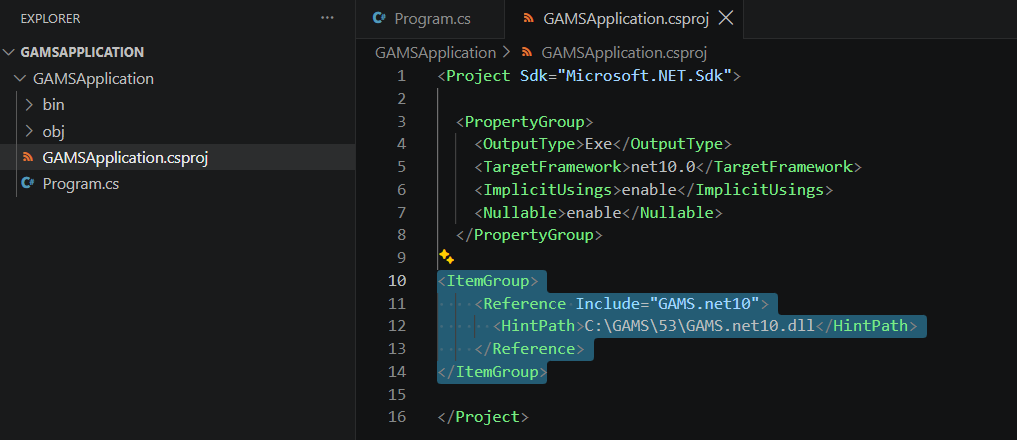
Replace C:\GAMS\55\api\dotnet\GAMS.net10.dll with the actual path to GAMS.net10.dll inside the GAMS system directory.
Solving the first model
This section illustrates how a model from the GAMS model library can be imported and solved.
Open a new project and reference the GAMS.net10.dll in the project as explained above. Open Program.cs which should be part of the project and replace the content by:
To run the program, open the integrated terminal (Terminal -> New Terminal), navigate to the folder containing the .csproj file (e.g., cd GAMSApplication), and run:
Alternatively, run and debug the program directly from within Visual Studio Code:
- Open the
Program.cstab of the project. - Open the Run and Debug panel on the left-hand side.
- Click Run and Debug. If prompted to select a debugger, choose C#, and then select C#: Launch Startup Project <YourProjectName> (e.g.,
C#: Launch Startup Project GAMSApplication) from the list of detected launch configurations.

The program is then built and executed, and its console output (including anything written to Console.Out) is shown in the integrated Debug Console:
Important Classes of the API
This section provides a quick overview of some fundamental classes of the GAMS Namespace. Their usage is demonstrated by an extensive set of examples.
- GAMS Namespace
- GAMSWorkspace Class
- GAMSJob Class
- GAMSDatabase Class
- GAMSOptions Class
- GAMSModelInstance Class
How to use the API
In the GAMS system directory there are some examples provided that illustrate the usage of the C# API. <GAMS system directory>\api\dotnet\examples\control\csharp contains a file TransportSeq.slnx that can be opened in Microsoft Visual Studio. The contained projects deal with the well-known transportation problem. In further course of this tutorial these examples are discussed step by step and new elements of the API are introduced in detail.
The aforementioned files provide a complete overview of the examples. Down below the examples are explained with the help of selected code snippets.
- Choose the GAMS system
- Export data to GDX
- Import data from GDX
- Run a GAMSJob from file
- Specify the solver
- Run a job with a solver option file and capture its log output
- Use include files
- Read data from string and export to GDX
- Run a job using data from GDX
- Run a job using implicit database communication
- Define data using C# data structures
- Prepare a GAMSDatabase from C# data structures
- Initialize a GAMSCheckpoint by running a GAMSJob
- Initialize a GAMSJob from a GAMSCheckpoint
- Run multiple GAMSJobs in parallel using a GAMSCheckpoint
- Create a GAMSModelInstance from a GAMSCheckpoint
- Modify a parameter of a GAMSModelInstance using GAMSModifier
- Modify a variable of a GAMSModelInstance using GAMSModifier
- Use a queue to solve multiple GAMSModelInstances in parallel
- Fill a GAMSDatabase by reading from MS Access
- Fill a GAMSDatabase by reading from MS Excel
- Create and use a save/restart file
Choose the GAMS system
Example: Transport1
By default the GAMS system is determined automatically. In case of multiple GAMS systems, the desired system can be specified via an additional argument when the workspace is created. When running the examples, an additional command line argument can be provided to define the GAMS system directory that should be used. By executing Transport1.exe with C:/GAMS/55, GAMS 55 is used to run Transport1 even if the default GAMS system might be a different one. This is managed by the following code:
Export data to GDX
Example: TransportGDX
Although the .NET Control API offers much more than exchanging data between .NET and GDX, a common use case is the export and import of GDX files. The central class for this purpose is GAMSDatabase. For the following example, it is assumed that the data to be exported is available in .NET data structures.
Different GAMS symbols are represented using different .NET data structures. The data for the GAMS sets is represented using lists of strings (e.g. plants and markets). On the other hand, GAMS parameters are represented by dictionaries (e.g. capacity and demand). Note that the representation of the two dimensional parameter distance uses tuples for storing the keys. The choice of data structures can also be different, but the used structures in this example fit well for representing GAMS data with .NET data structures.
A new GAMSDatabase instance can be created using GAMSWorkspace.AddDatabase.
Next, GAMS sets are added by using the method GAMSDatabase.AddSet, which takes the name and the dimension as arguments. The third argument is an optional explanatory text. A foreach-loop iterates through plants and adds new records to the recently created GAMSSet instance i using GAMSSet.AddRecord.
GAMSParameter instances can be added by using the method GAMSDatabase.AddParameter. It has the same signature as GAMSDatabase.AddSet. Anyhow, in this example an overload of the method is used, which takes a list of GAMSSet instances instead of the dimension for creating a parameter with domain information.
As soon as all data is prepared in the GAMSDatabase, the method GAMSDatabase.Export can be used to create a GDX file.
Import data from GDX
Example: TransportGDX
Data can be imported from a GDX file using GAMSWorkspace.AddDatabaseFromGDX. The method takes a path to a GDX file and creates a GAMSDatabase instance.
Reading the data from the GAMSSet i into a list can be done as follows:
A new list plants2 is created. i is retrieved by calling GAMSDatabase.GetSet on db2. The returned GAMSSet object can be iterated using a foreach-loop to access the records of the set. Each record is of type GAMSSetRecord and can be asked for its keys.
One can do the same for GAMSParameters. Instead of creating a list, one can have the data in the form of a dictionary. GAMSParameterRecords can not only be asked for their keys, but also for their value. The following code snippet shows how to read the one dimensional parameter a into a Dictionary<string, double>.
For multi dimensional symbols, one can use tuples instead of strings as dictionary keys.
Run a GAMSJob from file
Example: Transport1
Here the model trnsport is loaded from the GAMS Model Library. In doing so it is made available in the current working directory and can be loaded by the GAMSWorkspace.AddJobFromFile method afterwards. Apparently this method also works with any other gms file one might have created as long as it is located in the current working directory. Then the GAMSJob t1 is defined from that file and run by the GAMSJob.Run method.
The following lines create the solution output and illustrate the usage of the GAMSJob.OutDB property to get access to the GAMSDatabase created by the Run method. To retrieve the content of variable x, the GAMSVariableRecord class and the GAMSDatabase.GetVariable method are used.
Specify the solver
Example: Transport1
The solver can be specified via the GAMSOptions class and the GAMSWorkspace.AddOptions method. The GAMSOptions.AllModelTypes property sets xpress as default solver for all model types which the solver can handle.
Run a job with a solver option file and capture its log output
Example: Transport1
At first the StreamWriter is used to create the file xpress.opt, which will be used as solver option file and is stored in the current working directory. Then algorithm=barrier is written to this file to select the barrier algorithm and the solver option file is closed. Xpress is chosen as solver just like in the preceding example and the GAMSOptions.OptFile property is set to 1 to tell the solver to look for a solver option file. In addition, the argument output is specified in order to write the log of the GAMSJob into the file transport1_xpress.log.
Instead of writing the log output to a file, it can be written into any TextWriter. In order to write the log directly to Console.Out, one can use the following code:
Use include files
Example: Transport2
In this example, as in many that follow, the data text and the model text are separated into two different strings. Note that these strings GetDataText and GetModelText are using GAMS syntax.
At first an include file tdata.gms that contains the data but not the model text is written:
Afterwards a GAMSJob using the GAMSWorkspace.AddJobFromString method is created. The GAMSOptions.Defines field is used like the 'double dash' GAMS parameters, i.e., it corresponds to --incname=tdata on the command line.
Note that the string GetModelText contains the following lines to read in the data.
Read data from string and export to GDX
Example: Transport3
As in previous examples, the data is read from the string GetDataText. Note that this contains no solve statement but only data definition in GAMS syntax. By running the corresponding GAMSJob, a GAMSDatabase is created that is available via the GAMSJob.OutDb property. One can use the GAMSDatabase.Export method to write the content of this database to a GDX file tdata.gdx.
Run a job using data from GDX
Example: Transport3
This works quite similar to the usage of an include file explained in Transport2 - Use include files.
Note that there are some changes in GetModelText due to the usage of a GDX file instead of an include file.
Run a job using implicit database communication
Example: Transport3
This example does basically the same as the two preceding examples together. Two GAMSJobs t3a and t3b are created, where the first one contains only the data and the second one contains only the model without data. After running t3a the corresponding OutDB can be read in directly just like a GDX file. Note that the database needs to be passed to the GAMSJob.Run method as additional argument.
Define data using C# data structures
Example: Transport4
The List<T> class, the Dictionary<TKey, TValue> class, and the Tuple<T1, T2> class are used to define C# data structures that correspond to the sets, parameters, and tables used for the data definition in GAMS.
Prepare a GAMSDatabase from C# data structures
Example: Transport4
At first an empty GAMSDatabase db is created using the GAMSWorkspace.AddDatabase method. Afterwards, the database is prepared. To add a set to the database, the GAMSSet class and the GAMSDatabase.AddSet method is used with arguments describing the identifier, dimension, and explanatory text. To add the records to the database, one can iterate over the elements of the C# data structure and add them by using the GAMSSet.AddRecord method.
For parameters the procedure is pretty much the same. Note that an overload of GAMSDatabase.AddParameter taking the domain sets (e.g. i, j) instead of an explicit dimension is used here, which also attaches domain information to the parameter.
The GAMSJob can be run like explained in the preceding example about implicit database communication.
Initialize a GAMSCheckpoint by running a GAMSJob
Example: Transport5
The following two lines of code conduct several operations. While the first line simply creates a GAMS Checkpoint, the second one uses the GAMSWorkspace.AddJobFromString method to create a GAMSJob containing the model text and data but no solve statement. In contrast to the preceding examples it runs the job immediately using the GAMSJob.Run method. Furthermore, it passes an additional checkpoint argument to the Run method. That means the GAMSCheckpoint cp captures the state of the GAMSJob.
This creates the same checkpoint as for example the following code snippet:
Initialize a GAMSJob from a GAMSCheckpoint
Example: Transport5
Note that the string returned from function GetModelText() contains the entire model and data definition plus an additional demand multiplier and scalars for model and solve status but no solve statement:
A list with eight different values for this demand multiplier is created:
For each entry of that list, a GAMSJob t5 is created using the GAMSWorkspace.AddJobFromString method. Besides the string which resets the demand multiplier bmult, specifies the solve statement, and assigns values to the scalars ms and ss, the checkpoint cp is passed as additional argument. This results in a GAMSJob combined from the checkpoint plus the content provided by the string.
The GAMSJob is run, echoing some interesting data from the OutDB using the GAMSDatabase.GetParameter and GAMSDatabase.GetVariable methods, the GAMSParameter.FindRecord and GAMSVariable.FindRecord methods plus the GAMSParameterRecord.Value property and the GAMSVariableRecord.Level property.
- Note
- The value
bis formatted usingCultureInfo.InvariantCulturebefore embedding it in the GAMS statement text. Formatting adoublewith the current culture can produce a comma instead of a period as the decimal separator (e.g., on systems where the regional format uses,), which would break the resulting GAMS statement. - Some demand multipliers cause infeasibility. Nevertheless, GAMS keeps the incumbent objective function value. Therefore the model status and the solve status provide important information to correctly interpret the solution.
Run multiple GAMSJobs in parallel using a GAMSCheckpoint
Example: Transport6
This example illustrates how to run the jobs known from Transport5 in parallel. The GAMSCheckpoint cp is initialized and a demand multiplier is introduced as before:
Furthermore, a new object ioMutex is introduced that will be used to avoid mixed up output from the parallel jobs. For each element b from the list of demand multipliers, a delegate of the function RunScenario is called. Note that these calls are executed in parallel!
In function RunScenario a GAMSJob is created and run just like in the preceding example of Transport5. The output section is also the same except for the fact that it is marked as critical section by the lock keyword. That means the delegates of RunScenario are running in parallel but the output block of different delegates cannot be executed in parallel since it is 'locked' by the same object ioMutex for all delegates.
While the output in Transport5 is strictly ordered subject to the order of the elements of bmultlist, in Transport6 the output blocks might change their order but the blocks describing one scenario are still appearing together due to the lock keyword.
For a further impression of the impact of the lock keyword, comment out the lock in Transport6 as follows, run again, and compare the output.
Create a GAMSModelInstance from a GAMSCheckpoint
Example: Transport7
In Transport7 the usage of GAMS::GAMSModelInstance is demonstrated.
At first checkpoint cp is created as in the preceding examples. Then the GAMSModelInstance mi is created using the GAMSCheckpoint.AddModelInstance method. Note that the GAMSJob again contains no solve statement and the demand multiplier is already included with default value 1.
Modify a parameter of a GAMSModelInstance using GAMSModifier
Example: Transport7
A GAMSModelInstance uses a SyncDB to maintain the data. Using the GAMSDatabase.AddParameter method, bmult is defined as GAMSParameter and cplex is specified as solver. Afterwards, the GAMSModelInstance is instantiated with arguments opt and GAMSModifier bmult. The GAMSModifier means that bmult is modifiable while all other parameters, variables and equations of ModelInstance mi stay unchanged. The GAMSParameter.AddRecord method is used to assign a value to bmult that can be varied afterwards using the GAMSParameter.FirstRecord method to reproduce the well-known example with different demand multipliers.
Modify a variable of a GAMSModelInstance using GAMSModifier
Example: Transport7
A GAMSModelInstance is created just like in the next to last example. GAMSVariable x is created with upper bound as GAMSParameter xup. At the following instantiate method, GAMSModifier has three arguments. The first one says that x is modifiable, the second determines which part of the variable (lower bound, upper bound or level) can be modified, and the third specifies the GAMSParameter that holds the new value.
In the following loops, the upper bound of one link of the network is set to zero, which means that no transportation between the corresponding plant and market is possible, and the modified transportation problem is solved.
Use a queue to solve multiple GAMSModelInstances in parallel
Example: Transport8
A GAMSCheckpoint cp is initialized from a GAMSJob. Then a queue that represents the different values of the demand multiplier is defined. A queue follows the first-in-first-out-principle. The objects queueMutex and ioMutex are used later to avoid messed up output. Then two delegates of the function ScenSolve that get the same queue as argument are called in parallel.
In function ScenSolve, a GAMSModelInstance is created and instantiated as in the preceding examples and bmult is made modifiable. GAMSCheckpoint.AddModelInstance is called inside the same queueMutex lock used for dequeuing, since it is not safe to call concurrently from multiple threads. The two delegates of the function extract the elements of the queue using bmultQueue.Dequeue. Note that one of the thread-safe solvers is used. Once the queue is empty the loop terminates.
Fill a GAMSDatabase by reading from MS Access
Example: Transport9
This example illustrates how to import data from Microsoft Access to a GAMSDatabase. Unlike .NET Framework, .NET 10 does not include System.Data.OleDb out of the box, so one first needs to add it to the project as a NuGet package (e.g., via Manage NuGet Packages in Visual Studio Code, or by adding <PackageReference Include="System.Data.OleDb" Version="9.0.0" /> to the .csproj file). A function ReadFromAccess that finally returns a GAMSDatabase is called as shown below.
The data that is read can be found in <GAMS system directory>\apifiles\Data\transport.accdb. It might be helpful to open this file for a better understanding. The function begins with the creation of an empty GAMSDatabase. Afterwards, the MS Access database is connected by first specifying the provider and then defining the aforementioned file, located relative to GAMSWorkspace.SystemDirectory as data source. The OleDbConnection represents an open connection to a data source. The following lines initialize the connection and use a try and a catch block for potential exceptions, i.e., errors that occur during application execution. To finally read in GAMS sets and parameters, the functions ReadSet and ReadParameter are called. Several classes of the System.Data.OleDb namespace are documented here.
The function ReadSet incorporates a try and a catch block. In the try block, the reading from the MS Access file is prepared. Then a set symbol is added to the GAMSDatabase and filled with the data from the MS Access file. The function ReadParameter works quite similar.
Once all the data is read, one can create a GAMSJob from the GAMSDatabase and run it as usual.
Fill a GAMSDatabase by reading from MS Excel
Example: Transport10
This example illustrates how to read data from Excel, or to be more specific, from <GAMS system directory>\apifiles\Data\transport.xlsx. The model is given as string without data like in many examples before. At first, one has to add
to the preamble to be able to use the Microsoft.Office.Interop.Excel namespace. Then the excelApp is defined as Excel application using the implicit variable type var, the aforementioned file is used as workbook wb, and the Excel range is defined. The range can represent a cell, a row, a column, a selection of cells containing one or more contiguous blocks of cells, or a 3-D range.
The following lines address the different worksheets and read in the contained data. Afterwards, an errorcheck ensures that the number of plants and markets is the same in all worksheets.
If the steps above are not clear, adding the following output section right after wb.Close() might be helpful to understand where which data is stored.
Now the GAMSWorkspace and a GAMSDatabase can be created as usual and the database can be filled with the workbook data as follows:
Note that the C# variable names holding a GAMSSet/GAMSParameter do not need to match the GAMS identifier passed as the first argument, though in this example they do. Now the database can finally be set up and the GAMSJob be run as usual.
Create and use a save/restart file
Example: Transport11
Transport11 demonstrates how to create and use a save/restart file. Usually such a file should be supplied by an application provider, but this example creates one for demonstration purpose. Note that the restart is launched from a GAMSCheckpoint.
The main function starts with the creation of a folder called tmp that internally is denoted as wDir. Then the function CreateSaveRestart is called.
In function CreateSaveRestart the path of the file (wDir) is given as working directory argument. Then a GAMSJob is created from a string. Note that the string given via GetBaseModelText() contains the basic definitions of sets without giving them a content (that is what $onempty is used for). Afterwards, a GAMSOption is specified to only compile the job but do not execute it. Then a checkpoint cp is created that is initialized by the following run of the GAMSJob and stored in the file given as argument to the function. This becomes possible because the AddCheckpoint method accepts identifiers as well as file names as argument.
So what one should keep in mind, before returning to further explanations of the main function, is that now the file tbase in folder tmp, which is denoted as wDir, contains a checkpoint. Now in the main function, some data is defined using C# data structures as in Transport4, before the GAMSWorkspace is created with working directory wDir.
Afterwards the GAMSDatabase is set up as in Transport4. Once this is done, a GAMSJob is run using this data plus the checkpoint stored in file tbase.
Note that the string from which the job t4 is created is different to the one used to prepare the checkpoint stored in tbase and is only responsible for reading in the data from the GAMSDatabase correctly. The entire model definition is delivered by the checkpoint cpBase, which is equal to the one saved in tbase.