

Who this is for
If you are a GAMS user whose organization has centralized on Snowflake, or if your team relies on the Snowflake Data Cloud and needs a high-performance tool to embed optimization directly into your data pipelines, this post is for you. With GAMS and GAMSPy, you can formulate and solve large-scale optimization models without duplicating data or leaving your secure environment. Snowflake has become the central hub for enterprise data — stored in managed tables, governed by roles and warehouses, and queryable via SQL from anywhere with the right credentials. The integration is straightforward, but the initial setup has a few steps that aren’t obvious. This walkthrough covers those steps for basic GAMS and GAMSPy use cases against Snowflake.
If you’ve already read our GAMS/GAMSPy and Databricks walkthrough , the structure of this post will look familiar: same transport problem, same modeling code, same overall steps. Your optimization logic does not need to change based on where your data lives — only the handful of lines that read and write it do.
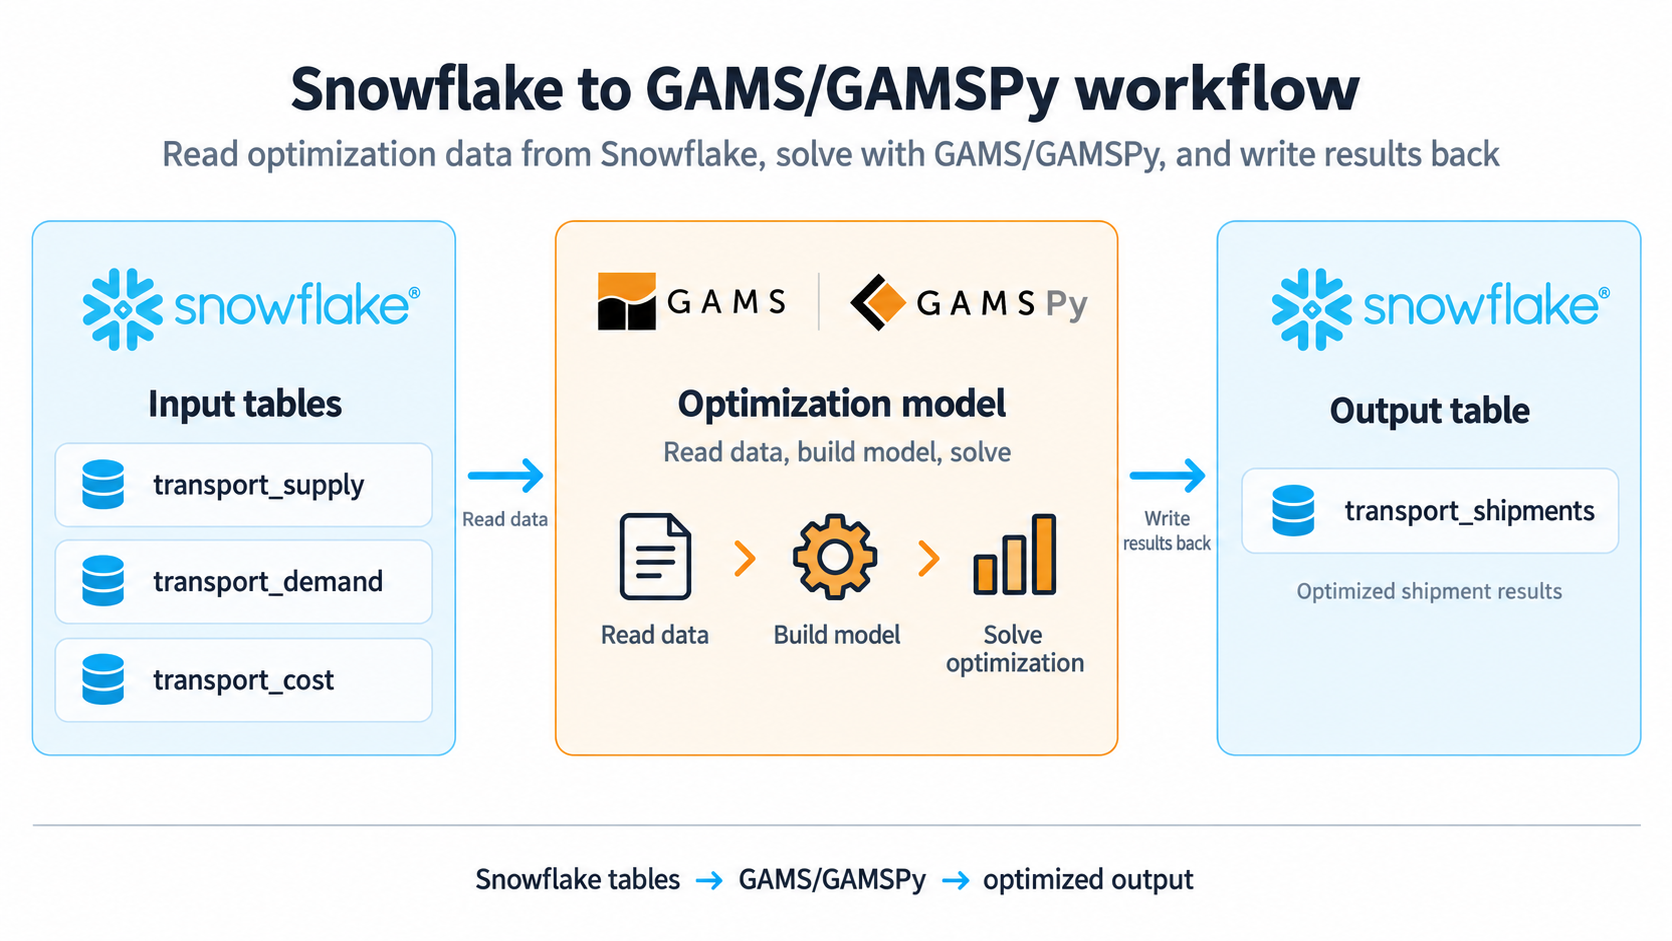
Through this step-by-step tutorial, you will learn to:
- Install GAMS/GAMSPy on your computer
- Streamline data reading from Snowflake directly into your models
- Solve a model with GAMS/GAMSPy (locally or in a Snowflake Notebook)
- Write the solution back to Snowflake tables
This tutorial does not aim to cover the endless possibilities of working with Snowflake. It instead focuses on the optimization part of your decision pipeline.

Step 0: Prerequisites
It is assumed that the user is familiar with the basic GAMS/GAMSPy syntax, and has a Snowflake account with access to a virtual warehouse. Depending on where you run your model, connecting to Snowflake varies slightly. If you are working inside a Snowflake Notebook, an active Session object is available to you automatically — you don’t need to supply credentials at all. However, if you want to develop and run models locally (on your laptop, a VM, or a CI job) and simply use Snowflake as the data layer, you connect explicitly with the same client library, just passing your account details.
There is no separate “connect” package to install for local development — snowflake-connector-python (and, if you prefer the DataFrame API, snowflake-snowpark-python) work identically whether you’re on your laptop or inside Snowflake itself. Install whichever you prefer:
pip install snowflake-connector-python[pandas]
# or, for the Snowpark DataFrame API used throughout this post
pip install snowflake-snowpark-python
Rather than hardcoding credentials into every script, the cleanest pattern — and the one used throughout this post — is to store them once in ~/.snowflake/connections.toml and reference a connection by name:
[transport_demo]
account = "<your_account_identifier>"
user = "<your_user>"
password = "<your_password>"
warehouse = "<your_warehouse>"
database = "DEMO"
schema = "PUBLIC"
Leave authenticator out of this file unless your account has SSO/SAML configured — it’s only needed for accounts federated through an identity provider like Okta or Azure AD. Setting authenticator = "externalbrowser" on a plain trial account fails with a SAML Identity Provider account parameter error.
Once that file exists, any script — local or otherwise — can build a session with a single line, instead of passing credentials around:
from snowflake.snowpark import Session
session = Session.builder.config("connection_name", "transport_demo").create()
Inside a Snowflake Notebook, you don’t need any of this — an active Session is already provided:
# Notebook: session is provided automatically, no import needed
from snowflake.snowpark.context import get_active_session
session = get_active_session()
The Snowflake CLI’s snow connection add command is a reasonable way to populate this interactively, though by default it writes to a separate ~/.snowflake/config.toml instead of connections.toml — if you use it, either point your tools at that file explicitly, or just edit connections.toml by hand as shown above, since that’s the one file every Snowflake Python library (connector, Snowpark, CLI) auto-discovers.
One more thing worth checking before you go further: make sure the warehouse you reference actually exists and that your role has USAGE on it — SHOW WAREHOUSES; in a Snowsight worksheet confirms this. Skip it, and everything will connect fine, but your first real query will fail with No active warehouse selected in the current session.
Setup used
- Compute: A Snowflake Notebook on Container Runtime (needed for
pip install), plus a smallX-SMALLvirtual warehouse for queries - SQL: Snowsight worksheets, used to create and query the demo tables
Demo example
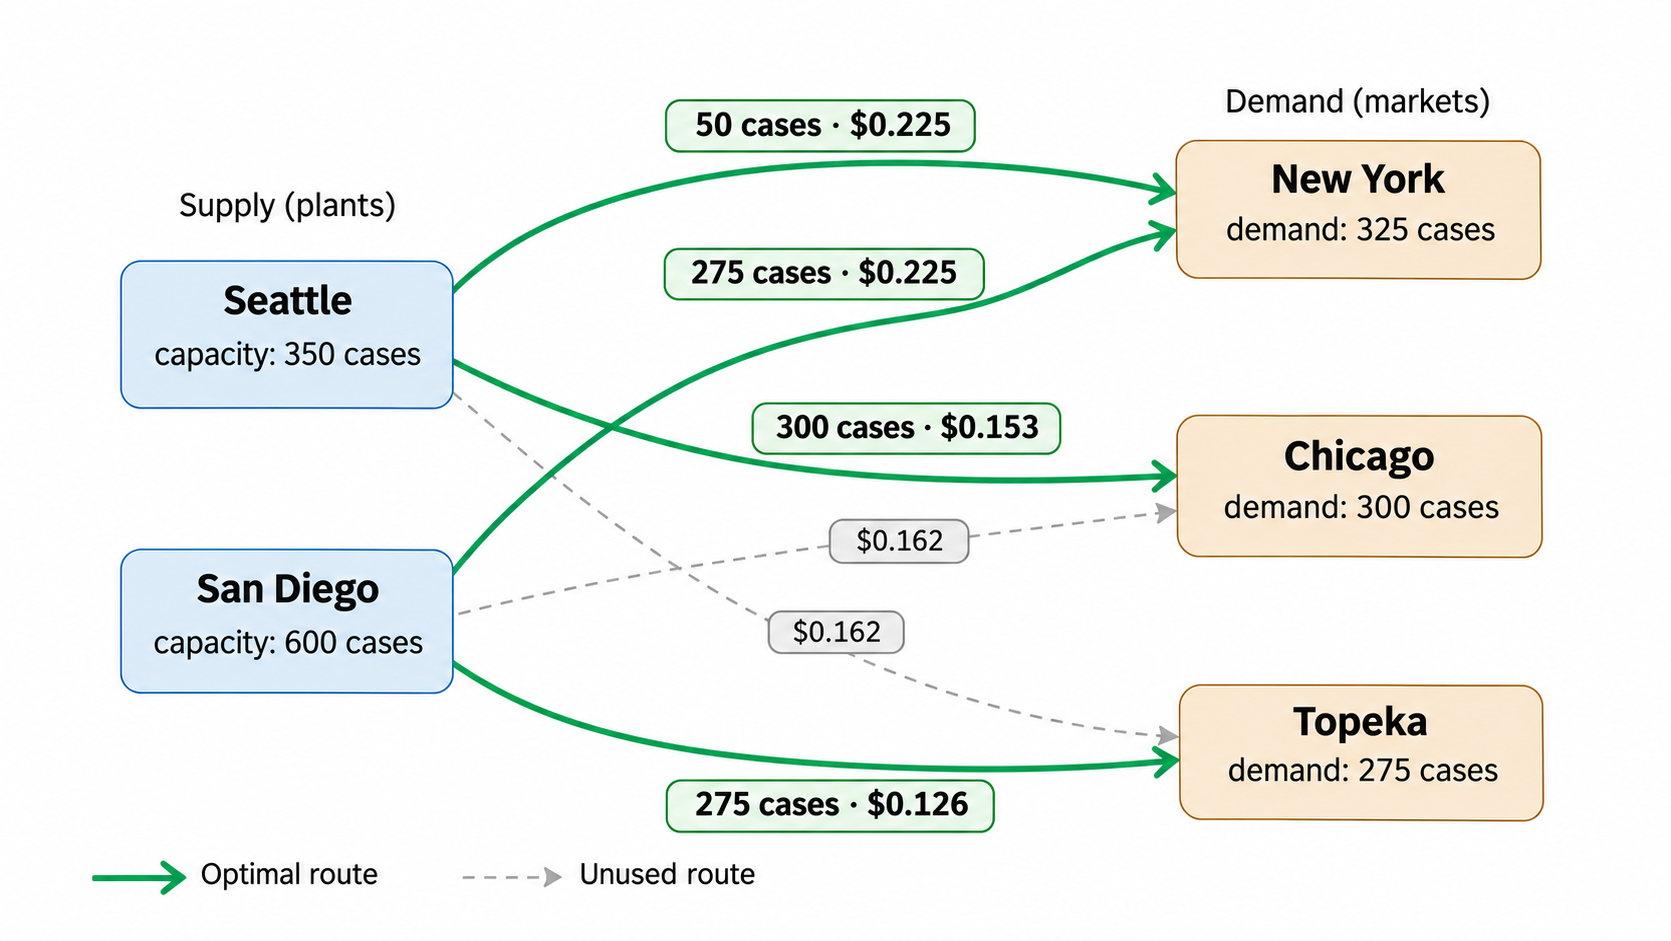
This tutorial uses the classic transport problem. This is a simple LP, but it is sufficient to demonstrate the flow of data in a complex decision pipeline consisting of Snowflake data and a GAMS/GAMSPy model.
Two plants can ship goods to three markets, and given all the required data about demand, supply capacity, and transportation costs, we want to minimize the total transportation cost.
| New York | Chicago | Topeka | |
|---|---|---|---|
| Seattle (cap: 350) | $0.225 | $0.153 | $0.162 |
| San Diego (cap: 600) | $0.225 | $0.162 | $0.126 |
Market demands: New York 325, Chicago 300, Topeka 275.
The formulation
Let $x_{ij}$ be the number of cases shipped from plant $i$ to market $j$.
minimize total shipping cost:
$$\min \sum_{i,j} c_{ij} \cdot x_{ij}$$
subject to:
supply constraints: do not exceed plant capacity:
$$\sum_j x_{ij} \le a_i \quad \forall i$$
demand constraints: satisfy each market:
$$\sum_i x_{ij} \ge b_j \quad \forall j$$
$$x_{ij} \ge 0 \quad \forall i,j$$
It is assumed that all model inputs already live as tables in Snowflake. This reflects how real production models work: your supply, demand, and cost data are maintained by other pipelines in your Data Cloud, and your optimization model is simply a consumer of that data.
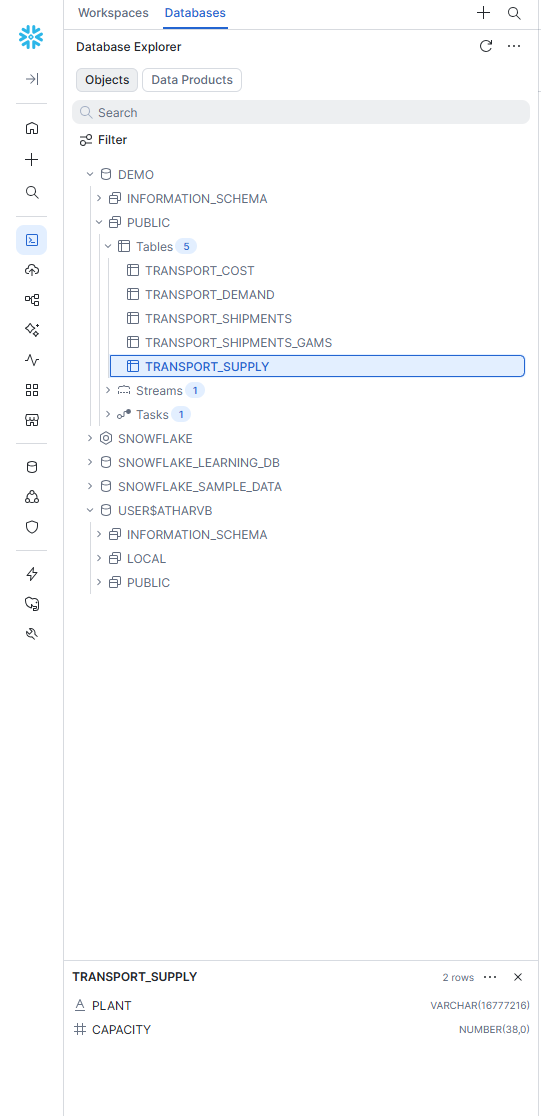
The three input tables for the transport problem are:
demo.public.transport_supply— plant names and available capacitydemo.public.transport_demand— market names and required demanddemo.public.transport_cost— unit shipping cost for each plant-market pair
For this post, we created these using a Snowsight worksheet against an X-SMALL warehouse. Once run, all four tables (including the empty transport_shipments output table) are visible in the Database Explorer.
GAMSPy
Step 1: GAMSPy installation and licensing
GAMSPy needs to be installed on your compute. Inside a Snowflake Notebook running on Container Runtime (the only notebook runtime that permits pip install), open a cell and run:
!pip install gamspy
Container Runtime notebooks reach the internet only through an External Access Integration (EAI). If
pip installfails with a network error, ask your account admin to create an EAI forpypi.organdfiles.pythonhosted.organd attach it to your notebook — or simply do this step locally, where you likely already have unrestricted internet access.
GAMSPy requires a valid GAMS license to solve models beyond the community edition limits. To add your license on the compute:
!gamspy install license <access code or path_to_ascii_file>
Step 2: Read data into Python
from snowflake.snowpark.context import get_active_session

DATABASE = "DEMO"
SCHEMA = "PUBLIC"

def full(table: str) -> str:
    return f"{DATABASE}.{SCHEMA}.{table}"

# Notebook: session is provided automatically
session = get_active_session()

# When running locally, using the connections.toml profile from Step 0
# from snowflake.snowpark import Session
# session = Session.builder.config("connection_name", "transport_demo").create()

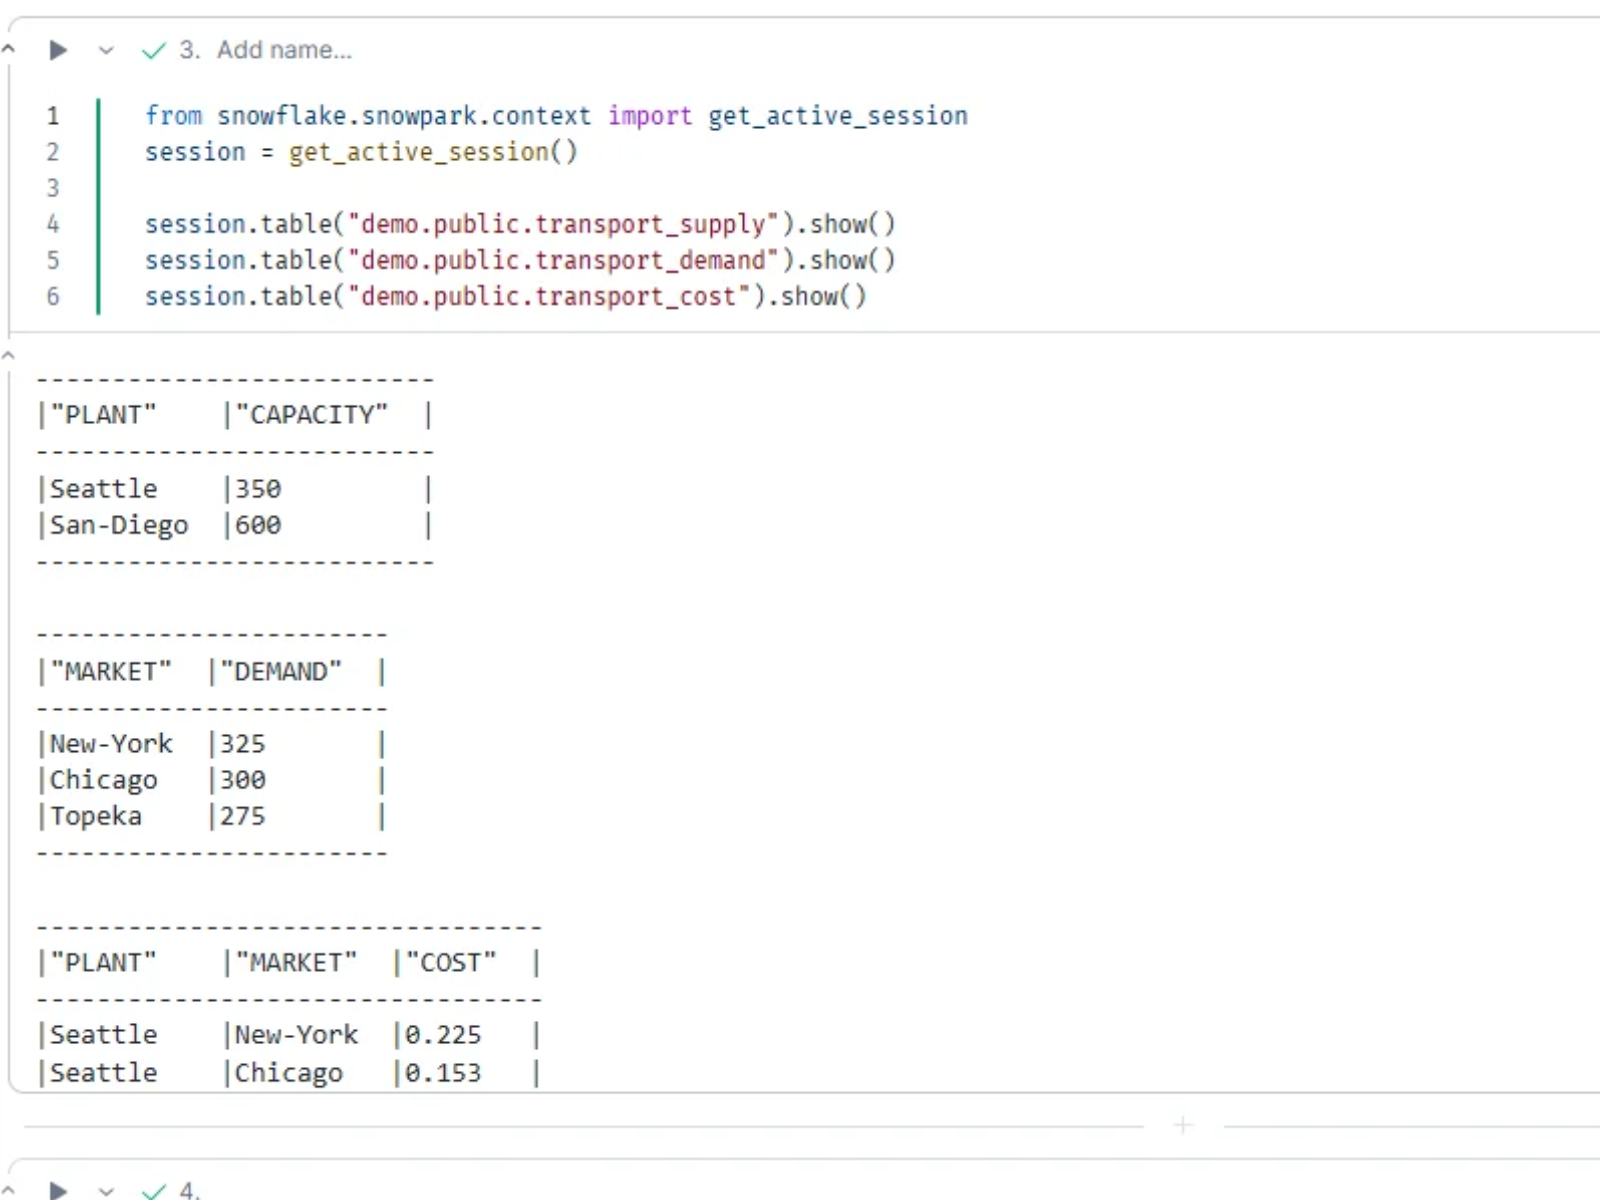
supply_df = session.table(full("transport_supply")).to_pandas()
demand_df = session.table(full("transport_demand")).to_pandas()
cost_df = session.table(full("transport_cost")).to_pandas()

# Snowflake folds unquoted identifiers to upper case, so columns come back
# as PLANT, CAPACITY, etc. Normalize case before handing frames to GAMSPy.
for df in (supply_df, demand_df, cost_df):
    df.columns = df.columns.str.lower()

print("Supply nodes:")
print(supply_df)
print("Demand nodes:")
print(demand_df)
print("Costs:")
print(cost_df)
Step 3: Build and solve the model
The model can also be found in the GAMSPy examples GitHub repository. Once you have plain pandas DataFrames in hand, the model itself doesn’t know or care that the data came from Snowflake — this part of the code is identical to any other GAMSPy workflow.
from gamspy import Container, Set, Parameter, Variable, Equation, Model, Sum, Sense

m = Container()

i = Set(m, name="i", description="supply nodes / plants")
j = Set(m, name="j", description="demand nodes / markets")

a = Parameter(
    m, name="a", domain=[i],
    domain_forwarding=True,
    records=supply_df.rename(columns={"plant": "i", "capacity": "value"}),
    description="plant capacity (cases)"
)

b = Parameter(
    m, name="b", domain=[j],
    domain_forwarding=True,
    records=demand_df.rename(columns={"market": "j", "demand": "value"}),
    description="market demand (cases)"
)

c = Parameter(
    m, name="c", domain=[i, j],
    records=cost_df.rename(columns={"plant": "i", "market": "j", "cost": "value"}),
    description="transport cost ($ per case per 1000 miles)"
)

x = Variable(
    m, name="x", domain=[i, j], type="positive",
    description="shipment quantity (cases)"
)

supply = Equation(m, name="supply", domain=[i], description="do not ship more than available capacity")
supply[i] = Sum(j, x[i, j]) <= a[i]

demand = Equation(m, name="demand", domain=[j], description="satisfy each market's demand")
demand[j] = Sum(i, x[i, j]) >= b[j]

cost_obj = Sum((i, j), c[i, j] * x[i, j])

transport = Model(
    m,
    name="transport",
    equations=m.getEquations(),
    problem="LP",
    sense=Sense.MIN,
    objective=cost_obj,
)

transport.solve()

print(f"\nSolve status : {transport.solve_status}")
print(f"Model status : {transport.status}")
print(f"Objective ($) : {transport.objective_value:.4f}")
Step 4: Write results back
Finally, you can write the shipment quantities back to Snowflake as shown below.
from datetime import datetime, timezone

results = x.records.copy()
results.columns = ["plant", "market", "quantity", "marginal", "lower", "upper", "scale"]
results = results[["plant", "market", "quantity"]].query("quantity > 0").reset_index(drop=True)

print("\nOptimal shipment plan:")
print(results.to_string(index=False))

run_ts = datetime.now(timezone.utc)
results["run_ts"] = run_ts

# Note: When running locally, session is initialized explicitly as shown in Step 2
success, nchunks, nrows, _ = session.write_pandas(
    results,
    "TRANSPORT_SHIPMENTS",
    database=DATABASE,
    schema=SCHEMA,
    auto_create_table=True,
    overwrite=True,
)

print(f"\n{nrows} rows written to {full('TRANSPORT_SHIPMENTS')} at {run_ts}")
session.table(full("TRANSPORT_SHIPMENTS")).show()
The terminal output is shown below
results
           i         j  level  marginal  lower  upper  scale
0    Seattle  New-York   50.0     0.000    0.0    inf    1.0
1    Seattle   Chicago  300.0     0.000    0.0    inf    1.0
2    Seattle    Topeka    0.0     0.036    0.0    inf    1.0
3  San-Diego  New-York  275.0     0.000    0.0    inf    1.0
4  San-Diego   Chicago    0.0     0.009    0.0    inf    1.0
5  San-Diego    Topeka  275.0     0.000    0.0    inf    1.0

Optimal shipment plan:
    plant   market  quantity
  Seattle New-York      50.0
  Seattle  Chicago     300.0
San-Diego New-York     275.0
San-Diego   Topeka     275.0

4 rows written to DEMO.PUBLIC.TRANSPORT_SHIPMENTS at 2026-08-12 14:03:07.512040+00:00

-------------------------------------------
|"PLANT"    |"MARKET"  |"QUANTITY"|"RUN_TS"|
-------------------------------------------
|Seattle    |New-York  |50.0      |...     |
|Seattle    |Chicago   |300.0     |...     |
|San-Diego  |New-York  |275.0     |...     |
|San-Diego  |Topeka    |275.0     |...     |
-------------------------------------------
GAMSPy: the verdict
By leveraging GAMSPy against Snowflake, you achieve a clean, Pythonic workflow that feels like a native extension of your Snowpark environment. The transition from session.table to a GAMSPy symbol is seamless, allowing you to move from raw data to an optimal shipment plan with remarkably concise and readable code.
GAMS
Your GAMS models may depend on data located remotely in Snowflake. This section shows how to connect a classic .gms file directly to Snowflake, running GAMS the same way you always have.
Step 1: GAMS installation and licensing
Install GAMS the same way you would for any other project — download the installer for your platform from gams.com/download and license it as usual. There’s nothing Snowflake-specific about this step: GAMS keeps running wherever it already runs for you (your laptop, a server, GAMS Engine, an orchestrator like Airflow), and Snowflake is simply the data source it reads from and writes to.
Step 2: Read data with GAMS
This section shows how to read the input tables directly from Snowflake inside a classic .gms file. There are two ways of achieving this, both using the GAMS embedded code facility
.
GAMS Connect
GAMS Connect
is a data exchange framework. It consists of a range of agents for integrating data from various types of files into the connect database, transforming the data, and writing data from the connect database to various destinations. The agents we need here are SQLReader and SQLWriter, which allow reading from a specific DBMS into the connect database. SQLReader can connect to Snowflake via the sqlalchemy connection type, since the snowflake-sqlalchemy package provides a SQLAlchemy dialect for Snowflake. There are several ways to use connect
(command line, Python, GAMS embedded code). In this section, we will use it via the GAMS embedded code facility — however, the underlying syntax is YAML and can be easily used in whatever way is convenient to you. The warehouse handles the query; GAMS handles the solve.
GAMS Connect’s SQLReader uses the Python installation that GAMS is configured to call, which by default is GMSPYTHON. However, since we need snowflake-sqlalchemy, it is recommended that you connect your own custom Python installation as shown in the embedded code Python documentation
.
pip install snowflake-sqlalchemy
This walkthrough reads all three input tables — supply, demand, and cost — directly from Snowflake via a single Connect block, rather than hardcoding any of them. The plant/market names themselves (i, j) are kept as literals below since they’re stable identifiers rather than data that changes run to run:
Set
   i 'canning plants' / seattle, san-diego /
   j 'markets'        / new-york, chicago, topeka /;

Parameter
   a(i)   'capacity of plant i in cases'
   b(j)   'demand at market j in cases'
   c(i,j) 'transport cost ($ per case per 1000 miles)'
;

$onEmbeddedCode Connect:
- SQLReader:
    connectionType: 'sqlalchemy'
    connection:
      drivername: 'snowflake'
      host: '<account_identifier>'
      username: '<user>'
      password: '<password>'
      database: 'DEMO'
      query:
        schema: 'PUBLIC'
        warehouse: '<warehouse_name>'
    symbols:
      - name: supply
        query: "SELECT plant, capacity FROM demo.public.transport_supply"
      - name: demand
        query: "SELECT market, demand FROM demo.public.transport_demand"
      - name: cost
        query: "SELECT plant, market, cost FROM demo.public.transport_cost"
- GAMSWriter:
    symbols:
        - name: supply
          newName: a
        - name: demand
          newName: b
        - name: cost
          newName: c
$offEmbeddedCode
The <account_identifier>, <user>, <password>, and <warehouse_name> above are placeholders — GAMS Connect’s YAML block needs the connection spelled out explicitly; unlike the Python side of this post, it can’t read your connections.toml profile. If you’d rather not put a plaintext password in a .gms file at all, GAMS supports command-line parameter substitution: write password: '%pw%' instead, then run gams transport.gms --pw=yourpassword (or wrap that in a small local script that isn’t checked into version control).
Snowpark from embeddedcode Python facility
If your system is already set up for accessing Snowflake data from Python, you can use an approach similar to the one we saw for the local setup of GAMSPy, but from the embedded code facility.
$onEmbeddedCode Python:
from snowflake.snowpark import Session
import gams.transfer as gt

# Picks up the [transport_demo] section from ~/.snowflake/connections.toml
session = Session.builder.config("connection_name", "transport_demo").create()

supply_df = session.table("transport_supply").to_pandas()
demand_df = session.table("transport_demand").to_pandas()
cost_df = session.table("transport_cost").to_pandas()

for df in (supply_df, demand_df, cost_df):
    df.columns = df.columns.str.lower()

m = gt.Container(gams.db)
m['a'].domain_forwarding = True
m['a'].setRecords(supply_df)

m['b'].domain_forwarding = True
m['b'].setRecords(demand_df)

m.write(gams.db)
$offEmbeddedCode
Here, you need your external Python installation connected to GMSPython, or GMSPython extended to include the snowflake-snowpark-python package. You can then use transfer Python
to read/write data from the GAMS database. We are also reading the symbols i, j, and a(i) in addition to b(j) as shown before. By using the domain_forwarding property for a and b, the records for the domain sets i and j are defined implicitly.
Step 3: Build and solve the model
Define relevant variables, constraints, model, solvers (if applicable), and solve the model.
Variable
   x(i,j) 'shipment quantities in cases'
   z      'total transportation costs in thousands of dollars';

Positive Variable x;

Equation
   cost      'define objective function'
   supply(i) 'observe supply limit at plant i'
   demand(j) 'satisfy demand at market j';

cost..      z =e= sum((i,j), c(i,j)*x(i,j));

supply(i).. sum(j, x(i,j)) =l= a(i);

demand(j).. sum(i, x(i,j)) =g= b(j);

Model transport / all /;

solve transport using lp minimizing z;
Step 4: Write results back
Similar to Step 2, there are two ways of writing results back to Snowflake: using GAMS Connect and using embeddedCode Python.
GAMS Connect
We want to write the results x, however, to write it using GAMS Connect we have to extract the values into a parameter. In this case, we define a parameter shipments(i, j) and assign the shipment quantities to it.
parameter shipments(i, j);
shipments(i, j) = x.l(i, j);

embeddedCode Connect:
- GAMSReader:
    symbols:
        - name: shipments
- SQLWriter:
    ifExists: replace
    connectionType: 'sqlalchemy'
    connection:
      drivername: 'snowflake'
      host: '<account_identifier>'
      username: '<user>'
      password: '<password>'
      database: 'DEMO'
      query:
        schema: 'PUBLIC'
        warehouse: '<warehouse_name>'
    symbols:
      - name: shipments
        tableName: transport_shipments_gams

endEmbeddedCode
display x.l, x.m;
We write to a separate transport_shipments_gams table here rather than transport_shipments, so this classic-GAMS run doesn’t overwrite the GAMSPy output from earlier — handy for comparing the two side by side.
GAMS Embedded Code
Similar to reading, if your system is set up to connect to Snowflake from your local Python scripts, you may prefer using embeddedcode Python.
embeddedCode Python:
from snowflake.snowpark import Session
import gams.transfer as gt

session = Session.builder.config("connection_name", "transport_demo").create()

m = gt.Container(gams.db)
shipments = m['x'].records.loc[:, :'level']
shipments.columns = ["plant", "market", "quantity"]

session.write_pandas(
    shipments,
    "TRANSPORT_SHIPMENTS_GAMSPYTHON",
    auto_create_table=True,
    overwrite=True,
)

endEmbeddedCode
Note that there are two embedded code blocks in the GAMS code. The first block reads data using SQLReader and writes to the GAMS database using GAMSWriter. The second block reads the shipments parameter from the GAMS database using GAMSReader and writes it to Snowflake using SQLWriter. More details on the SQLReader and SQLWriter agents can be found in the GAMS documentation
. Another observation to make is that the $onEmbeddedCode–$offEmbeddedCode block runs at compile-time, when the data is read. However, since the shipment values are only available at execution-time (after solve), we use embeddedCode–endEmbeddedCode for the write.
GAMS: the verdict
Whether you use GAMS Connect or embedded code, the integration remains robust and transparent. The ability to pull data from a Snowflake warehouse directly into a .gms file ensures that your GAMS models and new high-performance formulations remain connected to your organization’s single source of truth, all from the comfort of GAMS.
Reacting to new data automatically
Everything above assumes the solve is kicked off manually — a notebook cell, or a gams command. Snowflake’s Streams and Tasks provide a way to trigger a re-optimization automatically whenever the underlying data changes, instead of on a fixed schedule:
-- Track changes to the demand table
CREATE STREAM IF NOT EXISTS transport_demand_stream ON TABLE demo.public.transport_demand;

-- Re-run the model only when that stream has unconsumed changes
CREATE TASK IF NOT EXISTS reoptimize_transport
  WAREHOUSE = COMPUTE_WH
  SCHEDULE = '5 MINUTE'
  WHEN SYSTEM$STREAM_HAS_DATA('transport_demand_stream')
  AS
    CALL run_transport_pipeline();  -- wraps the GAMSPy/GAMS logic from above
run_transport_pipeline would wrap the read/solve/write logic from this post in a stored procedure (Python or SQL). This particular snippet is a starting sketch rather than a tested pipeline like the rest of this post, but it illustrates the pattern: the shipment plan stays current with the underlying data automatically, rather than going stale between manual runs.
Key takeaway
This integration’s main benefit is reducing data silos. By bringing GAMS and GAMSPy directly to Snowflake, your optimization model becomes a component of your enterprise decision pipeline, drawing on the same governed tables your other pipelines already trust — and, with Streams and Tasks, staying in sync with them automatically as new data arrives.
Whether you are a GAMS expert exploring the Data Cloud or a Snowflake user new to optimization, we hope this walkthrough helps you get started. We are always looking to improve our tools for the community — reach out to us at support@gams.com to share your experience.