To illustrate some of the aspects, Engine UI is used here. However, each of the steps shown below can also be achieved with the help of custom clients.
Administration
Introduction
GAMS Engine comes with a highly flexible model- and user management system that allows you to restrict the activities of your users according to your organizational hierarchy. To understand this in its entirety, we need to address a few concepts in more detail: models, namespaces, permissions and user types.
Note:
Models
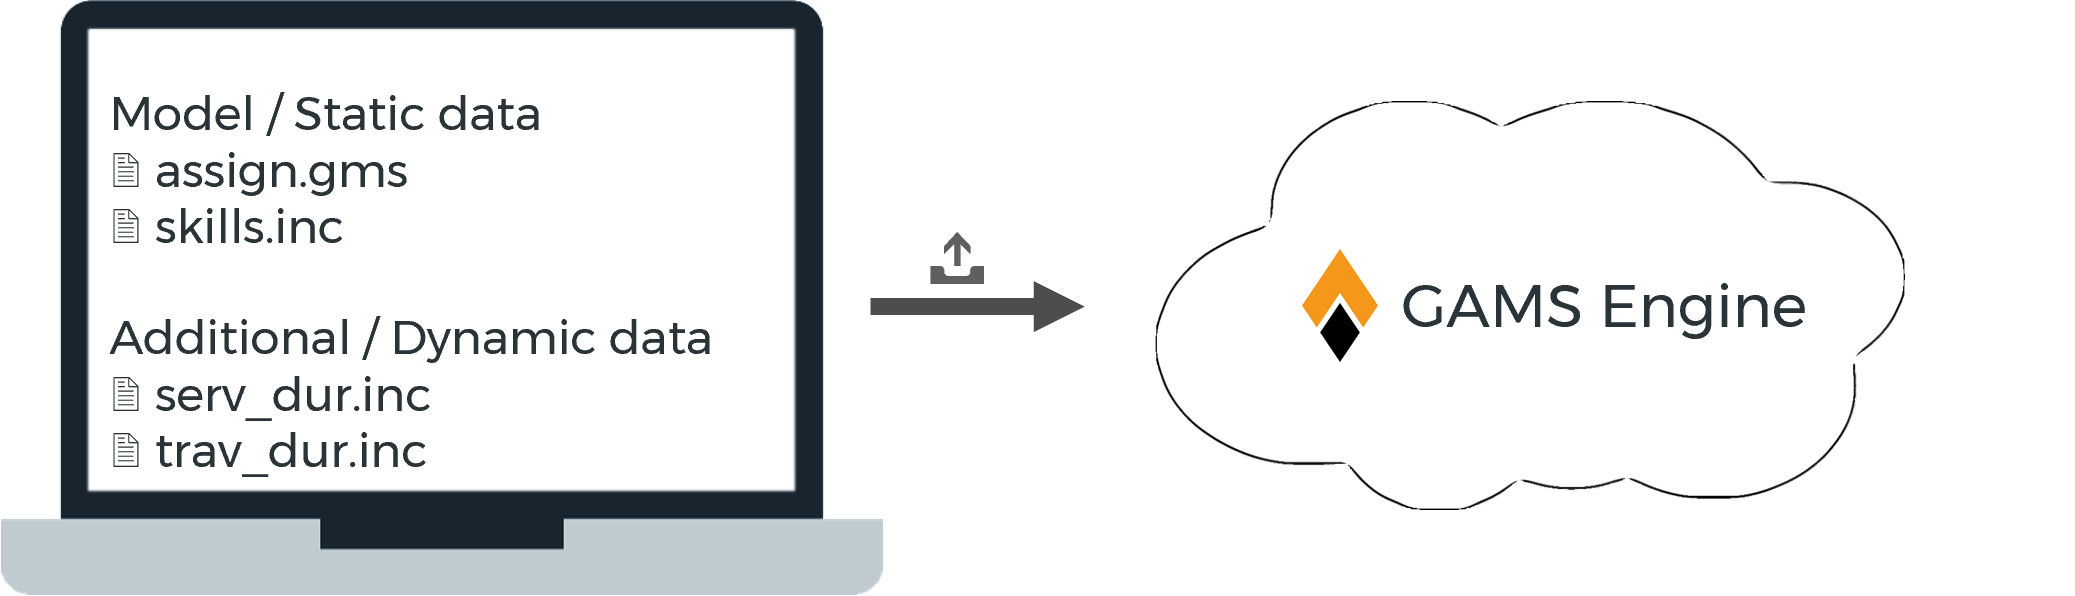
When submitting a GAMS job, it usually consists of model files and data files. While the latter usually differ with each job, the actual GAMS model remains mostly unchanged. In order to avoid submitting the same files to Engine with each job, models can be registered with Engine. Files of registered models are stored by Engine and used for subsequent jobs. You only need to provide the name under which the model is registered and send the dynamic data.
- Job with unregistered model
The user provides both the model files as well as the data to run the model with.
- Job with registered model
The GAMS model is registered with Engine and the user only provides the model name and dynamic data to run the model with.
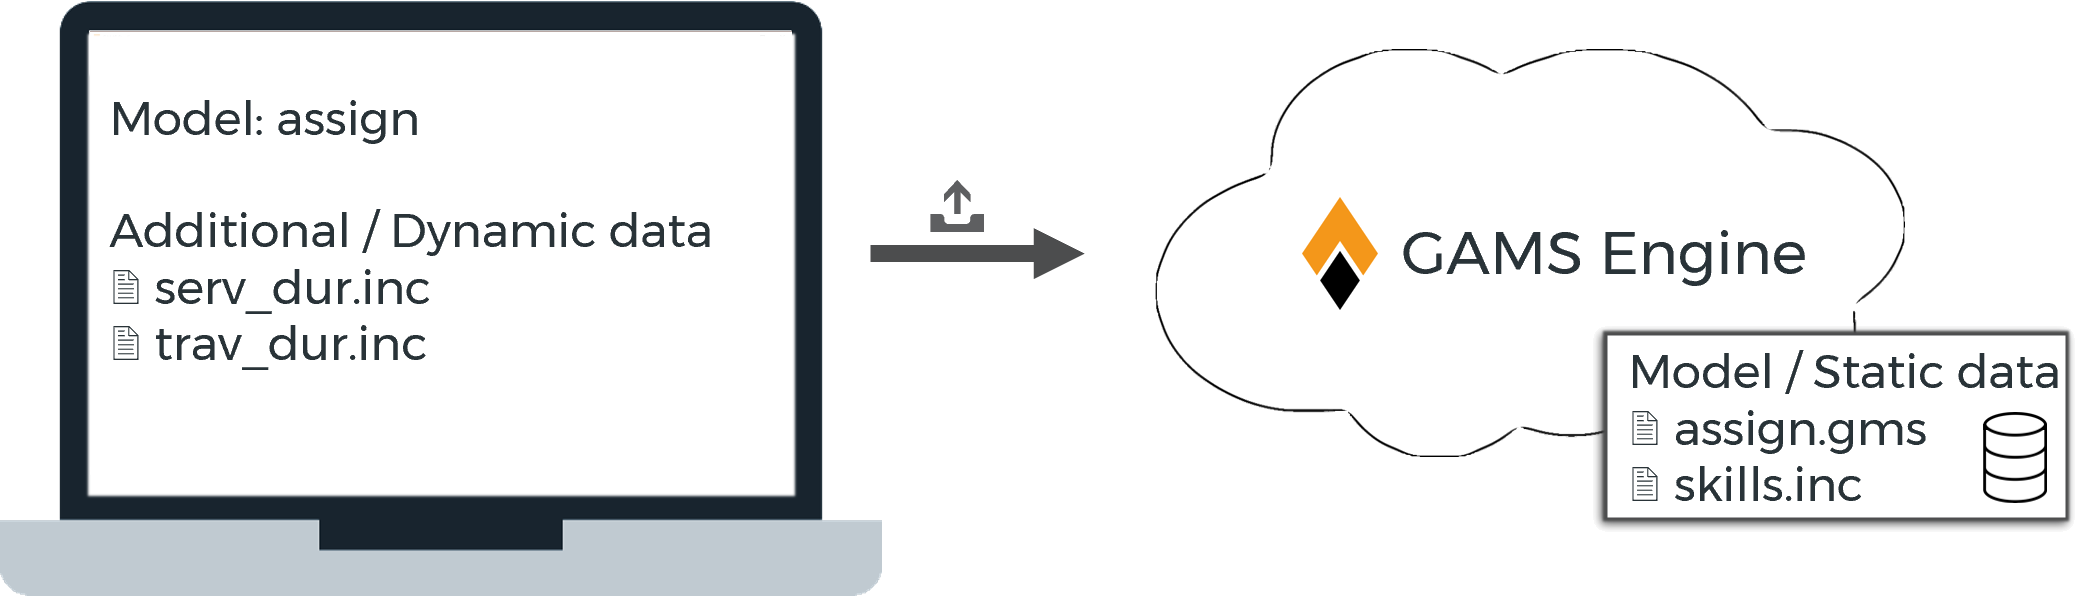
Note:
If a job submit includes files that are already stored as part of the registered model at Engine, the files submitted by the user will be used.
Namespaces and Permissions
Models are organized in namespaces, which you can think of as file directories. Models are always registered in a namespace and submitted GAMS jobs are also executed there. Each model name can only occur once within a namespace. If two models with the same name are to be registered, this must be done in different namespaces. Apart from the ability to manage multiple models with the same name, namespaces are particularly useful for representing hierarchical (user) structures. This is due to an important property of namespaces, namely the concept of permissions.
Namespaces are similar to directories in the UNIX file system: you can specify which users have access to which namespaces. Just like the UNIX file system, GAMS Engine has three types of permissions on namespaces:- Read Permission
Users can download GAMS models registered in this namespace - Write Permission
Users can register new models in this namespace - Execute Permission
Users can execute models in this namespace
| Namespace | Admin role | Read Permission | Write Permission | Execute Permission |
|---|---|---|---|---|
| create/delete namespace | - | - | - | |
| update/delete disk-quota | - | - | - | |
| display disk-quota | - | - | - | |
| register/delete models | - | - | - | |
| download model data | - | - | - | |
| Jobs (same for Hypercube jobs) | ||||
| submit registered models | - | - | - | |
| submit unregistered models | - | - | ||
Warning:
By default, the result files to which the user has access to also contain the model files. To deny a user access to your model files, it is not enough to revoke the read permission of this user! You have to specify a proper INEX file and set the protect_model_files flag to true when registering/updating your model! Otherwise, the user could upload a .gms file that overwrites the intended main file to execute their own code and access other (included) model files.
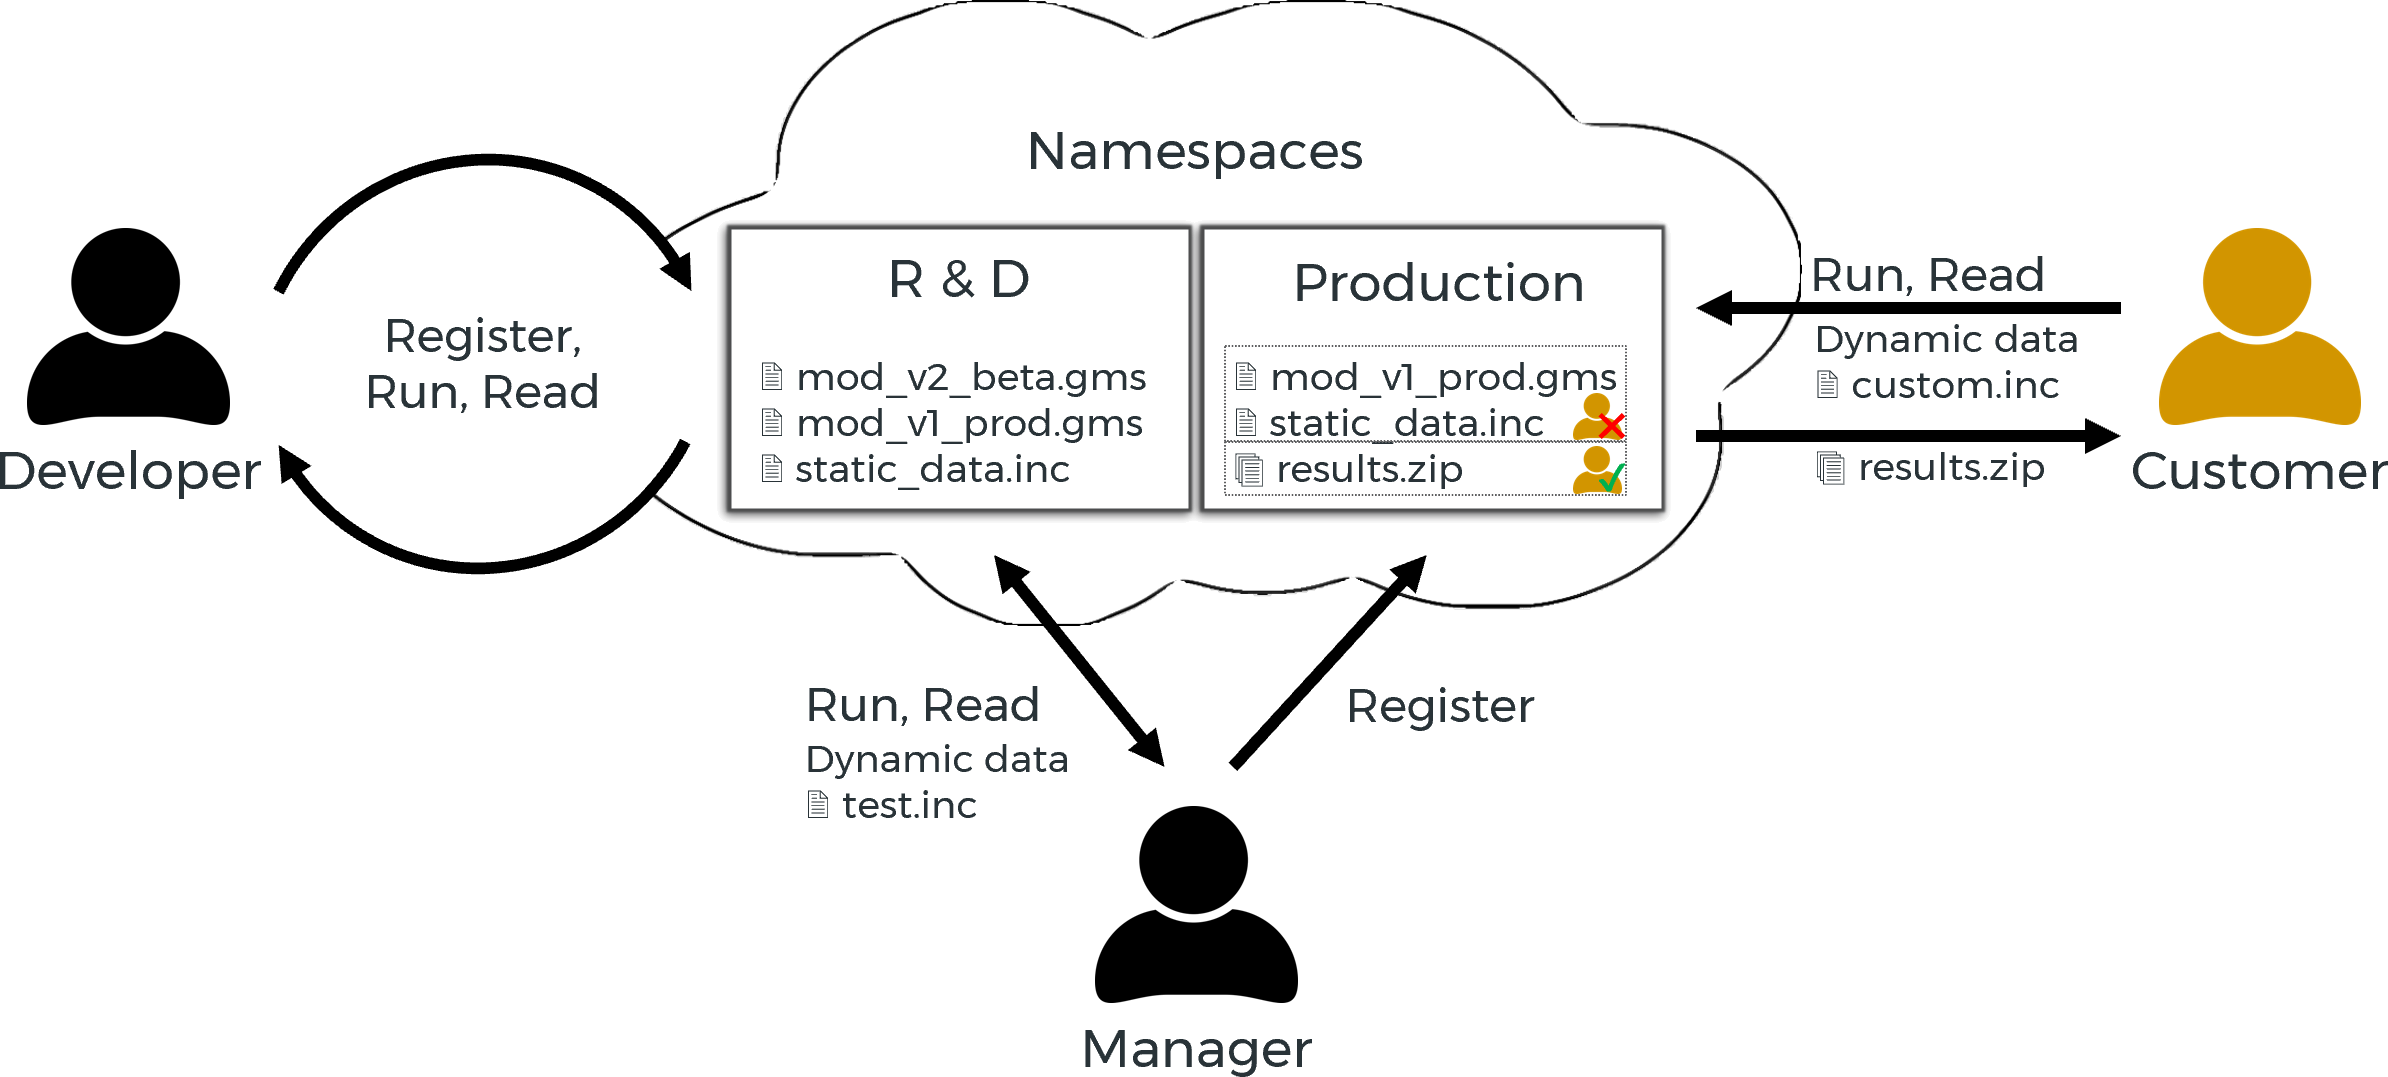
In the following example, two namespaces are used by three people with different permissions to represent the structure and workflow of a company with a customer.
- Developer:
The Model Developer is responsible for maintaining existing models and developing future models. He only accesses the namespace R&D provided for this purpose, in which he has all permissions. - Manager:
The manager has read and execute permissions on the namespace R&D. There she checks the models for customer suitability. If a model (update) is ready, then the manager registers it in the namespace production. - Customer:
The customer has read and execute permissions on the namespace production. With these permissions she can submit jobs with her data and receive the results.
Tip:
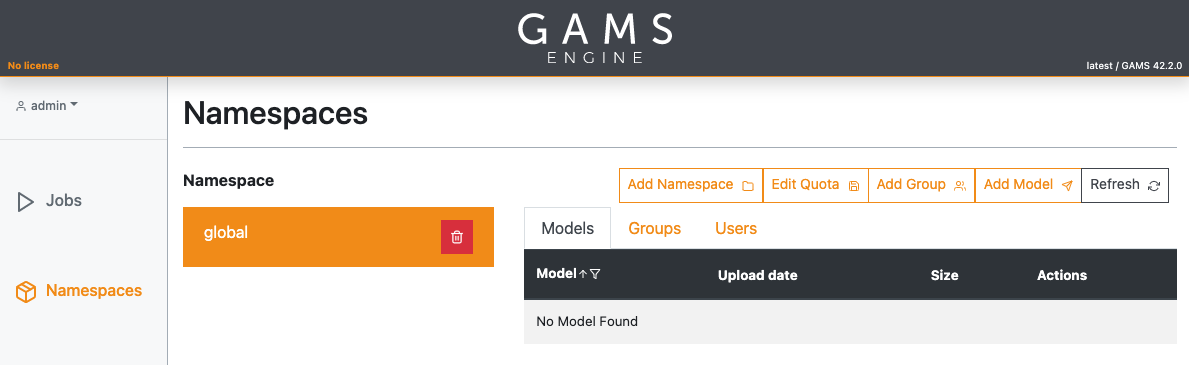
After setting up GAMS Engine, there is a single namespace available with the name: global. Adding namespaces as well as registering models can easily be done via the Engine UI in the Namespaces view.
User Management
After first installing the system, there is a single default user available with the name: admin and password: admin. Note that the default password can be changed during installation with the command line switch: -a.
Note:
We strongly recommend that you change the default password for the admin user immediately after installing Engine to prevent unauthorized users from accessing your system!
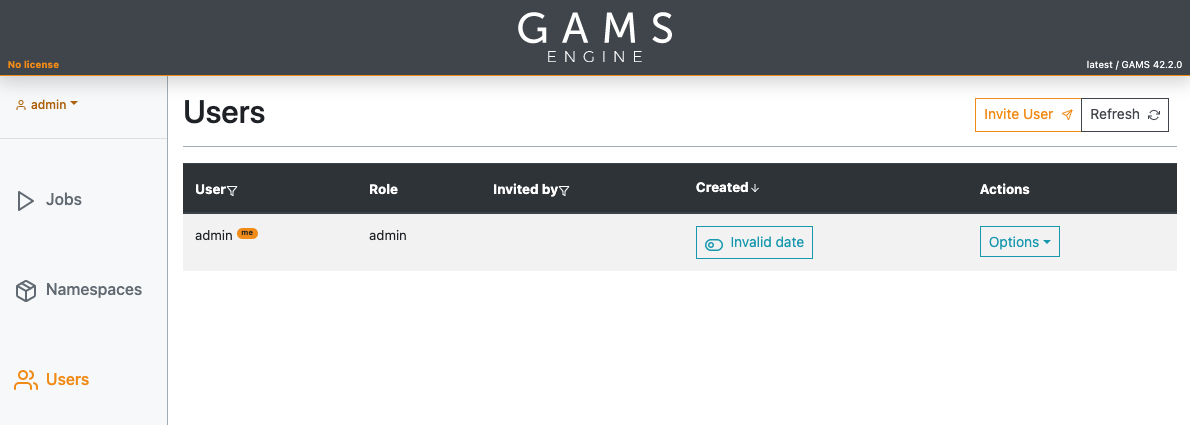
If you are administrator, you can invite other users. If you are using Engine UI, you will find an invite user button in the upper right corner of the Users section.
GAMS Engine distinguishes three types of users:
- Users
- Inviters
Inviters are users with the additional privilege to invite new users to use GAMS Engine. However, inviters can only invite users who have the same or fewer permissions than themselves. For example, if an inviter has read and execute permissions on the namespace global, she is not allowed to invite a user with write permission on this namespace. Inviters can invite other inviters, but not admins. - Administrators
Administrators are the most privileged users. They have full permissions for each namespace and are allowed to invite new users, even new administrators. Administrators can also add new namespaces or remove existing ones.
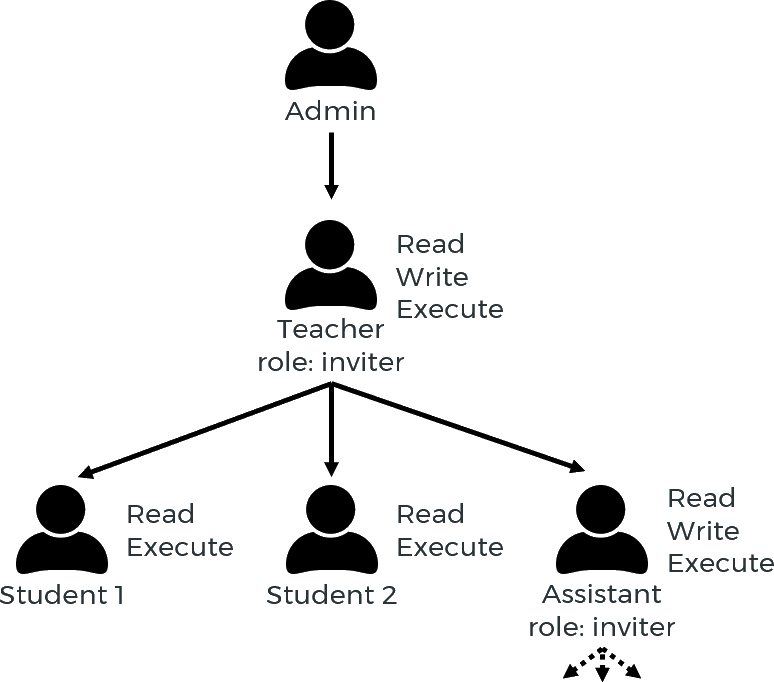
In order to add a new user to GAMS Engine, you need to generate an invitation code. Users can then register themselves by providing this invitation code, a username and a password. Invitation codes can be generated by administrators and inviters. When creating an invitation code, permissions to namespaces can be assigned so that the new user can start interacting with the system directly. Note that the invitee's permissions may be lower than the inviter's, but not higher. Furthermore, inviters are able to manage - i.e. modify permissions and delete - their children (invitees) as well as any grandchildren. In this way, you can set up several hierarchy levels.
User hierarchy example:
Note:
Users only have access to jobs that they have submitted themselves. Inviters can see and interact with their own jobs as well as those of all users invited by them directly or indirectly. Administrators have access to the jobs of all users.
User groups
Users can be assigned to user groups. A user group is a collection of users with any role (user, iviter, or administrator). A user group is always assigned to a namespace and has a unique label/name within that namespace. To create or remove a user group, you must be an inviter with write permission in that namespace (or an administrator).
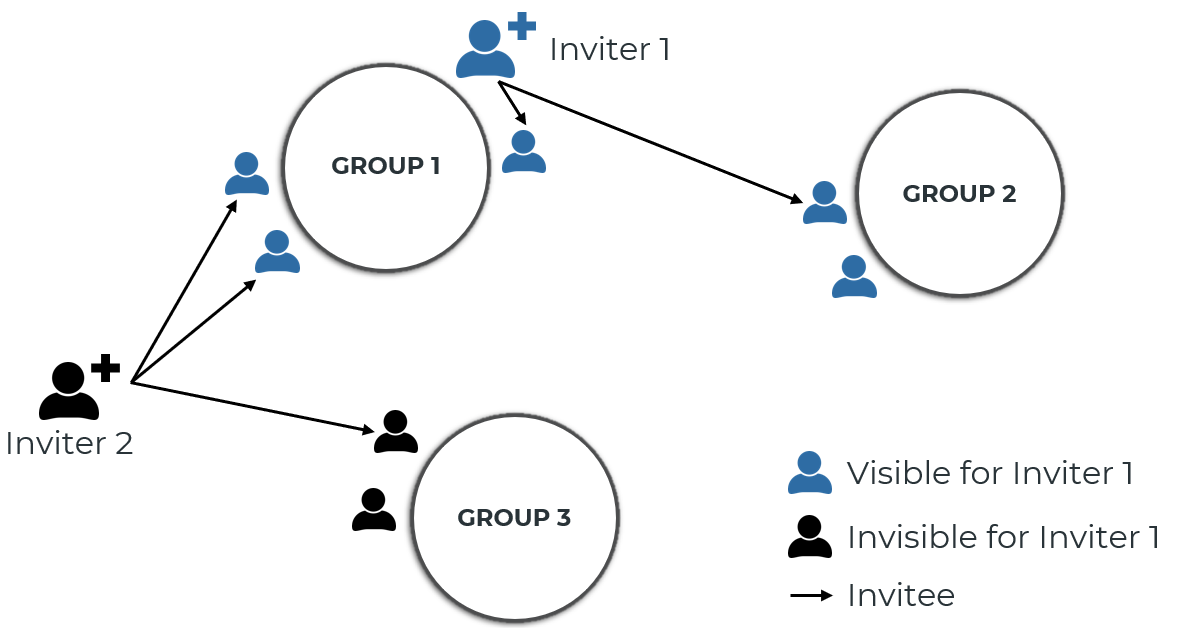
Any member of a group can see all other members within that group. In addition, inviters can see the mebbers of all their invitees' groups. Only inviters and admins can add and remove members from a group. While admins can remove any member from any group, inviters can only remove their invitees. Also, inviters can only remove members from groups that they are either a member of themselves or that belong to an invitee.
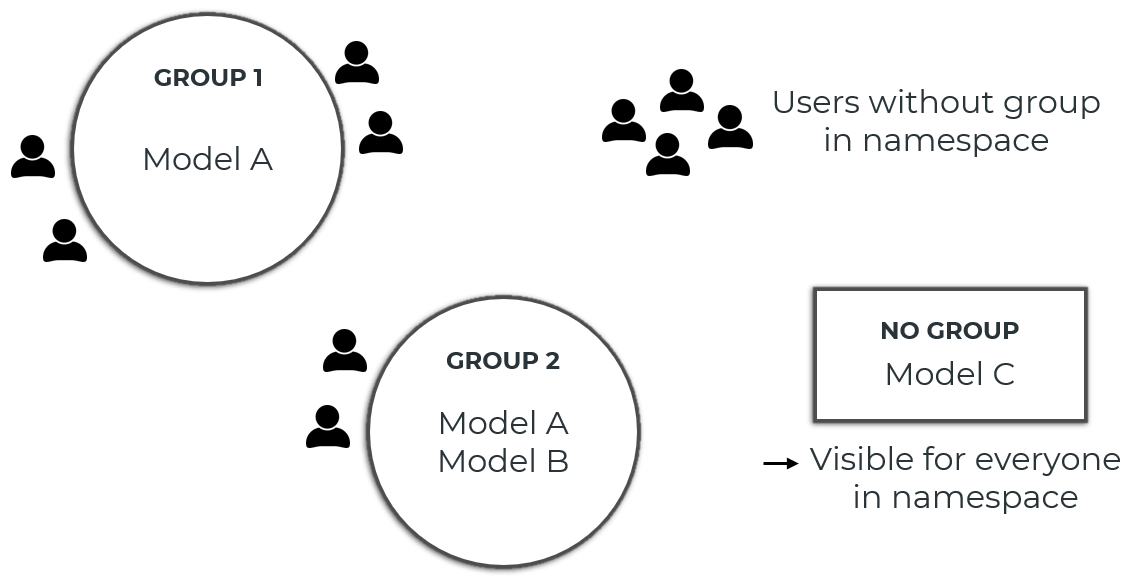
User groups can be used to restrict the visibility of models in a namespace. When registering a new model (or updating an existing model), you can specify which user groups can see that model. All users who can see at least one of the user groups to which the model is assigned can see the model. If a model is not assigned to a user group, the model is visible to anyone who has any permission (read, write, and/or execute) in that namespace.
Jobs can also be shared with user groups. When you submit a new (Hypercube) job, you can specify which user groups have access to the job. Anyone who has access to the user group can then access the job (view the job details, cancel the job, download/delete the results, etc.). The access groups of a job can be edited even after the job has been submitted (via the PUT /jobs/{token}/access-groups endpoint).
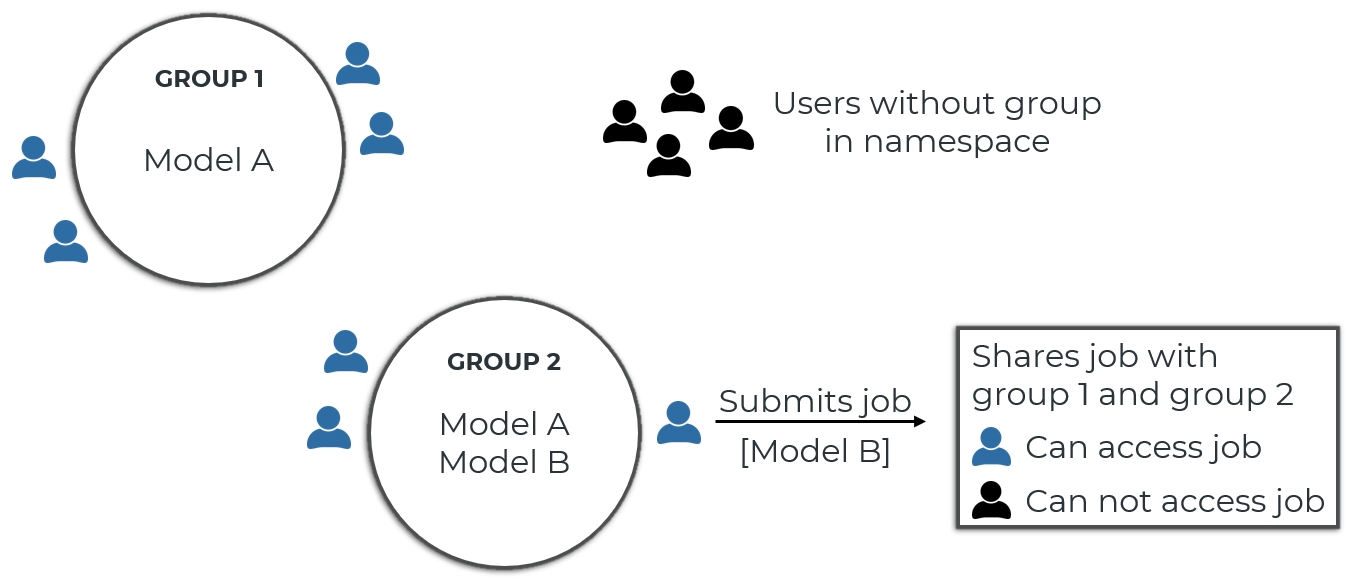
Note:
When you share a job, any member of the group you shared the job with can download the job results. This can include model files of models that the user accessing the job cannot see. Use INEX files to restrict which files are included in the results archive.
Authentication
To interact with GAMS Engine, you must authenticate yourself. Engine currently supports two ways to authenticate: Basic authentication as well as authentication using JSON Web Tokens (JWT).
With basic authentication, you send your username and password with each request. You can use basic authentication only if GAMS Engine is your identity provider. With JWT, a token is used for authentication. JWT tokens are only valid for a certain period of time. If your identity provider is GAMS Engine, you can specify the time period when creating a new token (using POST /auth/login endpoint), otherwise your identity provider may allow you to specify a time period depending on its security policy.
Whenever your username or password is changed (either by yourself or by an administrator), all your JWT are automatically invalidated and you have to generate new ones. You can also manually invalidate all your JWT via the POST /auth/logout endpoint. It is not possible to invalidate individual tokens.
One advantage of JWT authentication over basic authentication is that instead of storing a user's password (which is often reused for multiple services), a random-looking token is stored if you want to implement a "stay logged in" feature on your client (in fact, this is what Engine UI, GAMS Studio and GAMS MIRO do). In addition, you can restrict access of a certain token by making use of "access scopes":
In GAMS Engine, you can specify what you can do with a particular token: You can make a token accessible only to GET endpoints with the READONLY access scope, or you can specify which API endpoints (for example, JOBS or NAMESPACES) can be accessed with that particular token. This allows you to ensure, for example, that a particular CI job can only add/update/delete models but cannot submit new jobs, etc.
Password policy
When GAMS Engine is used as an identity provider, password policies become relevant. Administrators
can
use the PUT /auth/password-policy endpoint to set a password policy for all their users.
The standard password policy requires a minimum password length of eight characters; there are no
further requirements. In addition, it is always forbidden (regardless of the defined password policy)
for the username and password to be identical.
Identity Providers
If you have an LDAP server or identity platform that supports OAuth2, you can integrate Engine with it. This transfers the responsibility for authentication (also authorization if OAuth2) to your identity provider. With an external identity provider, you can have:
- Centralized management for your users
- Additional security policies such as multi-factor authentication
- Single user account for many applications
The default identity provider of GAMS Engine is called gams_engine and it cannot be removed. The first admin must always use that identity provider. The term "external" identity provider refers to any identity provider other than the default identity provider. Adding, updating or deleting identity providers require admin privileges.
If no external identity providers have been added to Engine, you can continue to use the Engine identity provider as you always have. Engine will be the only place where passwords are stored.
Adding an identity provider does not bypass the invitation mechanism that we have in Engine. A user can have an identity in an external identity provider, but in order for them to log in, they have to be invited. So by default, users cannot log in to Engine without being invited.
In this tutorial, for the LDAP examples, we used jumpcloud but we have also tested with OpenLDAP and Active Directory. For the OAuth 2.0 examples, we used okta but we have also tested with Azure Active Directory (Azure AD).
In the following sections, we will talk about LDAP and OAuth 2.0 identity providers. In Engine API, you can list identity providers with GET /auth/providers endpoint. This endpoint does not require authentication because it contains information that is required for authentication. Also, this endpoint does not expose any secret fields. We consider following fields to be secret:
- Any LDAP information besides name and label
- web_ui_client_secret field for OAuth 2.0 providers
LDAP Identity Providers
Many organizations use the Lightweight Directory Access Protocol (LDAP) servers to store user information and authentication. Engine can integrate with your LDAP server.
In a general authentication flow with LDAP, you must pass the LDAP credentials to the application, and the application talks to the LDAP server and authenticates you. This means that you trust the application, in this case GAMS Engine, with your credentials. This is why we prefer using OAuth2 over LDAP, because with OAuth2 you do not have to give your credentials. It is also very important that your communication is encrypted. Otherwise, your credentials will be transmitted insecurely and this is a big security risk.
Here is how an LDAP identity provider can be used in Engine:
- Admin adds the identity provider to Engine
- Admin gives permission to an inviter to invite with this identity provider
- The inviter invites a user with this identity provider
- User registers to Engine using the invitation token (only to get a username in Engine)
- User logs in to Engine using that identity provider
1. Adding an LDAP Identity Provider
To add a new identity provider, you need a user with the admin role.
Let's describe the parameters required to add a new LDAP identity provider.
 hidden determines if the identity provider is shown when all the identity providers
are listed. Hidden identity providers can be listed using their name.
hidden determines if the identity provider is shown when all the identity providers
are listed. Hidden identity providers can be listed using their name.
| Parameter | Required | Example | Description |
|---|---|---|---|
| name | GAMS_LDAP | A unique string to identify the identity provider | |
| label | GAMS LDAP | Suggested login tab name | |
| hidden | false | Should the identity provider be listed when all identity providers are listed? | |
| host | ldap.yourcompany.com | Host of the LDAP server excluding protocol and port | |
| port | 389 | Port of the LDAP server | |
| uid | uid | The LDAP attribute that is used as username. Examples: "sAMAccountName" for Active Directory, "uid" for OpenLDAP. | |
| bind_dn | - |
uid=readonlyadmin,ou=users,dc=example,dc=org EXAMPLE\readonlyadmin |
The full DN of the user who is used for binding. |
| password | - | some_secret | The password of the user who is used for binding |
| encryption | start_tls | Encryption method, available values: start_tls, simple_tls, plain | |
| verify_certificates | - | true | Should the SSL certificate of the LDAP server be checked? true if not provided. Setting this to false is not suggested and could lead to security issues. |
| active_directory | - | false | Is LDAP server an Active Directory LDAP server. For AD, NTLMv2 authentication is used if bind_dn is in "domain\username" format. |
| base | ou=users,dc=example,dc=com | DN of the base where users are located | |
| user_filter |
(objectClass=User) (memberOf=cn=gams-engine,ou=groups,dc=example,dc=com) &((objectClass=User),(employeeType=developer)) |
LDAP user filter. Format can be found in RFC4515 |
Here is an example of adding jumpcloud as an LDAP identity provider. POST /auth/ldap-providers with body:
{
  "name": "jumpcloud-ldap",
  "label": "Login via jumpcloud",
  "hidden": false,
  "host": "ldap.jumpcloud.com",
  "port": 389,
  "uid": "uid",
  "bind_dn": "uid=readonlyadmin,ou=Users,o=YOUR_ORG_ID,dc=jumpcloud,dc=com",
  "encryption": "start_tls",
  "active_directory": false,
  "base": "ou=Users,o=YOUR_ORG_ID,dc=jumpcloud,dc=com",
  "user_filter": "(objectClass=inetOrgPerson)",
  "verify_certificates": true
}
name is the name of the identity provider. You can update or delete
it using that name. label is the label of the tab displayed in the
Engine UI.
hidden determines if the identity provider is shown when all the identity providers
are listed. Hidden identity providers can be listed using their name.
2. Giving Permissions to Inviters to Invite with Identity Providers
If Engine is your only identity provider, inviters in your system can invite with Engine without specifying which identity provider the invitee can log in with.
Users with admin role can invite with any identity provider available in Engine. Inviters can invite only with identity providers for which they have permissions. Using an identity provider at login does not mean that the inviter can invite with it.
To query the list of identity providers a user can invite with, you can use the GET /users/inviters-providers/{username} endpoint. If you are an inviter, you can query users in your subtree. If you are an administrator, you can query everyone.
Similarly, to update the list of identity providers a user can invite with, you can use the PUT /users/inviters-providers/{username} endpoint. If you are an inviter, you can update inviters in your subtree. If you are an admin, you can update allowed identity providers for each inviter.
Let's say we have an inviter named johndoe, then we can give the inviter
permissions to the new identity provider.
PUT /users/inviters-providers/johndoe with body:
{
    "name": ["gams_engine", "jumpcloud-ldap"]
}
After that, johndoe can invite users with both the default provider
"gams_engine" and the newly added provider "jumpcloud-ldap". Omitting
"gams_engine" from this list would prohibit the inviter from using the default
identity provider when inviting.
3. Inviting with an LDAP Identity Provider
Inviting with an identity provider is similar to inviting before the introduction of the identity providers feature. In addition to the fields you have already specified, you must specify identity_provider_name and identity_provider_user_subject.
Specifying an identity provider when inviting
If you have not added any external identity providers, you do not need to specify identity_provider_name and identity_provider_user_subject. By default, Engine uses the identity provider "gams_engine". However, if you have more than 1 identity provider that you can invite with, you must specify these fields because Engine cannot know which one you want to use.
POST /users/invitation with body:
{
    "namespace_permissions": ["7@global"],
    "identity_provider_name": "jumpcloud-ldap",
    "identity_provider_user_subject": "burak"
}
Returns:
{
    "invitation_token": "15cd5eff-c503-4ae8-9f15-e83ab5f0afbc"
}
The identity_provider_user_subject field specifies the identity of
the user in the specified identity provider. How this field is used depends on
the type of identity provider. For identity providers of the LDAP type, this
value is used in the login form in Engine and should match the value of the
user attribute specified in the uid field.
In this example, Engine will search for the user in the Distinguished Name "ou=Users,o=YOUR_ORG_ID,dc=jumpcloud,dc=com" with the filter "(&(objectClass=inetOrgPerson)(uid=burak))" at login because the uid field of the registered identity provider is "uid". For example, another uid field name commonly used in Active Directory is "sAMAccountName". In this case, the filter would be "(&(objectClass=inetOrgPerson)(sAMAccountName=burak))".
4. Registering when using an identity provider
We have invited the user "burak" from jumpcloud LDAP, but the user cannot log in to Engine because he has to register first. Registering with Engine is necessary because the unique identifier of the user "burak" may already exist in Engine. Therefore, the username in Engine may be different from the username in LDAP.
The new user registers with a request to POST /users/ with body:
{
    "invitation_code": "15cd5eff-c503-4ae8-9f15-e83ab5f0afbc",
    "username": "burak_engine"
}
Please note that the username in LDAP "burak" is different from the username in
Engine "burak_engine".
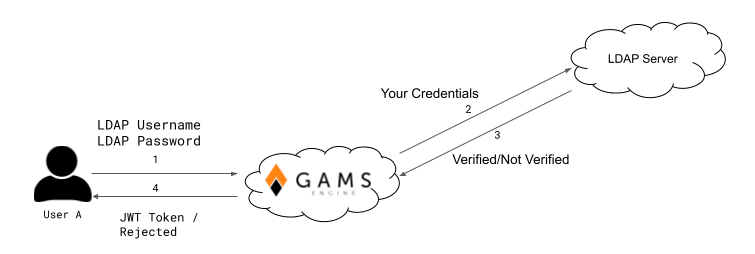
5. Login via an LDAP Identity Provider
Now that our user has registered, he can log in to Engine with his
credentials. It might be advantageous to remember the image from the
introduction.
The URL for LDAP login is /auth/ldap-providers/{provider_name}/login. First, the user sends his credentials to Engine with a POST request to /auth/ldap-providers/jumpcloud-ldap/login with body:
{
    "username": "burak",
    "password": "verysecureldappassword",
    "scope": "NAMESPACES JOBS USERS HYPERCUBE USAGE"
}
username and password are username and password for LDAP.
Using the username from Engine would not work here. Engine communicates with
the LDAP server and checks the user's credentials. If the user's credentials
are OK, Engine signs a JWT token with the scopes requested and returns it to
the user.
{
    "token": "eyJhbGciOiJIUzUxMiIsInR5cCI6ImF0K2p3dCJ9.eyJpc3MiOiJodHRwOi8vbG9jYWxob3N0L2FwaSIsImV4cCI6MTY3MzAzMTQ3MiwiYXVkIjoiaHR0cDovL2xvY2FsaG9zdC9hcGkiLCJzdWIiOiIzIiwiY2xpZW50X2lkIjoicHVibGljIiwiaWF0IjoxNjcyNDI2NjcyLCJqdGkiOiIyYjY0MGI0YS1lYmVlLTQzZGUtOTkwYy02ZTNmZWYwYTU0ODQiLCJsZGFwX2lkIjoiNDdjM2M1ODEtN2ViOC00ZjMzLWFjZjgtNDVjZDljYTkyNDYxIn0.xxx",
}
Now the user can use this JWT token in the "Authorization" header with
bearer authentication to make requests to Engine. However, since the
user has requested only specific scopes, he cannot use this token to reach
an unspecified scope like "LICENSES".
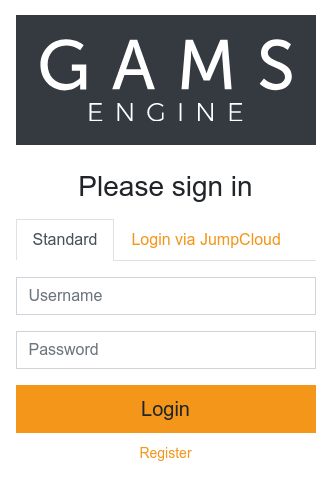
You can also use Engine UI to log in through your identity provider. If you have set the hidden parameter to true, the LDAP Tab is not displayed on the login page. You can still view the tab by appending the query "provider=your_provider_name" to your login URL, for example: "https://your_engine_url.com/login?provider=jumpcloud"
Scopes
When using JWT tokens signed by Engine or an external OAuth2 identity provider, a scope in the token does not give you permission to reach that specific resource. Specifying the scope is necessary, but not sufficient. As a non-admin user, you can request and receive the "LICENSES" scope, but Engine will not let you access the resource because you are not an admin. If an admin user uses a JWT token that does not have the "LICENSES" scope, they will not be able to access the resource either.
Communication between Engine and your LDAP Provider
For troubleshooting, it is helpful to understand the communication between GAMS Engine and your LDAP server when authenticating a user. In summary, Engine performs the following steps when a user attempts to log in via LDAP:
- Establish connection
- Bind with bind_dn and password*
- Search the user in distinguished name base
- Bind with user using user's password
If any of these steps fail, the authentication is considered failed. You can also jump to the troubleshooting hints hints.
Establishing connection
First, Engine will try to connect to your LDAP server. The host and port fields specify where Engine tries to connect to. If your encryption parameter is "start_tls" or "simple_tls", GAMS Engine will communicate with your LDAP server using TLS, if it is "plain", the communication will not be encrypted. We recommend that you do not use "plain".If connection is secure, verify_certificates determines if GAMS Engine should verify the certificate of your LDAP server. Unless you have a really good reason, this should be left true.
Binding
After the connection is established, Engine attempts to bind using the distinguished name specified in bind_dn and the password specified in the password field. The bind user must have permission to bind and search the specified base. If the bind_dn and password fields are left blank, Engine will attempt an anonymous bind (not all LDAP servers support anonymous binds).
When Active Directory
If the active_directory field is set to true and the bind_dn has the format "domain\username", NTLMv2 is used when binding. Kerberos is not supported by Engine.
Searching the user
With the user bound, GAMS Engine searches for the distinguished name specified by base using a filter that is a combination of the uid field and the user_filter field.
Let's assume we have the same identity provider we used in the previous section and user "burak" tries to log in. Engine searches the distinguished name "ou=Users,o=YOUR_ORG_ID,dc=jumpcloud,dc=com" with the filter "(&(objectClass=inetOrgPerson)(uid=burak))". This search must match exactly 1 entry. Also, the binding user needs the permission to search this base.
Binding with user
When active_directory is false:
Engine tries to bind to the LDAP server using the distinguished name of the
found entry and the password provided by the user.
Example:
Found distinguished name:
"uid=burak,ou=Users,o=YOUR_ORG_ID,dc=jumpcloud,dc=com"
Provided Password: "verysecureldappassword".
If binding is successful, Engine signs a new JWT token for the user and gives
it back to the user.
When active_directory is true:
Engine tries to read the "msDS-PrincipalName" attribute of the entry. If it is found, this attribute and the specified password is used to bind. Also when binding, Engine uses NTLMv2.
If "msDS-PrincipalName" is not found, Engine tries to read the "userPrincipalName" attribute. If it is found, this attribute and the specified password is used to bind. Engine does not use NTLMv2.
If "userPrincipalName" is also not found, Engine tries to bind using the distinguished name of the found entry and the password provided by the user. Engine does not use NTLMv2.
If binding is successful, Engine signs a new JWT token for the user and gives it back to the user.Troubleshooting LDAP Identity Provider
With so many parts, it can be a tedious task to figure out why you can't log in with your LDAP identity provider. We have put together some tips for you!
You haven't registered
Even if you specified all parameters correctly when adding the identity provider, users will not be able to log in to Engine if they are not invited and registered!
You used your Engine username
The login request must use the LDAP username and password, not the Engine username. The LDAP username is the field that was specified with identity_provider_user_subject when the user was invited.
Engine could not connect to your LDAP Server
For various reasons, Engine may fail to connect to your LDAP server. You can check if this is the case by looking at the logs of the "forward proxy" container. You can check if this is the case by looking at the logs of the "Forward Proxy" container. The forward proxy container is the container that communicates with your LDAP server.
Understanding Forward Proxy container logs
You can query logs with: docker logs forward_proxy_container_name
-
"WARNING #: LDAPException while generating JWT, exception: invalid server address"
Could be invalid host, port etc or forward proxy cannot reach your LDAP server. -
"INFO #: Could not bind to the LDAP server with service account"
Bind with bind_dn and password fails. It could be wrong bind_dn or password or missing bind permissions. -
"INFO #: Search was not successful!"
Bound user could not search the specified base, it might be a permission issue. -
"INFO #: Search did not match exactly 1 entry, it matched %d"
Engine expects the search to match exactly 1 entry, if it finds 0 it means the user is not found in LDAP. If more than 1 entry is found, there is a problem with uid and user filter. -
"INFO #: Could not bind to the LDAP server with user account"
Everything went well, the user is found but bind was not successful. It could be incorrect user password or maybe the user does not have bind permissions.
OAuth2 Identity Providers
Another common protocol used for "authorization" is OAuth 2.0. Engine can integrate with OAuth 2.0 providers. The term "authorization" is in quotes here because when you protect your API (in this case, Engine API) with OAuth 2.0, your identity provider also decides which scopes you can access in addition to confirming your identity.
We recommend using OAuth 2.0 instead of LDAP when possible because with OAuth 2.0 you don't have to share your user credentials with Engine. In addition, multi-factor authentication is easier to implement with OAuth 2.0.
From Engine API's perspective, an OAuth 2.0 provider means that you provide Engine API with JWT tokens signed by your OAuth 2.0 provider. Engine API, at least while consuming the tokens, is not involved in obtaining the tokens and therefore does not need to know your credentials. Here is the highly simplified process for using your OAuth 2.0 provider for Engine.
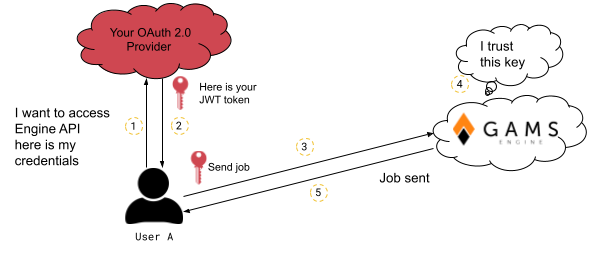
Here is how an OAuth 2.0 identity provider can be used in Engine:
- Configure your OAuth 2.0 provider
- Admin adds the identity provider to Engine
- Admin gives permission to an inviter to invite with this identity provider
-
The inviter invites the user and the user registers
- If you want to specify a user subject
- If you do not want to specify a user subject
- User logs in to Engine using that identity provider
1. Configuring your OAuth 2.0 provider and Engine hostname
You need to configure your OAuth 2.0 provider so it protects your Engine API. Since there are different OAuth 2.0 providers, we cannot document how to configure each of them. But we can give you some hints. Let's assume that you host Engine API at the URL "https://engine.somecompanynamehere.com/api" and Engine UI at the URL "https://engine.somecompanynamehere.com/". It is important that you:
- Set your audience correctly
- Specify scopes for Engine API
- Get a public client ID for Engine UI
- Specify redirect URL for Engine UI
You should let Engine API know where it is hosted by updating the
hostname configuration. You can do it by:
PATCH /configuration with body:
{
    "hostname": "https://engine.somecompanynamehere.com/api"
}
After that, Engine API expects the JWT tokens to contain a matching "aud"
(audience) claim (unless you used override_audience, which we'll mention later).
Then you have to configure your OP (OAuth 2.0 provider) so that the generated tokens have the "aud" claim which is "https://engine.somecompanynamehere.com/api". Sometimes OP implementations do not follow the standard and set the wrong "aud". In this case, you must set override_audience when adding the identity provider.
Engine API has the following scopes:
- READONLY
- NAMESPACES
- JOBS
- USERS
- HYPERCUBE
- CLEANUP
- LICENSES
- USAGE
- AUTH
- CONFIGURATION
You should create a public client for Engine UI if you want to log in conveniently from the UI. Engine UI is a single-page application that cannot store secrets. Therefore, it is important that you create a public client in your OP and not a private one. There is a way to use a private client with Engine UI but it should be avoided if possible.
Engine UI performs "Authorization Code Flow" with PKCE verifier. It is crucial that you specify the redirect URIs in your OP correctly. Your OP should redirect you to the URL of your Engine UI, for example, "https://engine.somecompanynamehere.com".
2. Adding an OAuth 2.0 Identity Provider
To add a new identity provider, you need a user with the admin role. Let's describe the parameters required to add a new OAuth 2.0 identity provider.
| Parameter | Required | Example | Description |
|---|---|---|---|
| name | okta | A unique string to identify the identity provider | |
| label | Login via Okta | Suggested login button string | |
| hidden | false | Should the identity provider be listed when all identity providers are listed? | |
| web_ui_client_id | 0oac41eda688759EE1C7 | OAuth 2.0 client id that should be used by Engine UI while logging in | |
| web_ui_client_secret | - | somelongandsecuresecret | OAuth 2.0 client secret that should be used by Engine UI while logging in. Please read here before using it. |
| device_client_id | - | 0oac41eda68xx59EE1C7 | OAuth 2.0 client ID, which should be used by clients that do not have browser access. The client must be a public client. |
| issuer | https://dev-xxxxxxxx.okta.com/oauth2/default | URL using the https scheme with no query or fragment component that the OAuth 2.0 provider asserts as its Issuer Identifier. | |
| override_audience | - | api://default | Expected "aud" claim in JWT tokens signed by this provider. Please read here before using it. |
| use_oidc_discover | - | false | Should OpenID Connect Discovery be used. Fetches information from issuer URL appended with /.well-known/openid-configuration Default: false |
| use_oauth2_auth_server_metadata | - | false | Should OAuth 2.0 Authorization Server Metadata be used. Fetches information from issuer URL appended with /.well-known/oauth-authorization-server Default: false |
| authorization_endpoint | Required unless discovery is used. | https://dev-xxxxxxxx.okta.com/oauth2/default/v1/authorize | URL of the OP's OAuth 2.0 Authorization Endpoint (ignored if discovery is used) |
| token_endpoint | Required unless discovery is used. | https://dev-xxxxxxxx.okta.com/oauth2/default/v1/token | URL of the OP's OAuth 2.0 Token Endpoint (ignored if discovery is used) |
| jwks_uri | Required unless discovery is used. | https://dev-xxxxxxxx.okta.com/oauth2/default/v1/keys | URL of the OP's JSON Web Key Set document (ignored if discovery is used). |
| response_types_supported | Required unless discovery is used. | code id_token code id_token code token | Array containing a list of the OAuth 2.0 response_type values that this OP supports (ignored if discovery is used). |
| grant_types_supported | - | authorization_code implicit refresh_token | Array containing a list of the OAuth 2.0 Grant Type values that this OP supports (ignored if discovery is used). |
| token_endpoint_auth_methods_supported | - | client_secret_basic client_secret_post | Array containing a list of client authentication methods supported by the OP's token endpoint (ignored if discovery is used). |
| end_session_endpoint | - | https://dev-xxxxxxxx.okta.com/oauth2/default/v1/logout | URL in the OP to which the Engine UI can redirect to prompt the end user to be logged out of the OP (ignored if discovery is used) |
| device_authorization_endpoint | - | https://dev-xxxxxxxx.okta.com/oauth2/default/v1/device/authorize | URL of the authorization server's device authorization endpoint (ignored if discovery is used) |
| request_scope_NAMESPACES | - | NAMESPACES | Scope that the client should request from the OP to get 'NAMESPACES' scope. Default: NAMESPACES |
| request_scope_JOBS | - | JOBS | Scope that the client should request from the OP to get 'JOBS' scope. Default: JOBS |
| request_scope_USERS | - | USERS | Scope that the client should request from the OP to get 'USERS' scope. Default: USERS |
| request_scope_HYPERCUBE | - | HYPERCUBE | Scope that the client should request from the OP to get 'HYPERCUBE' scope. Default: HYPERCUBE |
| request_scope_CLEANUP | - | CLEANUP | Scope that the client should request from the OP to get 'CLEANUP' scope. Default: CLEANUP |
| request_scope_LICENSES | - | LICENSES | Scope that the client should request from the OP to get 'LICENSES' scope. Default: LICENSES |
| request_scope_USAGE | - | USAGE | Scope that the client should request from the OP to get 'USAGE' scope. Default: USAGE |
| request_scope_AUTH | - | AUTH | Scope that the client should request from the OP to get 'AUTH' scope. Default: AUTH |
| request_scope_CONFIGURATION | - | CONFIGURATION | Scope that the client should request from the OP to get 'CONFIGURATION' scope. Default: CONFIGURATION |
Do not use private OAuth2 client if possible:
We recommend using a public OAuth 2.0 client and not specifying a secret, as Engine UI is a single-page application and cannot store client secrets. However, if this is not possible, you can use a slightly modified version of the Authorization Code Flow and have the API send token requests with the secret on your behalf.
Do not override audience if possible:
By default, JWT tokens are expected to have audience claim matching the hostname in Engine configuration. To change expected audience for this provider, you can provide override_audience. Please try to avoid this. Instead, set the hostname properly in the Engine configuration and in the authorization server. Use this option if the OAuth 2.0 provider does not provide the correct "aud" claim.
{
    "name": "okta",
    "label": "Login via Okta",
    "hidden": false,
    "web_ui_client_id": "0oac41eda688759EE1C7",
    "issuer": "https://dev-xxxxxxxx.okta.com/oauth2/default",
    "authorization_endpoint": "https://dev-xxxxxxxx.okta.com/oauth2/default/v1/authorize",
    "token_endpoint": "https://dev-xxxxxxxx.okta.com/oauth2/default/v1/token",
    "jwks_uri": "https://dev-xxxxxxxx.okta.com/oauth2/default/v1/keys",
    "response_types_supported": [
                                    "code",
                                    "id_token",
                                    "code id_token",
                                    "code token",
                                    "id_token token",
                                    "code id_token token"
                                ],
    "grant_types_supported": ["authorization_code", "implicit", "refresh_token"],
    "token_endpoint_auth_methods_supported": ["client_secret_basic"],
    "end_session_endpoint": "https://dev-xxxxxxxx.okta.com/oauth2/default/v1/logout",
    "request_scope_NAMESPACES": "NAMESPACES",
    "request_scope_JOBS": "JOBS",
    "request_scope_USERS": "USERS",
    "request_scope_HYPERCUBE": "HYPERCUBE",
    "request_scope_CLEANUP": "CLEANUP",
    "request_scope_LICENSES": "LICENSES",
    "request_scope_USAGE": "USAGE",
    "request_scope_AUTH": "AUTH",
    "request_scope_CONFIGURATION": "CONFIGURATION"
}
In this example, we can skip specifying the "request_scope_XXX" parameters
because we use the default values. Also, Okta provides an OIDC discovery
mechanism, so we can use the discovery instead of entering some values
manually. POST /auth/oauth2-providers with body:
{
    "name": "okta",
    "label": "Login via Okta",
    "hidden": false,
    "web_ui_client_id": "0oac41eda688759EE1C7",
    "issuer": "https://dev-xxxxxxxx.okta.com/oauth2/default",
    "use_oidc_discover": true
}
When you use "use_oidc_discover", Engine queries the
URL that is your issuer plus
"/.well-known/openid-configuration". In this example,
that would be "https://dev-xxxxxxxx.okta.com/oauth2/default/.well-known/openid-configuration"
When you use "use_oauth2_auth_server_metadata", Engine queries the URL that is your issuer plus "/.well-known/oauth-authorization-server". In this example, that would be "https://dev-xxxxxxxx.okta.com/oauth2/default/.well-known/oauth-authorization-server"
3. Giving Permissions to Inviters to Invite with Identity Providers
Since granting permissions to invitees when using LDAP is identical to OAuth 2.0, this section is just a copy so as not to interrupt the flow of reading.
If Engine is your only identity provider, inviters in your system can invite with Engine without specifying which identity provider the invitee can log in with.
Users with admin role can invite with any identity provider available in Engine. Inviters can invite only with identity providers for which they have permissions. Using an identity provider at login does not mean that the inviter can invite with it.
To query the list of identity providers a user can invite with, you can use the GET /users/inviters-providers/{username} endpoint. If you are an inviter, you can query users in your subtree. If you are an administrator, you can query everyone.
Similarly, to update the list of identity providers a user can invite with, you can use the PUT /users/inviters-providers/{username} endpoint. If you are an inviter, you can update inviters in your subtree. If you are an admin, you can update allowed identity providers for each inviter.
Let's say we have an inviter named johndoe, then we can give the inviter
permissions to the new identity provider.
PUT /users/inviters-providers/johndoe with body:
{
    "name": ["gams_engine", "okta"]
}
After that, johndoe can invite users with both the default provider
"gams_engine" and the newly added provider "okta". Omitting
"gams_engine" from this list would prohibit the inviter from using the default
identity provider when inviting.
4.a.1 Inviting with an OAuth 2.0 Identity Provider with subject
Inviting with an identity provider is similar to inviting before the introduction of the identity providers feature. In addition to the fields you have already specified, you must specify identity_provider_name and optionally identity_provider_user_subject field.
Specifying an identity provider when inviting
If you have not added any external identity providers, you do not need to specify identity_provider_name and identity_provider_user_subject. By default, Engine uses the identity provider "gams_engine". However, if you have more than 1 identity provider that you can invite with, you must specify these fields because Engine cannot know which one you want to use.
POST /users/invitation with body:
{
    "namespace_permissions": ["7@global"],
    "identity_provider_name": "okta",
    "identity_provider_user_subject": "jane@somecompanymail.com"
}
Returns:
{
    "invitation_token": "257bec97-8454-4f56-bedb-9e5ab23ca0a7"
}
The identity_provider_user_subject field specifies the identity of
the user in the specified identity provider. How this field is used depends on
the type of identity provider. For identity providers of the OAuth type, this
value needs to match the "sub"(subject) claim.
If you do not know the user's subject claim, you can leave identity_provider_user_subject empty. If this field is left empty, the user will have to provide a valid access token at the time of registration.
4.a.2 Registering when using an OAuth 2.0 identity provider with subject
We have invited the user "jane@somecompanymail.com" from Okta, but the user cannot log in to Engine because she has to register first. Registering with Engine is necessary because the unique identifier of the user may already exist in Engine. Therefore, the username in Engine may be different from the username in OAuth. And in this case, the subject in the external identity provider contains invalid characters ("@") for an Engine username.
The new user registers with a request to POST /users/ with body:
{
    "invitation_code": "257bec97-8454-4f56-bedb-9e5ab23ca0a7",
    "username": "jane"
}
Please note that the subject in OAuth "jane@somecompanymail.com" is different
from the username in Engine "jane".
4.b.1 Inviting with an OAuth 2.0 Identity Provider without subject
There may be cases where you do not know the user subject, or you do not want to tie the invitation to a specific user subject. In that case, you can specify only the identity_provider_name field and leave identity_provider_user_subject field empty.
POST /users/invitation with body:
{
    "namespace_permissions": ["7@global"],
    "identity_provider_name": "okta",
}
Returns:
{
    "invitation_token": "a5940eff-6837-4799-b477-646f32f9daca"
}
4.b.2 Registering when using an OAuth 2.0 identity provider without subject
We have invited a user from Okta, but the user cannot log in to Engine because she has to register first. Registering with Engine is necessary because the unique identifier of the user may already exist in Engine. Therefore, the username in Engine may be different from the username in OAuth 2.0.
The new user registers with a request to POST /users/ with body:
{
    "invitation_code": "a5940eff-6837-4799-b477-646f32f9daca",
    "username": "jane",
    "identification_token": "eyJhbGciOiJIUzI1NiIsInR5cCI6IkpXVCJ9.eyJzdWIiOiIxMjM0NTY3ODkwIiwibmFt....."
}
Please note that the user must specify a valid access token (not an ID token) in the
identification_token field when registering, because we invited them
without specifying a user subject. Engine will figure out the user subject from the
access token.
5. Login via an OAuth 2.0 Identity Provider
If you do not use Engine UI, Engine will not help you with the login process. Engine API wants a correctly signed JWT token from your OP that matches the subject you specified and Engine hostname, but how you get this token is outside the scope of Engine API.
Engine UI can perform "Authorization Code Flow" with PKCE verifier. If your identity provider is not hidden, when you go the login page, you will see a button for logging in with your identity provider.
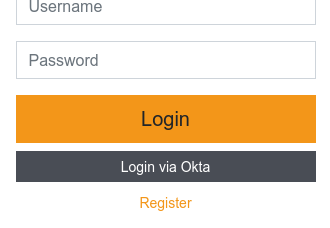
If you have correctly specified web_ui_client_id and your identity provider parameters, you are redirected to your identity provider for login. After successful login, your identity provider will redirect you back to the Engine UI URL. Engine UI receives a JWT token from your provider and uses this token when communicating with Engine API.
If you have set the hidden parameter to true (perhaps you don't want the button to appear in the UI), you can still initiate the flow by appending the query "provider=your_provider_name" to your login URL, e.g: "https://engine.somecompanynamehere.com/login?provider=okta"
Login via an OAuth 2.0 Identity Provider with private client
Please recall our warning about private OAuth 2.0 clients. However, if it is not possible to get a public client, this section describes how the "Authorization Code Flow" is slightly modified to make it work with Engine UI.
Before understanding the modified version, you should understand the original
version. Here is the figure 3 from
RFC6749.
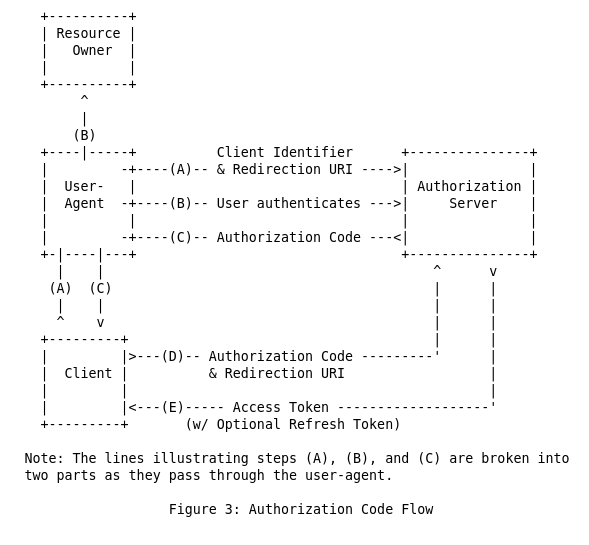 The resource owner is you. The user-agent is your browser, the client is Engine UI
and the authorization server is your identity provider, e.g okta. We will not
dive into details of how it works but you can read
this
blog post from auth0 to get a better understanding.
The resource owner is you. The user-agent is your browser, the client is Engine UI
and the authorization server is your identity provider, e.g okta. We will not
dive into details of how it works but you can read
this
blog post from auth0 to get a better understanding.
Engine UI cannot make the request (D) because it does not have the client secret. In the modified version, instead of exchanging the authorization code with access token directly, it passes the authorization code to Engine API. Since Engine API has the client secret, it performs the exchange on your behalf and returns the access token to you. The endpoint for doing that is POST /auth/oauth2-token and Engine UI automatically does this request when the OAuth 2.0 provider has a secret.
Troubleshooting OAuth 2.0 Identity Provider
Many things can go wrong when authenticating with OAuth 2.0 and we have put together some tips for you.
Make sure you have registered. Even if you specified all parameters correctly when adding the identity provider, users will not be able to log in to Engine if they are not invited and registered!
JWT tokens are inserted into the "Authorization" header and their value is preceded by "Bearer". Example: "Authorization: Bearer eyJhbGciOiJIUzUxMiIsInR5cCI6ImF0K2p3dCJ9.eyJpc3MiOiJodHRwOi...8wX2lkIjo.xxx"
You can also use jwt.io to see if your token is a valid JWT. No need to verify its signature.
You've your JWT token but Engine API does not accept it
This section assumes that you've managed to get a token but Engine API does not accept it. When we say "Check if your JWT contains this" or similar statements, you need to decode your JWT and see if the claim we ask for is there. We suggest that you use jwt.io to do this. And be careful with copy/pasting JWTs as they are used to grant permissions. Treat them like passwords.
You get 403
This is good news! Engine API knows who you are, but it does not believe that you are authorized to access the resource. It could be the case that you really are not authorized to access this resource, for example, a non-admin cannot update the Engine license (and it does not matter if you have "LICENSES" scope). Or, your JWT is missing the required scopes to access this resource. If you think the latter is the case, you can examine your JWT and determine if it contains the required scopes. Engine API looks for "scp" or "scope" claims.
You get 401
There can be several reasons why you receive a 401 error code. We recommend checking the following items in the order in which we present them.
GAMS Engine version 23.01.09 had "auth token" instead of "access token" in the following logs.
Make sure that the JWT has the correct "issuer" claim. The "issuer" claim must match the "issuer" parameter of the identity provider exactly. You can check the identity provider's issuer and compare it to the "issuer" claim in the JWT. Also, in the broker container's logs, you would see INFO Error while decoding an access token, unknown issuer(Base64 encoded): ...
Make sure that the JWT contains the correct "sub" claim. The "sub" claim must match the "identity_provider_user_subject" that you specified when you invited the user. Also, in the broker container's logs, you would see WARNING Error while processing an access token, token was good but no user registered using that IDP. ...
The logs of the broker container contains detailed information about failed login attempts via JWTs. You can look for the lines
- Invalid token error while decoding an access token, claimed issuer: ..., reason: ...
- PyJWK client error while decoding an access token, claimed issuer: ..., reason: ...
- JSONDecodeError client error while decoding an access token, claimed issuer: ..., reason: ...
- socket.timeout error while decoding an access token, claimed issuer: ...
You cannot get JWT with Engine UI
If you see the message: There does not appear to be a GAMS Engine user associated with your account. Please register first. this means that you received a JWT, but it did not work. You can check your browser's network logs to see if you received a 401 or 403.
Besides that most common errors are:
- Incorrect web_ui_client_id
- Incorrect web_ui_client_secret
- Incorrect CORS settings
OpenID Connect, OIDC, Identity Providers
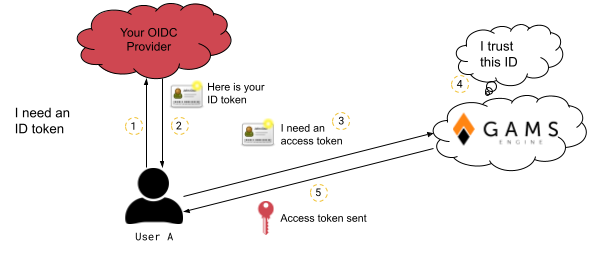
OIDC is an extension of OAuth 2.0, which is also widely used. The main difference between OIDC and OAuth 2.0 is that OIDC solves the authentication problem instead of the authorization problem. When you use an OIDC identity provider, it provides ID tokens to validate who you are, but it does not say what you can access. This removes the burden of providing Engine API information to your identity provider.
Here is how an OIDC identity provider can be used in Engine:
- Configure your OIDC provider
- Admin adds the identity provider to Engine
- Admin gives permission to an inviter to invite with this identity provider
-
The inviter invites the user and the user registers
- If you want to specify a user subject
- If you do not want to specify a user subject
- User logs in to Engine using that identity provider
1. Configuring your OIDC provider
You must register clients with your OIDC provider to obtain ID tokens. We do not recommend using existing clients. After creating the clients, note the client IDs and client secrets (if any). You'll need one client for the Engine UI.
2. Adding an OIDC Identity Provider
To add a new identity provider, you need a user with the admin role. Let's describe the parameters required to add a new OIDC identity provider.
| Parameter | Required | Example | Description |
|---|---|---|---|
| name | google-oidc | A unique string to identify the identity provider | |
| label | Login via Google | Suggested login button string | |
| hidden | false | Should the identity provider be listed when all identity providers are listed? | |
| web_ui_client_id | 0oac41eda688759EE1C7.apps.googleusercontent.com | OAuth 2.0 client id that should be used by Engine UI while logging in | |
| web_ui_client_secret | - | somelongandsecuresecret | OAuth 2.0 client secret that should be used by Engine UI while logging in. |
| device_client_id | - | 0ofc41edaAIKF59EE1C8.apps.googleusercontent.com | OAuth 2.0 client ID, which should be used by clients that do not have browser access. This can be a private client, unlike OAuth 2.0-type identity providers. |
| device_client_secret | - | anothersecuresecret | Device OAuth 2.0 client secret. |
| extra_client_ids | - | client_id_a, client_id_b | Engine only accepts ID tokens whose audience matches the web_ui_client_id or device_client_id. To add more clients from which Engine will accept ID tokens, you can provide a list of additional client IDs. |
| issuer | https://accounts.google.com | URL using the https scheme with no query or fragment component that the OIDC provider asserts as its Issuer Identifier. Unlike OAuth 2.0 the issuer does not need to be unique amongst other OIDC providers. | |
| use_oidc_discover | - | false | Should OpenID Connect Discovery be used. Fetches information from issuer URL appended with /.well-known/openid-configuration Default: false |
| authorization_endpoint | Required unless discovery is used. | https://accounts.google.com/o/oauth2/v2/auth | URL of the OP's OAuth 2.0 Authorization Endpoint (ignored if discovery is used) |
| token_endpoint | Required unless discovery is used. | https://oauth2.googleapis.com/token | URL of the OP's OAuth 2.0 Token Endpoint (ignored if discovery is used) |
| jwks_uri | Required unless discovery is used. | https://www.googleapis.com/oauth2/v3/certs | URL of the OP's JSON Web Key Set document (ignored if discovery is used). |
| end_session_endpoint | - | URL in the OP to which the Engine UI can redirect to prompt the end user to be logged out of the OP (ignored if discovery is used). | |
| device_authorization_endpoint | - | https://oauth2.googleapis.com/device/code | URL of the authorization server's device authorization endpoint (ignored if discovery is used) |
| token_endpoint_auth_methods_supported | - | client_secret_basic client_secret_post | Array containing a list of client authentication methods supported by the OP's token endpoint (ignored if discovery is used). |
| scopes | ["openid", "profile", "email"] | The scopes that will be requested from the OP | |
| uid | - | The claim that serves as the unique identifier for identifying users. The default and highly recommended value is sub (Subject). This claim is designed by the OIDC specification to be a unique, non-reassignable, and permanent identifier for the user. Warning: Ensure the chosen claim is guaranteed to be unique for every user and does not change over time. Using a mutable value like an email address can lead to account access issues if the user's email changes. |
{
    "name": "google",
    "label": "Login via Google",
    "hidden": false,
    "web_ui_client_id": "0oac41eda688759EE1C7.apps.googleusercontent.com",
    "web_ui_client_secret": "some_client_secret",
    "device_client_id": "0ofc41edaAIKF59EE1C8.apps.googleusercontent.com",
    "device_client_secret": "anothersecuresecret",
    "issuer": "https://accounts.google.com",
    "authorization_endpoint": "https://accounts.google.com/o/oauth2/v2/auth",
    "token_endpoint": "https://oauth2.googleapis.com/token",
    "jwks_uri": "https://www.googleapis.com/oauth2/v3/certs",
    "device_authorization_endpoint": "https://oauth2.googleapis.com/device/code",
    "scopes": ["openid", "profile", "email"]
}
Google provides an OIDC discovery mechanism, so we can use the discovery
instead of entering some values manually. POST /auth/oidc-providers
with body:
{
    "name": "google",
    "label": "Login via Google",
    "hidden": false,
    "web_ui_client_id": "0oac41eda688759EE1C7",
    "web_ui_client_secret": "some_client_secret",
    "device_client_id": "0ofc41edaAIKF59EE1C8",
    "device_client_secret": "anothersecuresecret",
    "issuer": "https://accounts.google.com",
    "use_oidc_discover": true,
    "scopes": ["openid", "profile", "email"]
}
When you use "use_oidc_discover", Engine queries the
URL that is your issuer plus
"/.well-known/openid-configuration". In this example,
that would be "https://accounts.google.com/.well-known/openid-configuration"
3. Giving Permissions to Inviters to Invite with Identity Providers
If Engine is your only identity provider, inviters in your system can invite with Engine without specifying which identity provider the invitee can log in with.
Users with admin role can invite with any identity provider available in Engine. Inviters can invite only with identity providers for which they have permissions. Using an identity provider at login does not mean that the inviter can invite with it.
To query the list of identity providers a user can invite with, you can use the GET /users/inviters-providers/{username} endpoint. If you are an inviter, you can query users in your subtree. If you are an administrator, you can query everyone.
Similarly, to update the list of identity providers a user can invite with, you can use the PUT /users/inviters-providers/{username} endpoint. If you are an inviter, you can update inviters in your subtree. If you are an admin, you can update allowed identity providers for each inviter.
Let's say we have an inviter named johndoe, then we can give the inviter
permissions to the new identity provider.
PUT /users/inviters-providers/johndoe with body:
{
    "name": ["gams_engine", "google"]
}
After that, johndoe can invite users with both the default provider
"gams_engine" and the newly added provider "google". Omitting
"gams_engine" from this list would prohibit the inviter from using the default
identity provider when inviting.
4.a.1 Inviting with an OIDC Identity Provider with subject
Inviting with an identity provider is similar to inviting before the introduction of the identity providers feature. In addition to the fields you have already specified, you must specify identity_provider_name and identity_provider_user_subject.
Specifying an identity provider when inviting
If you have not added any external identity providers, you do not need to specify identity_provider_name and identity_provider_user_subject. By default, Engine uses the identity provider "gams_engine". However, if you have more than 1 identity provider that you can invite with, you must specify these fields because Engine cannot know which one you want to use.
POST /users/invitation with body:
{
    "namespace_permissions": ["7@global"],
    "identity_provider_name": "google",
    "identity_provider_user_subject": "geralt@somecompanymail.com"
}
Returns:
{
    "invitation_token": "85fbc868-654d-4a12-a323-58610b26c644"
}
The identity_provider_user_subject field specifies the identity of
the user in the specified identity provider. How this field is used depends on
the type of identity provider. For identity providers of type OIDC, this value
must match the claim that is specified by the uid. The default
is the "sub" (subject) claim.
4.a.2 Registering when using an OIDC identity provider with subject
We have invited the user "geralt@somecompanymail.com" from Google, but the user cannot log in to Engine because he has to register first. Registering with Engine is necessary because the unique identifier of the user may already exist in Engine. Therefore, the username in Engine may be different from the username in OAuth. And in this case, the subject in the external identity provider contains invalid characters ("@") for an Engine username.
The new user registers with a request to POST /users/ with body:
{
    "invitation_code": "85fbc868-654d-4a12-a323-58610b26c644",
    "username": "geralt"
}
Please note that the subject in OAuth "geralt@somecompanymail.com" is different
from the username in Engine "geralt".
4.b.1 Inviting with an OIDC Identity Provider without subject
There may be cases where you do not know the user subject, or you do not want to tie the invitation to a specific user subject. In that case, you can specify only the identity_provider_name field and leave identity_provider_user_subject field empty.
POST /users/invitation with body:
{
    "namespace_permissions": ["7@global"],
    "identity_provider_name": "google",
}
Returns:
{
    "invitation_token": "f13f0a78-5b2f-4721-857f-610ee985d030"
}
4.b.2 Registering when using an OIDC identity provider without subject
We have invited a user from Google, but the user cannot log in to Engine because he has to register first. Registering with Engine is necessary because the unique identifier of the user may already exist in Engine. Therefore, the username in Engine may be different from the username in OAuth.
The new user registers with a request to POST /users/ with body:
{
    "invitation_code":  "f13f0a78-5b2f-4721-857f-610ee985d030",
    "username": "geralt",
    "identification_token": "eyJhbGciOiJIUzI1NiIsInR5cCI6IkpXVCJ9.eyJzdWIiOiIxMjM0NTY3ODkwIiwibmFt....."
}
Please note that the user must specify a valid ID token (not an access token) in the
identification_token field when registering, because we invited them
without specifying a user subject. Engine will figure out the user subject from the
ID token.
5. Login via an OIDC Identity Provider
If you are not using the Engine UI, you must obtain an ID token yourself. Engine API wants a correctly signed ID token from your OP that matches the subject you specified. In addition, the audience of the ID token should match one of the client ids that is provided.
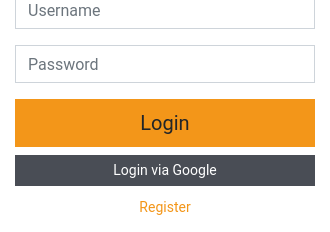
Engine UI can perform "Authorization Code Flow" with PKCE verifier to obtain ID Token. If your identity provider is not hidden, when you go the login page, you will see a button for logging in with your identity provider.
If you have correctly specified web_ui_client_id and your identity provider parameters, you are redirected to your identity provider for login. After successful login, your identity provider will redirect you back to the Engine UI URL. Engine UI receives an ID token from your provider and exchanges this ID token for an access token to communicate with the Engine API.
ID tokens are not access tokens
You must exchange your ID token for an access token using the Engine API to make API calls. Engine does not accept ID tokens in the authorization header, you need to provide an (Engine-signed) access token in the authorization header.
You can get an access token from Engine by making a request to POST /auth/oidc-providers/login endpoint with your ID token in the body.
ID tokens are one-time only, you cannot reuse them to get multiple access tokens.
If you have set the hidden parameter to true (perhaps you don't want the button to appear in the UI), you can still initiate the flow by appending the query "provider=your_provider_name" to your login URL, e.g: "https://engine.somecompanynamehere.com/login?provider=google"
Quotas
GAMS Engine allows you to limit the solve time as well as the disk usage of individual users or groups of users.
Note:
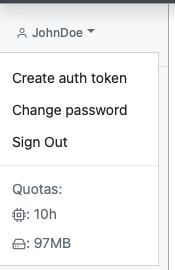
In the GAMS Engine UI, you can view your remaining quota by clicking on your username in the upper left corner.
Let's take the user hierarchy from the previous section on user management to give you an example of how quotas work:
Only admins and inviters can update quotas of users. While admins can update the quotas of all users, inviters can only update the quotas of direct/indirect invitees (we also call this the "subtree" of an inviter). An inviter cannot assign a quota larger than his own
There are three types of quotas that can be assigned: volume_quota, disk_quota and parallel_quota (only used in Engine Kubernetes version).
If "Admin" sets the volume_quota of "Student 1" to 60 seconds, the student can only run jobs for one minute. If the quota is exceeded, new jobs submitted by "Student 1" are rejected by Engine. In addition, currently active jobs are canceled (using SIGKILL) when the volume quota of the user who submitted the job is exhausted.
If "Admin" sets the volume_quota of "Teacher" to 1800 seconds, it means that the "Teacher", "Student 1", "Student 2", "Assistant" and anyone invited by the "Assistant" can run GAMS for a total of 1800 seconds. This allows administrators to invite new "entities" by creating a new inviter that has quotas assigned to it. Both the inviter and anyone invited by that inviter are now limited by those quotas.
Quotas allow further restrictions. Imagine the case where "Admin" has assigned 1800 seconds of volume_quota to "Teacher". As an inviter, "Teacher" can give students any volume_quota that is less than or equal to 1800 seconds. "Teacher" could give "Student 1" and "Student 2" each 600 seconds and "Assistant" 800 seconds. In this case, "Student 1" can use up to 600 seconds, "Student 2" can use up to 600 seconds, and "Assistant" can use up to 800 seconds.
Quotas allow for overbooking. An attentive reader may have noticed that in the last example, the teacher had 1800 seconds, but she provided a total of 2000 seconds for her invitees. This does not mean that the teacher's subtree had a total of more than 1800 seconds. When "Student 1" and "Student 2" have used up their entire allotment, the "Assistant" still has 600 seconds left. Therefore, he can no longer use up the full 800 seconds allocated to him by the teacher.
disk_quota is used to limit the disk usage of a user as well as the user's invitees (if any). The following files contribute to disk usage:
- Temporary/unregistered models
- Additional data provided with the (Hypercube) job
- Inex files provided with the (Hypercube) job
- (Hypercube) job results
If the disk_quota is exceeded, GAMS Engine rejects all new jobs submitted by users who have exceeded their quotas. When a worker receives a job from a user whose disk_quota is exceeded, it is cancelled.
The disk space used during solving does not contribute to the disk_quota. A job could use more disk space during solving, but only upload a small portion (perhaps a result GDX file) and would not violate the quota.
Unlike volume_quota, disk_quota has a grace space. When a job is solved, it might be undesirable to refuse to upload the result because the disk_quota is exceeded. In this scenario, the result will be uploaded if it does not exceed disk_quota + 1GB. If the grace space is also exceeded, the job is marked as "Corrupted" and the results are not available.
disk_quota allows you to limit unregistered files. To limit registered files, such as registered models, inex files, etc. admins can assign a disk_quota to namespaces (available via the /namespaces/{namespace}/disk-quota API).
Similar to the volume_quota, the disk_quota allows further restrictions for invited users as well as overbooking.
Resource requests Engine SaaS/Engine K
While jobs in Engine One share available resources, in Engine SaaS and Engine K you must assign resource requests to a job. Engine then takes care of scheduling these heterogeneous jobs on the available hardware. Assigning resource requests is done via the labels field in the POST /jobs/ / POST /hypercube/ endpoints.
The labels field is an array of key=value pairs. The following table lists the available keys for assigning resource requests:
| Key | Required | Example | Description |
|---|---|---|---|
| cpu_request | cpu_request=8 | CPU units (vCPU/Core, Hyperthread) to be reserved for the job | |
| memory_request | memory_request=1000 | Memory to be reserved for the job, in MiB | |
| workspace_request | workspace_request=2000 | Workspace (hard disk) space to be reserved for the job, in MiB | |
| tolerations | - | tolerations=key1=value1,tolerations=key2=value2 | Array of node taints this job should tolerate (see the Kubernetes documentation for more details) |
| node_selectors | - | node_selectors=key1=value1,node_selectors=key2=value2 | Array of node labels this job should be scheduled on. The job can be scheduled only on a node that has all the specified labels (see the Kubernetes documentation for more details) |
Assigning resource requests directly to a job is very powerful and flexible. However, you may want to limit which resources your users can use. Also, users usually don't need this level of flexibility. This is where the concept of instances comes into play, which will be described in the next chapter.
Instances Engine SaaS/Engine K
Instances are a way to bundle resource requests under a single label. For example, we could define a new instance with 4 vCPU, 4000 MiB of memory and a workspace size of 10000 MiB and assign it the label small. Instead of assigning the resource requests directly to the job, we can assign the instance label instead (e.g. "small"). Internally, this label is then replaced by the corresponding resource requirements. We do this using the key: instance; in our example: instance=small. If you use the instance label, you cannot use one of the labels to specify resources directly at the same time, and vice versa.
Instances can be assigned to users via the PUT /usage/instances/{username} endpoint. When a user is assigned instances, they can no longer use the raw resource requests (cpu_request, memory_request etc.). Instead, they must select from one of the instances assigned to them. When instances are assigned to a user, a default instance should also be selected. If the user does not specify an instance for a job, this default instance is used. Users can update their own default instance via the PUT /usage/instances/{username}/default endpoint.
If a user has no instances assigned, she inherits the instances from her inviter. If the inviter itself has no instances assigned or inherits them from its inviter, the user can use raw resource requests or select an arbitrary instance. The list of all available instances can be queried via the GET /usage/instances endpoint. Users who do not have instances assigned can still select a default instance for convenience. Admins cannot be assigned instances.
Note:
Once a user has been assigned instances (even an empty list of instances), they cannot use all instances/raw resource requests unless the instance assignment is explicitly removed (with the DELETE /usage/instances/{username} endpoint). This means that removing an existing instance cannot lead to a user suddenly being able to use all instances if this was the last instance assigned to him.
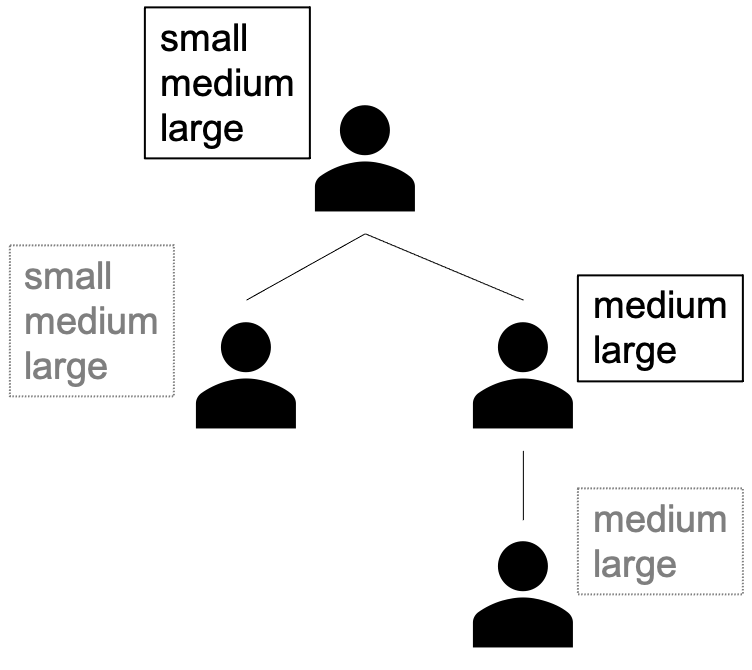
When you invite new users, you cannot assign instances to which you do not have access yourself. Thus, the invitees can only be further restricted in terms of permissible instances.
Below is an example of how instances are inherited. Boxes with a dashed gray border indicate that instances are not directly assigned to the user, but he inherits them from his inviter. Boxes with a solid black border indicate that instances are explicitly assigned to the user.
When creating a new instance, you have to specify both a multiplier as well as a multiplier_idle. Every second that a job runs on this instance, the multiplier is subtracted from the volume quota of the user who created that job. While a worker is idle in an instance pool, the multiplier_idle is subtracted from the volume quota of the user who created the pool.
Instance Pools
When you create a new job on Engine SaaS/Engine K, a new worker (a Kubernetes job) is created with the specified resources. Depending on whether or not the required resources already exist in the cluster, new resources may need to be added to the cluster first (if the cluster supports this, e.g. in cloud environments such as Engine SaaS and Engine K). Adding resources to the cluster, as well as creating a worker, involves some overhead that may be undesirable, especially if you have time-critical or short-running jobs.
In such situations, you may prefer to create an instance pool: a number of workers with a homogeneous instance and a custom label to uniquely identify the pool. Instance pools can be created (via the POST /usage/pools endpoint) for any instance you have access to and can be scaled up or down at any time. When creating an instance pool, the specified number of workers is created (with the overhead mentioned above). These workers continue to run until the instance pool is either scaled down (via the PUT /usage/pools endpoint) or deleted (via the DELETE /usage/pools endpoint).
To run a job in an instance pool, simply specify the label of the pool as the instance. For example, to run a job in a pool named my_pool, specify: instance=my_pool. If there are free workers in the pool, the job is started immediately. If all workers in the pool are busy, the job is queued.
When you reduce the number of workers in a pool, Engine will first try to shut down workers that are not busy. If there are not enough free workers available, busy workers are shut down. The jobs on these workers are re-queued.
While a job is running, the multiplier of the instance is subtracted from your volume quota every second. If a worker is idle, the multiplier_idle is used instead.
Instance pools can be assigned and inherited just like instances. When you create an instance pool, your inviter (and all its ancestors) can access your pool.
To retrieve all instance pools that a user has access to, use the GET /usage/pools/{username} endpoint (admins can also retrieve all instance pools using the GET /usage/pools endpoint).
An instance pool can be set as a default instance just like a normal instance using the PUT /usage/instances/{username}/default endpoint.
Cleanup
Over time, the amount of disk space required on the server can grow accordingly. It is the responsibility of the admin to ensure that the result data is deleted when required. Engine API provides a cleanup endpoint for this purpose.
When working with Engine UI, you can reduce the amount of disk space used by GAMS Engine using the Cleanup view. You can either remove result files of individual jobs one by one or clean up multiple files at once using the Run housekeeping dialog. This allows you to remove all files created more than x days ago and/or files created by users who have been removed from the system.

Tip for Administrators:
If you notice a significant difference between the disk usage report and the actual disk usage, you can manually examine the files. GAMS Engine has its own container for housekeeping purposes. In case of network interruptions or other unusual events, automatic housekeeping may be disrupted. In this case, you can always force the process manually.
Assuming you have access to the cleaner container, you can get a status report using the commands: docker exec cleaner_container_name kill -10 1 and docker logs cleaner_container_name.
You can force the cleaner to manually check and delete the files that should be deleted. To do this, run: docker exec cleaner_container_name kill -12 1
Logging
For production servers, we recommend tracking logs of GAMS Engine to ensure system stability. You can use solutions such as EFK or ELK stack. Regardless of which solution you use, you need to familiarize yourself with GAMS Engine's core parts and their logging formats.
In GAMS Engine, we chose RabbitMQ as the message broker solution. When the cluster is first spun up, RabbitMQ creates the necessary queues, exchanges, and users. This part of the process creates non-standard protocols. However, it is usually okay to skip this part as it is only done once. After that, the logging format is standard. An example of a RabbitMQ log entry: 2021-10-20 11:46:16.006 [info] <0.941.0> accepting AMQP connection <0.941.0> (172.19.0.5:46598 -> 172.19.0.2:5672)
We chose PostgreSQL to store most of the structured data. Similar to RabbitMQ, PostgreSQL also creates the required tables and users on the first run, so it creates non-default logs. Skipping these logs should not be a problem either, as they are only issued once. An example of a PostgreSQL log entry: 2021-10-20 11:46:02.076 UTC [1] LOG: database system is ready to accept connection
MongoDB stores some of the structured data and all of the unstructured data. Its bootstrap process is also similar to RabbitMQ and PostgreSQL. A sample log of MongoDB looks like this: 2021-10-20T11:46:07.054+0000 I NETWORK [initandlisten] waiting for connections on port 27017
The logging format of the Worker,Cleaner,Hypercube Unpacker,Hypercube Appender, Dependency Checker,Job Watcher,Job Spawner, Job Canceler,Event Manager,Forward Proxy containers is standardized. An example log a worker is [20/10/2021 11:46:16] INFO #: Waiting for job.. The hash sign (#) after the severity (INFO) indicates which job is associated with this log. In this case, no job is associated with this log. Another log of a worker: [20/10/2021 12:11:54] INFO 1: Job Received indicates that the worker got the job with id 1. For Hypercubes, the log format is different. For example [20/10/2021 12:13:18] DEBUG 4@617007d8917cb774979dab76: Working directory cleaned this log refers to the the 4th job of the Hypercube job 617007d8917cb774979dab76. This log format facilitates the retrieval of logs that refer to a single job from multiple containers.
The REST API backend log format is different from the other log formats. We should address that the backend is reverse proxied by nginx. The log format of nginx is different from the backend log format. An example log is 172.22.0.1 - - [20/Oct/2021:12:12:58 +0000] "GET /api/jobs/status-codes HTTP/1.1" 200 385 "http://localhost:30001/" "Mozilla/5.0 (X11; Ubuntu; Linux x86_64; rv:93.0) Gecko/20100101 Firefox/93.0" "-" 799 Note that in addition to the default combined log format, the $request_length is also logged as the last parameter. Behind the nginx is a WSGI application. A sample log looks like this: [pid: 13] 172.22.0.1 (admin 1) [20/Oct/2021:12:13:01 +0000] apis.ns_users INFO User 'admin' listed all the users. We also log the user ID after the user name because it is possible to change the user name. However, the logs that come from uWSGI do not log the user ID. [pid: 13] 172.22.0.1 (-) [20/Oct/2021:12:11:49 +0000] uwsgi INFO {36 vars in 401 bytes} [Wed Oct 20 12:11:49 2021] GET /api/version => generated 72 bytes in 6 msecs (HTTP/1.1 200) 3 headers in 108 bytes (1 switches on core 0)
Pro Tip for Administrators:
You can change log format for containers to include milliseconds in the timestamps.
The following containers accept the new GMS_RUNNER_LOG_SHOW_MSEC environment variable to add milliseconds to timestamps in log entries:
- Broker*
- Worker
- Cleaner
- Hypercube Unpacker
- Hypercube Appender
- Dependency Checker
- Job Watcher
- Job Spawner
- Job Cleaner
- Job Canceler
Monitoring
Monitoring the endpoints of your cluster can be valuable in terms of being proactive about solving the potential bottlenecks in the cluster. GAMS Engine provides /api/metrics endpoint to monitor the endpoints of the api. This feature is not enabled by default. It can be enabled by providing environment variables PROMETHEUS_AUTH_USERNAME and PROMETHEUS_AUTH_PASSWORD to the broker for authentication. An example scrape config for Prometheus to suck in the information exposed by the metrics endpoint would look like the following:
- job_name: 'api-metrics-exporter'

  scrape_interval: 5s
  static_configs:
    - targets: ['localhost:80/api/metrics']
For visualization, an example Grafana dashboard can be found at Prometheus Flask Exporter
Webhooks
Instead of polling Engine for specific events, such as when a particular job has finished, Engine also supports sending this information in the form of webhooks: HTTP POST requests to a specified URL. Per default, webhooks are disabled. However, you can enable it either for administrators only or for everyone via the configuration API. A webhook configuration consists of the following components:
URL
The URL that receives the payload of the HTTP POST request.
Content Type
The media type used to serialize the data. Possible values are form (default) and json. When choosing form, the content type will be set to application/x-www-form-urlencoded, when choosing json, the content type will be application/json.
Secret
If a secret is specified, an additional header: X-ENGINE-HMAC is sent, which contains the HMAC (SHA-256) of the (raw) request body. The secret must be at least 8 characters long. Below is an example of HMAC validation in Node.js:
const crypto = require('crypto');
const validateHmac = (requestHeaders, requestBody, secret) => {
  if (!('x-engine-hmac' in requestHeaders)) {
    return false;
  }
  const hmac = crypto.createHmac('sha256', secret);
  const signature = Buffer.from(requestHeaders['x-engine-hmac'], 'utf8');
  const digest = Buffer.from('sha256=' + hmac.update(requestBody).digest('hex'), 'utf8');
  return crypto.timingSafeEqual(digest, signature);
}
Recursive
When the recursive flag is set, the webhook applies not only to events of the webhook owner, but also to all her invitees. If the webhook owner is an administrator, a recursive webhook applies to each user's events.
Events
The events to subscribe to. A list of possible events and their payloads is given below. The special ALL event can be specified to subscribe to all events.
Parameterized Events
Certain events (e.g. reaching a certain volume quota threshold or order duration) require parameters. These events must be specified in the form EVENT_NAME=EVENT_PARAMETER (e.g. VOLUME_QUOTA_THRESHOLD=3600 to be notified when the remaining volume quota falls below a threshold of 3600 seconds).
Insecure SSL
If this flag is set, no SSL certificate validation is performed when the webhook is sent over SSL. We strongly recommend that you do NOT disable certificate validation for security reasons.
Web Push
Engine allows users to add Web Push
subscriptions to webhooks. In addition to sending the payload of the event to the webhook URL (which
is optional), users can register a Web Push subscription to this webhook using the POST
/users/webhooks/webpush API. The endpoint URL of the push server (only HTTPS with trusted
certificate supported) as well as a public ECDH key and an
authentication secret have to be provided. GAMS Engine then encrypts the payload as specified here, adds VAPID headers and sends it to
the push server. The public key used to encrypt the
VAPID JWT token can be queried via the GET /users/webhooks/webpush/vapid endpoint. The GAMS
Engine UI implements this protocol to allow users to receive notifications in their browsers. For more
information, see the Engine UI documentation section.
Webhook events
The request body of a webhook always has the same structure: a JSON-encoded object with the fields: event (string), which specifies the name of the event, username (string), which specifies the name of the user who registered the webhook, payload (object), which contains the payload of the event as well as text (string) and content (string) that both contain a human-readable representation of the event (useful, for example, for getting notified via business communication tools such as Slack, Microsoft Teams, Discord). The payloads for all supported event types are described in detail below.
In case the content type of the webhook is set to form, the entire JSON payload is sent as a form parameter called payload.
An example of a webhook payload of a JOB_FINISHED event is shown below:
{
  "event": "JOB_FINISHED",
  "username": "shanghai",
  "text": "GAMS Engine job of the user: 'shanghai' and token: '46bbf80d-262f-4257-86ee-4881164d6b0c' finished.",
  "content": "GAMS Engine job of the user: 'shanghai' and token: '46bbf80d-262f-4257-86ee-4881164d6b0c' finished.",
  "payload": {
    "token": "46bbf80d-262f-4257-86ee-4881164d6b0c",
    "model": "trnsport",
    "is_temporary_model": true,
    "is_data_provided": false,
    "status": 10,
    "process_status": 0,
    "stdout_filename": "log_stdout.txt",
    "namespace": "global",
    "arguments": [
      "LP=CBC",
      "--bla=def"
    ],
    "labels": null
    "submitted_at": "2022-03-23T09:43:42.783211",
    "finished_at": "2022-03-23T09:43:43.056074",
    "user": {
      "username": "shanghai",
      "deleted": false,
      "old_username": null
    }
  }
}
HC_JOB_DURATION_THRESHOLD
This event is triggered when a job of a Hypercube job runs for a certain time. The threshold value is specified when setting up the webhook.
Webhook payload object
| Key | Type | Description |
|---|---|---|
| token | string | The token of the Hypercube job |
| model | string | The name of the model |
| is_temporary_model | boolean | Whether the solved model is a temporary model or a registered model |
| is_data_provided | boolean | Whether additional data was provided with the model |
| status | integer | The Engine status of the job. The Engine status can be queried via GET /jobs/status-codes |
| namespace | string | The namespace in which the job was executed. |
| arguments | array | Additional command line arguments defined for the job. |
| tag | object | Human-readable tag assigned to job |
| labels | object | Labels that are attached to the job. |
| submitted | string | The date and time of the start of the job (ISO 8601). |
| finished | object | The date and time of completion of the job (ISO 8601). |
| job_count | integer | Number of jobs that make up this Hypercube job. |
| completed | integer | Number of jobs whose execution has been completed. |
| user | object | User who submitted this Hypercube job. |
| threshold_level | integer | The threshold level that was reached (in seconds) |
Webhook payload example
{
  "token": "332f6438-6485-416c-b893-089524259153",
  "model": "trnsport",
  "is_temporary_model": true,
  "is_data_provided": "F",
  "status": 10,
  "namespace": "global",
  "arguments": [
    "LP=CBC",
    "--mode=ENGINE"
  ],
  "tag": "My first job",
  "labels": {
    "cpu_request": 23.7,
    "instance": "z1d.6xlarge",
    "memory_request": 188100,
    "multiplier": 2.5,
    "node_selectors": [
      {
        "key": "gams.com/instanceType",
        "value": "z1d.6xlarge"
      }
    ],
    "resource_warning": "memory",
    "tolerations": [],
    "workspace_request": 50000
  },
  "submitted": "2022-03-17T17:01:37.406000+00:00",
  "finished": "2022-03-17T17:01:39.878000+00:00",
  "job_count": 2,
  "completed": 2,
  "user": {
    "deleted": false,
    "old_username": null,
    "username": "admin"
  },
  "threshold_level": 7200
}
HC_JOB_FINISHED
This event is triggered when a Hypercube job is finished.
Webhook payload object
| Key | Type | Description |
|---|---|---|
| token | string | The token of the Hypercube job |
| model | string | The name of the model |
| is_temporary_model | boolean | Whether the solved model is a temporary model or a registered model |
| is_data_provided | boolean | Whether additional data was provided with the model |
| status | integer | The Engine status of the job. The Engine status can be queried via GET /jobs/status-codes |
| namespace | string | The namespace in which the job was executed. |
| arguments | array | Additional command line arguments defined for the job. |
| tag | object | Human-readable tag assigned to job |
| labels | object | Labels that are attached to the job. |
| submitted | string | The date and time of the start of the job (ISO 8601). |
| finished | string | The date and time of completion of the job (ISO 8601). |
| job_count | integer | Number of jobs that make up this Hypercube job. |
| completed | integer | Number of jobs whose execution has been completed. |
| user | object | User who submitted this Hypercube job. |
Webhook payload example
{
  "token": "332f6438-6485-416c-b893-089524259153",
  "model": "trnsport",
  "is_temporary_model": true,
  "is_data_provided": "F",
  "status": 10,
  "namespace": "global",
  "arguments": [
    "LP=CBC",
    "--mode=ENGINE"
  ],
  "tag": "My first job",
  "labels": {
    "cpu_request": 23.7,
    "instance": "z1d.6xlarge",
    "memory_request": 188100,
    "multiplier": 2.5,
    "node_selectors": [
      {
        "key": "gams.com/instanceType",
        "value": "z1d.6xlarge"
      }
    ],
    "resource_warning": "memory",
    "tolerations": [],
    "workspace_request": 50000
  },
  "submitted": "2022-03-17T17:01:37.406000+00:00",
  "finished": "2022-03-17T17:01:39.878000+00:00",
  "job_count": 2,
  "completed": 2,
  "user": {
    "deleted": false,
    "old_username": null,
    "username": "admin"
  }
}
HC_JOB_OUT_OF_RESOURCES
This event is triggered when a Hypercube job ran out of resources. Note that this event is triggered as soon as the resource is exhausted. This can be before or after the `HC_JOB_FINISHED` event is triggered.
Webhook payload object
| Key | Type | Description |
|---|---|---|
| token | string | The token of the Hypercube job |
| model | string | The name of the model |
| is_temporary_model | boolean | Whether the solved model is a temporary model or a registered model |
| is_data_provided | boolean | Whether additional data was provided with the model |
| status | integer | The Engine status of the job. The Engine status can be queried via GET /jobs/status-codes |
| namespace | string | The namespace in which the job was executed. |
| arguments | array | Additional command line arguments defined for the job. |
| tag | object | Human-readable tag assigned to job |
| labels | object | Labels that are attached to the job. |
| submitted | string | The date and time of the start of the job (ISO 8601). |
| finished | object | The date and time of completion of the job (ISO 8601). |
| job_count | integer | Number of jobs that make up this Hypercube job. |
| completed | integer | Number of jobs whose execution has been completed. |
| user | object | User who submitted this Hypercube job. |
Webhook payload example
{
  "token": "332f6438-6485-416c-b893-089524259153",
  "model": "trnsport",
  "is_temporary_model": true,
  "is_data_provided": "F",
  "status": 10,
  "namespace": "global",
  "arguments": [
    "LP=CBC",
    "--mode=ENGINE"
  ],
  "tag": "My first job",
  "labels": {
    "cpu_request": 23.7,
    "instance": "z1d.6xlarge",
    "memory_request": 188100,
    "multiplier": 2.5,
    "node_selectors": [
      {
        "key": "gams.com/instanceType",
        "value": "z1d.6xlarge"
      }
    ],
    "resource_warning": "memory",
    "tolerations": [],
    "workspace_request": 50000
  },
  "submitted": "2022-03-17T17:01:37.406000+00:00",
  "finished": "2022-03-17T17:01:39.878000+00:00",
  "job_count": 2,
  "completed": 2,
  "user": {
    "deleted": false,
    "old_username": null,
    "username": "admin"
  }
}
JOB_DURATION_THRESHOLD
This event is triggered when a job runs for a certain time. The threshold value is specified when setting up the webhook.
Webhook payload object
| Key | Type | Description |
|---|---|---|
| token | string | The token of the job |
| model | string | The name of the model |
| is_temporary_model | boolean | Whether the solved model is a temporary model or a registered model |
| is_data_provided | boolean | Whether additional data was provided with the model |
| status | integer | The Engine status of the job. The Engine status can be queried via GET /jobs/status-codes |
| process_status | object | The exit status of the GAMS process. |
| stdout_filename | string | The name of the file to which the stdout of the GAMS process is written. |
| namespace | string | The namespace in which the job was executed. |
| tag | object | Human-readable tag assigned to job |
| arguments | array | Additional command line arguments defined for the job. |
| labels | object | Labels that are attached to the job. |
| submitted_at | string | The date and time of the start of the job (ISO 8601). |
| finished_at | object | The date and time of completion of the job (ISO 8601). |
| user | object | User who submitted this job. |
| threshold_level | integer | The threshold level that was reached (in seconds) |
Webhook payload example
{
  "token": "332f6438-6485-416c-b893-089524259153",
  "model": "trnsport",
  "is_temporary_model": true,
  "is_data_provided": true,
  "status": 10,
  "process_status": 0,
  "stdout_filename": "log_stdout.txt",
  "namespace": "global",
  "tag": "My first Hypercube job",
  "arguments": [
    "LP=CBC",
    "--mode=ENGINE"
  ],
  "labels": {
    "cpu_request": 23.7,
    "instance": "z1d.6xlarge",
    "memory_request": 188100,
    "multiplier": 2.5,
    "node_selectors": [
      {
        "key": "gams.com/instanceType",
        "value": "z1d.6xlarge"
      }
    ],
    "resource_warning": "memory",
    "tolerations": [],
    "workspace_request": 50000
  },
  "submitted_at": "2022-03-17T17:01:37.406000+00:00",
  "finished_at": "2022-03-17T17:01:39.878000+00:00",
  "user": {
    "deleted": false,
    "old_username": null,
    "username": "admin"
  },
  "threshold_level": 7200
}
JOB_FINISHED
This event is triggered when a job (not a Hypercube job) is finished.
Webhook payload object
| Key | Type | Description |
|---|---|---|
| token | string | The token of the job |
| model | string | The name of the model |
| is_temporary_model | boolean | Whether the solved model is a temporary model or a registered model |
| is_data_provided | boolean | Whether additional data was provided with the model |
| status | integer | The Engine status of the job. The Engine status can be queried via GET /jobs/status-codes |
| process_status | object | The exit status of the GAMS process. |
| stdout_filename | string | The name of the file to which the stdout of the GAMS process is written. |
| namespace | string | The namespace in which the job was executed. |
| tag | object | Human-readable tag assigned to job |
| arguments | array | Additional command line arguments defined for the job. |
| labels | object | Labels that are attached to the job. |
| submitted_at | string | The date and time of the start of the job (ISO 8601). |
| finished_at | string | The date and time of completion of the job (ISO 8601). |
| user | object | User who submitted this job. |
Webhook payload example
{
  "token": "332f6438-6485-416c-b893-089524259153",
  "model": "trnsport",
  "is_temporary_model": true,
  "is_data_provided": true,
  "status": 10,
  "process_status": 0,
  "stdout_filename": "log_stdout.txt",
  "namespace": "global",
  "tag": "My first Hypercube job",
  "arguments": [
    "LP=CBC",
    "--mode=ENGINE"
  ],
  "labels": {
    "cpu_request": 23.7,
    "instance": "z1d.6xlarge",
    "memory_request": 188100,
    "multiplier": 2.5,
    "node_selectors": [
      {
        "key": "gams.com/instanceType",
        "value": "z1d.6xlarge"
      }
    ],
    "resource_warning": "memory",
    "tolerations": [],
    "workspace_request": 50000
  },
  "submitted_at": "2022-03-17T17:01:37.406000+00:00",
  "finished_at": "2022-03-17T17:01:39.878000+00:00",
  "user": {
    "deleted": false,
    "old_username": null,
    "username": "admin"
  }
}
JOB_OUT_OF_RESOURCES
This event is triggered when a job (not a Hypercube job) ran out of resources. Note that this event is triggered as soon as the resource is exhausted. This can be before or after the `JOB_FINISHED` event is triggered.
Webhook payload object
| Key | Type | Description |
|---|---|---|
| token | string | The token of the job |
| model | string | The name of the model |
| is_temporary_model | boolean | Whether the solved model is a temporary model or a registered model |
| is_data_provided | boolean | Whether additional data was provided with the model |
| status | integer | The Engine status of the job. The Engine status can be queried via GET /jobs/status-codes |
| process_status | object | The exit status of the GAMS process. |
| stdout_filename | string | The name of the file to which the stdout of the GAMS process is written. |
| namespace | string | The namespace in which the job was executed. |
| tag | object | Human-readable tag assigned to job |
| arguments | array | Additional command line arguments defined for the job. |
| labels | object | Labels that are attached to the job. |
| submitted_at | string | The date and time of the start of the job (ISO 8601). |
| finished_at | object | The date and time of completion of the job (ISO 8601). |
| user | object | User who submitted this job. |
Webhook payload example
{
  "token": "332f6438-6485-416c-b893-089524259153",
  "model": "trnsport",
  "is_temporary_model": true,
  "is_data_provided": true,
  "status": 10,
  "process_status": 0,
  "stdout_filename": "log_stdout.txt",
  "namespace": "global",
  "tag": "My first Hypercube job",
  "arguments": [
    "LP=CBC",
    "--mode=ENGINE"
  ],
  "labels": {
    "cpu_request": 23.7,
    "instance": "z1d.6xlarge",
    "memory_request": 188100,
    "multiplier": 2.5,
    "node_selectors": [
      {
        "key": "gams.com/instanceType",
        "value": "z1d.6xlarge"
      }
    ],
    "resource_warning": "memory",
    "tolerations": [],
    "workspace_request": 50000
  },
  "submitted_at": "2022-03-17T17:01:37.406000+00:00",
  "finished_at": "2022-03-17T17:01:39.878000+00:00",
  "user": {
    "deleted": false,
    "old_username": null,
    "username": "admin"
  }
}
VOLUME_QUOTA_THRESHOLD
This event is triggered when a certain threshold value of the volume quota is reached. The threshold value is specified when setting up the webhook.
Webhook payload object
| Key | Type | Description |
|---|---|---|
| threshold_level | integer | The threshold level that was reached (in seconds) |
| quota_user | object | User to whom the quota is assigned |
| trigger_user | object | User who caused the threshold to be reached |
| trigger_type | object | Resource that triggered the threshold to be reached |
Webhook payload example
{
  "threshold_level": 3600,
  "quota_user": {
    "deleted": false,
    "old_username": null,
    "username": "janedoe"
  },
  "trigger_user": {
    "deleted": false,
    "old_username": null,
    "username": "johndoe"
  },
  "trigger_type": "job"
}
Custom certificate authorities (CAs)
When Engine sends webhooks or communicates with identity providers via HTTPS, it checks whether the certificate provided by the server is signed by a trusted certificate authority (CA). Engine has a number of default certificate authorities (CAs) that are part of the Alpine Linux distribution.
In most cases, this is sufficient. However, if you have your own custom certificate authority, you may want to overwrite this default. Engine provides a way to do so via the PATCH /configuration endpoint. CA certificates need to be provided as a concatenated (by newlines) list of PEM encoded CA certificates:
                    -----BEGIN CERTIFICATE-----
MIIH0zCCBbugAwIBAgIIXsO3pkN/pOAwDQYJKoZIhvcNAQEFBQAwQjESMBAGA1UE
[...]
-----END CERTIFICATE-----

-----BEGIN CERTIFICATE-----
MIIFgzCCA2ugAwIBAgIPXZONMGc2yAYdGsdUhGkHMA0GCSqGSIb3DQEBCwUAMDsx
[...]
-----END CERTIFICATE-----
An example request using curl that reads custom CAs from a file named custom_cas.pem looks like this:
> curl -X PATCH -H "Authorization: Bearer
YOUR_ACCESS_TOKEN" --data-urlencode "custom_cas@custom_cas.pem"
https://engine.gams.com/api/configuration
Note that this list needs to be extensive, since Engine will overwrite (not append) the default. To provide a custom list of CAs, use the custom_cas parameter. To reset Engine to use the default certificates again, simply provide an empty string to the custom_cas parameter.