GAMS Studio only supports OpenID Connect providers which inlcude Device Authorization Flow.
Engine Clients
Introduction
With the GAMS Engine UI, GAMS MIRO Desktop and GAMS Studio, GAMS already provides three interfaces to Engine. However, if you want to use your own application with Engine, you can do so with ease. The use of OpenAPI allows applications of all kinds to connect to Engine via a RESTful API. Learn more about custom clients here.
Registration
To use Engine, you must first register with the system. For this, you need an invitation code.
- Open Engine UI
- Click 'Register' below the Login button
- Put your invitation code, username and password
- Click 'Register'
- You will automatically be logged in
GAMS Engine UI
GAMS Engine comes with a web user interface that implements most of the available features. Via this interface you can manage users, models and data, but also submit new jobs and download the results. Depending on your role ("User", "Inviter" or "Administrator"), different elements of the UI are visible.
The UI consists of six views (the minimum user role required to see this view is appended in brackets):
- Jobs (User)
- Namespaces (User)
- Users (User)
- Pools (config-dependent)
- Webhooks (User)
- Cleanup (User)
- Administration (Administrator)
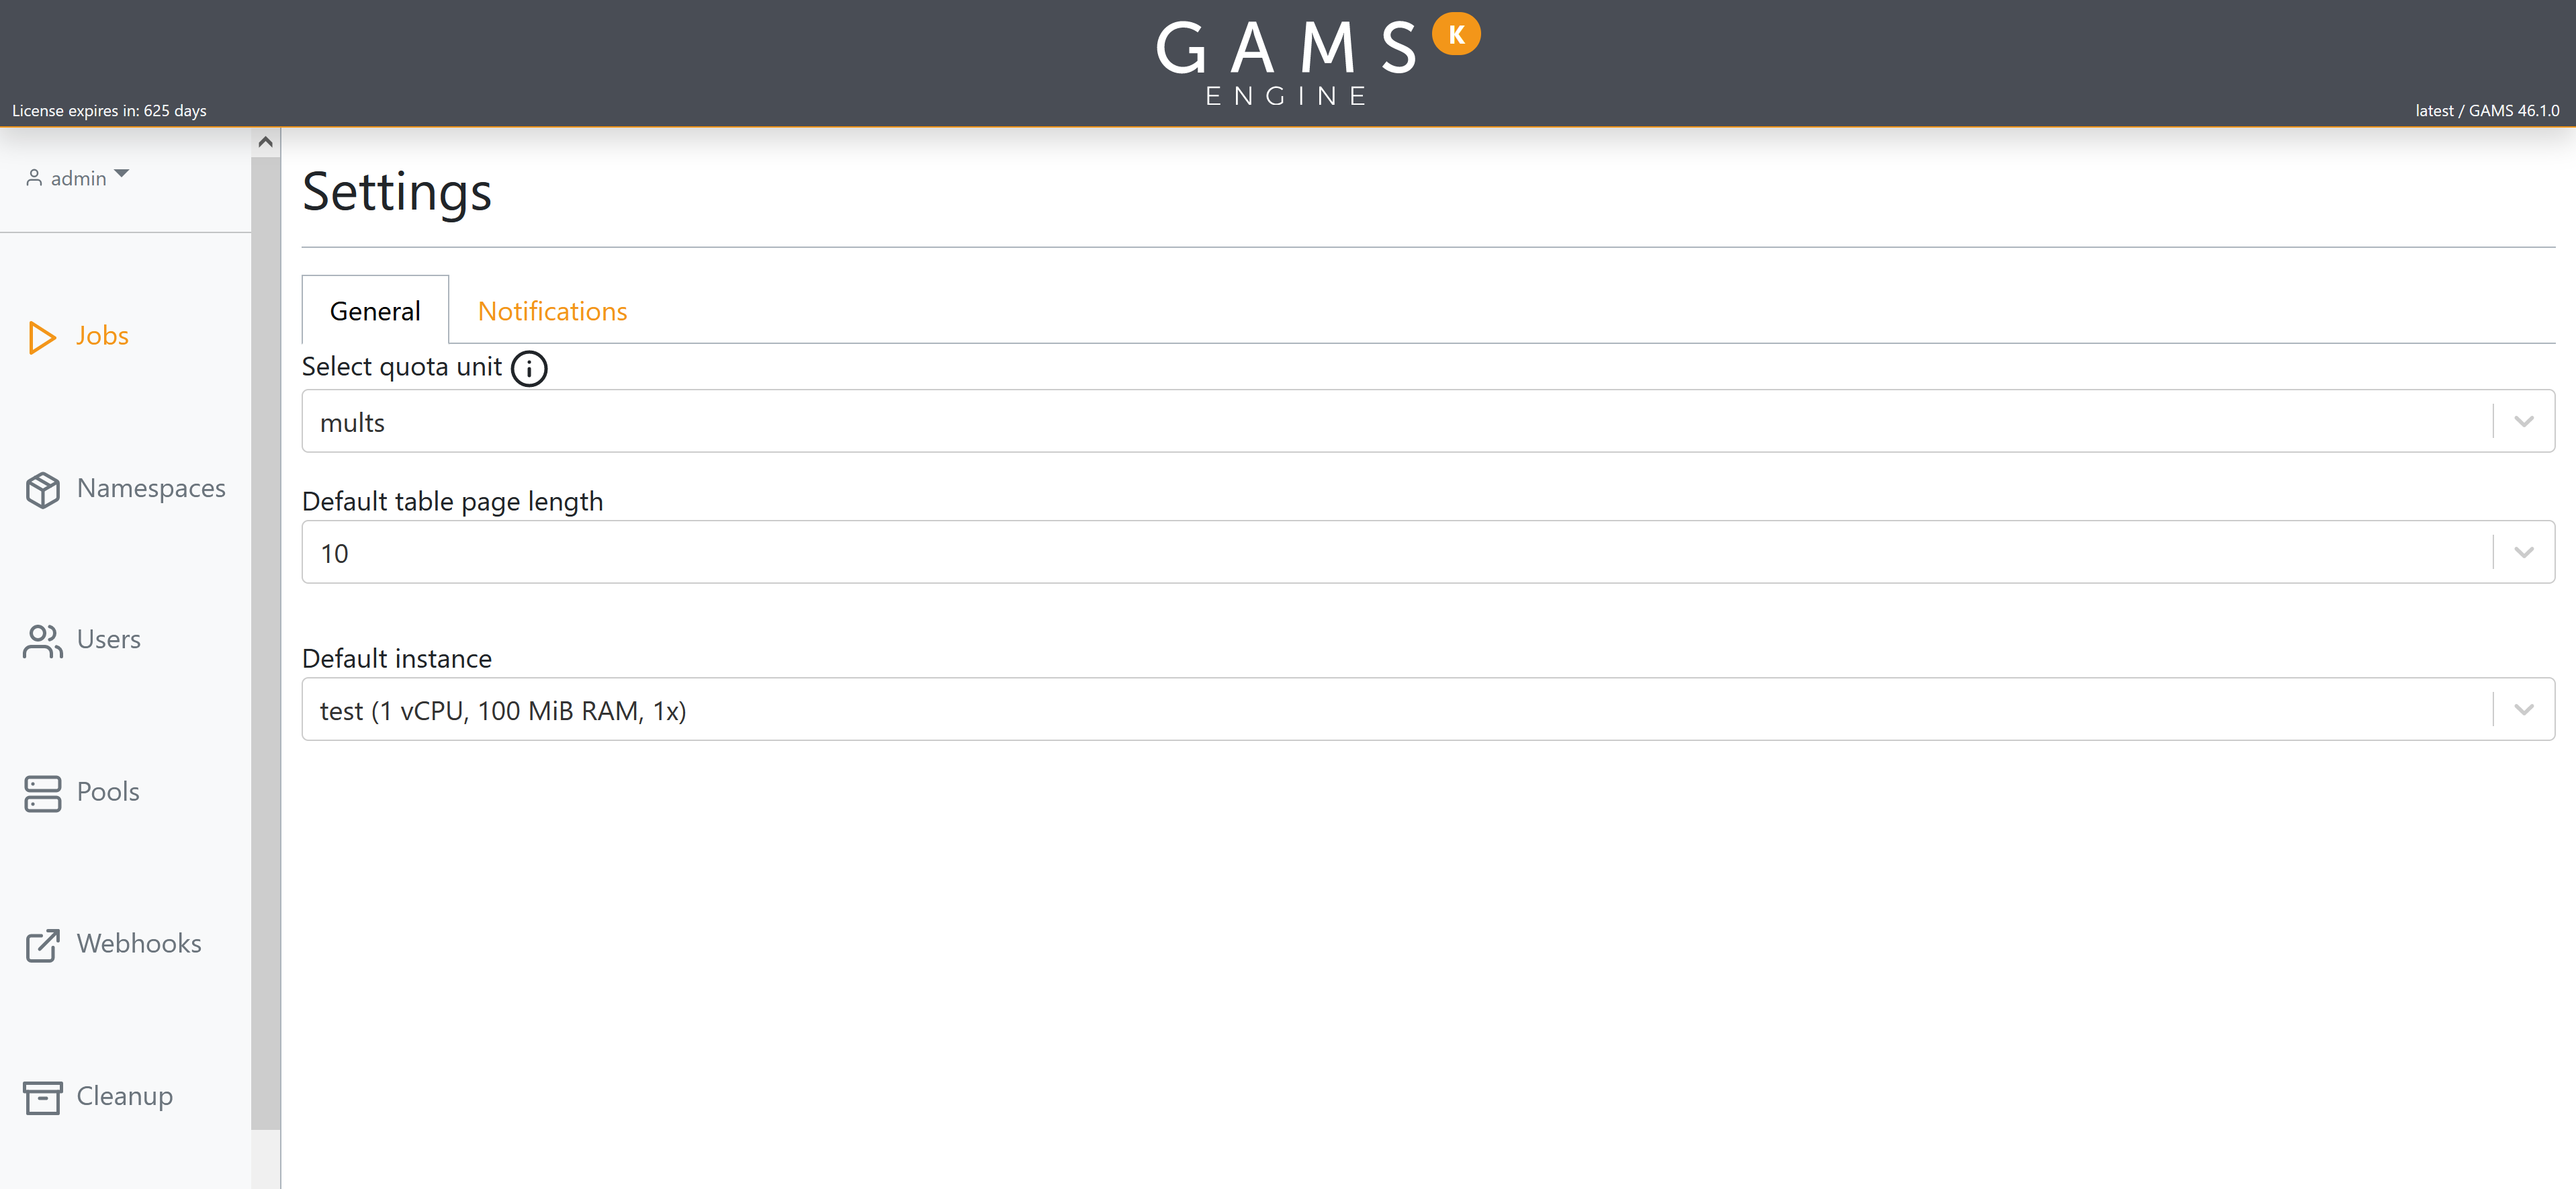
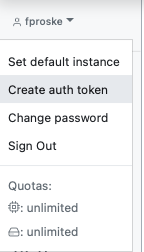
Furthermore, options can be reached by clicking on your username in the top left corner. Here you find Settings, Create auth token and Change password. Also your quota is displayed here.

In the Settings dialog you can define the quota unit, the default table length per page and set your default instance, if at least one instance exist for you. There are two options for the quota unit, the default is mults, which means that the quota is expressed as multiplier * seconds. The second option is multh, in which case all quota values will be divided by 3600 (multiplier * hours). In addition to these general settings, you also have the option of activating push notifications to be notified when certain events occur, e.g. when a job is completed. For this feature to be available, an administrator must have activated the webhooks feature.
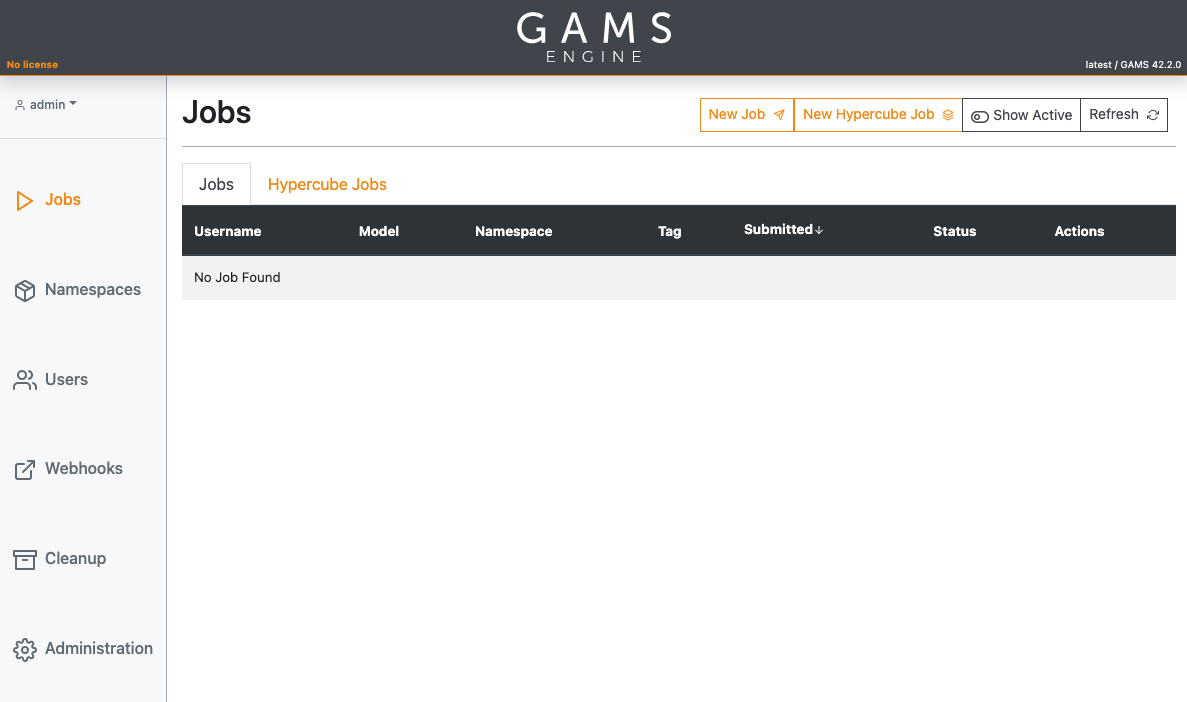
Jobs
The Jobs view lists all the jobs you submitted and all jobs shared with you via groups (User groups). Furthermore, an administrator sees all jobs submitted by all users and inviters can see all jobs submitted by their invitees. You can sort your submissions by clicking on the desired column. From this view, you can also interact with your jobs (view more details, cancel running jobs or download results) as well as submit new ones.
Namespaces
The Namespaces view lists all the namespaces as well as all the models registered in each namespace. To view the models registered in a particular namespace, click on this namespace and the table that lists the models will update. Just as in the Jobs view you can sort the table by clicking on the desired column. You can add or remove namespaces from this view as well as register new models.
Users
If you open the Users view as a user, you can only see yourself here. If you are an administrator, you can see all users registered in the system; if you are an inviter, only users invited either by you or by one of your invitees are displayed. The table displays the role, inviter and date of creation of the users. Additionally, here you can delete users or create new invitation codes. Note that inviters can only invite people who have the same or less privileges as themselves. To learn more about user roles and permissions click here. To edit user roles, permissions and quota as well as view the usage, and for inviters their invitees, click on the underlined usernames to access the User Page of the selected user.
User Page
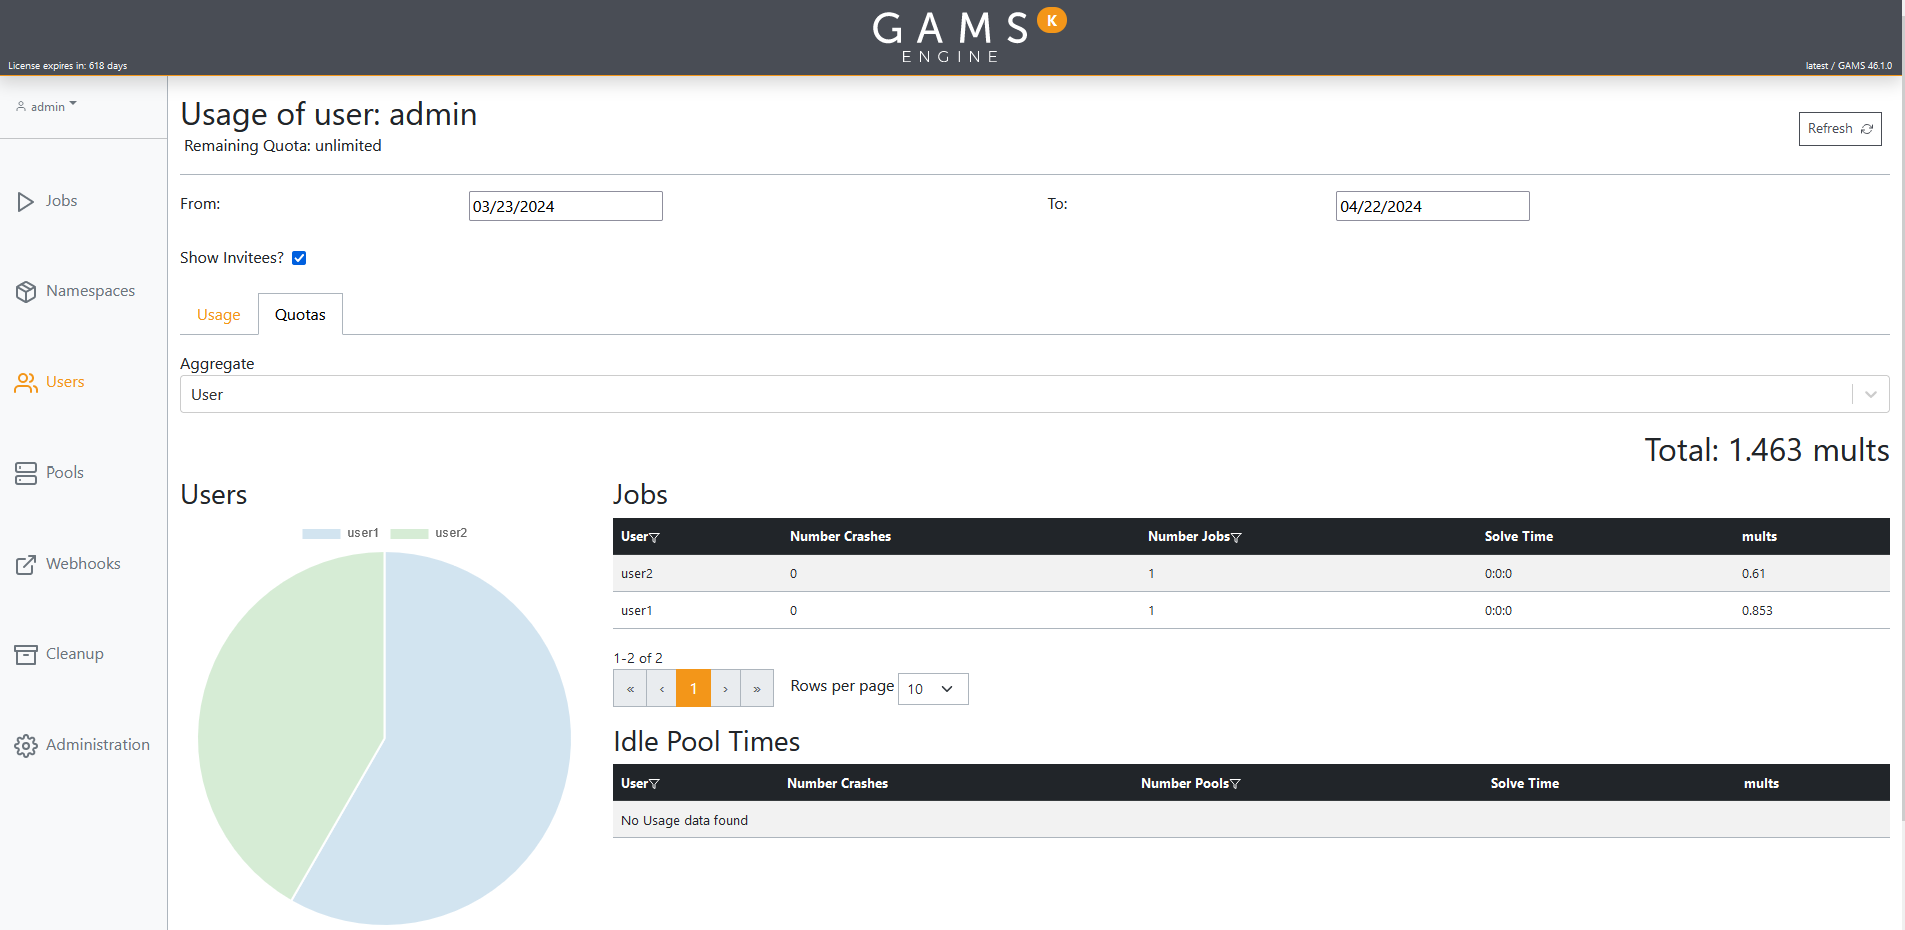
The User Page contains all information and settings for the seleced user. This page is reachable wherever a username is mentioned (if you have the permission to see that user's page). Depending on your permissions the page contains a different amount of tabs. If you are a user you have only the permission to view your own page and will find your Usage here. As an inviter you can view the User Page of all your invited users, and the users they invited. For them you have the option to edit the password, license, instance, quota, identity provider, permissions, and view their usage. For yourself you will find your own usage and an invitee tree. As an admin you will find the same options as an inviter, but for all existing users.
If you select the Usage tab a more detailed view of the usage of that user is displayed. Here you will find the user's remaining quota and an overview of the jobs generated by that user. First, select the timeframe you are interested in and if you are an admin or an inviter, whether you want to include invitees in the data. The Dashboard allows a more detailed view of the individual jobs. The table will by default be grouped by username. It is possible to change this to no grouping at all, or by instance, or by pool label. If at least two users/instances/pool labels exist in the selected timeframe, the data will also be displayed in pie diagrams. If Instance Pools are used, the second table will display the idle times of these pools. Under the second tab Timeline a graphical visualization shows either the jobs weighted by their multipliers, or just the number of parallel jobs over time.
Pools
If GAMS Engine is used with a Kubernetes backend (e.g. Engine SaaS/Engine K), Instance Pools can be
generated and modified under the Pools view. As an administrator this
view is always visible to you, for Users/Inviters it depends on the
configuration. As an administrator, you can also
enable/disable the Instance Pools feature from this view.
Webhooks
Webhooks can be added/updated and removed via the Webhooks view. This view may not be visible to you if you are a user or an inviter and the administrator has not enabled this feature for you. As an administrator, you can also enable/disable the Webhook feature from this view.
Cleanup
To clean up the results of your model runs and free up space in the database, use the Cleanup view. You can either remove files one by one or clean up multiple files at once by clicking the "Run Housekeeping" button. This "Housekeeping" dialog allows you to remove all files created more than x days ago and/or files created by users who have been removed from the system.
Administration
The Administration view can be used to add/update the GAMS Engine license as well as the system-wide GAMS license. Here it is also possible for administrators to manage identity providers and instances. Furthermore, it is possible for the administrator to set a password policy for all users who use Engine as an identity provider.
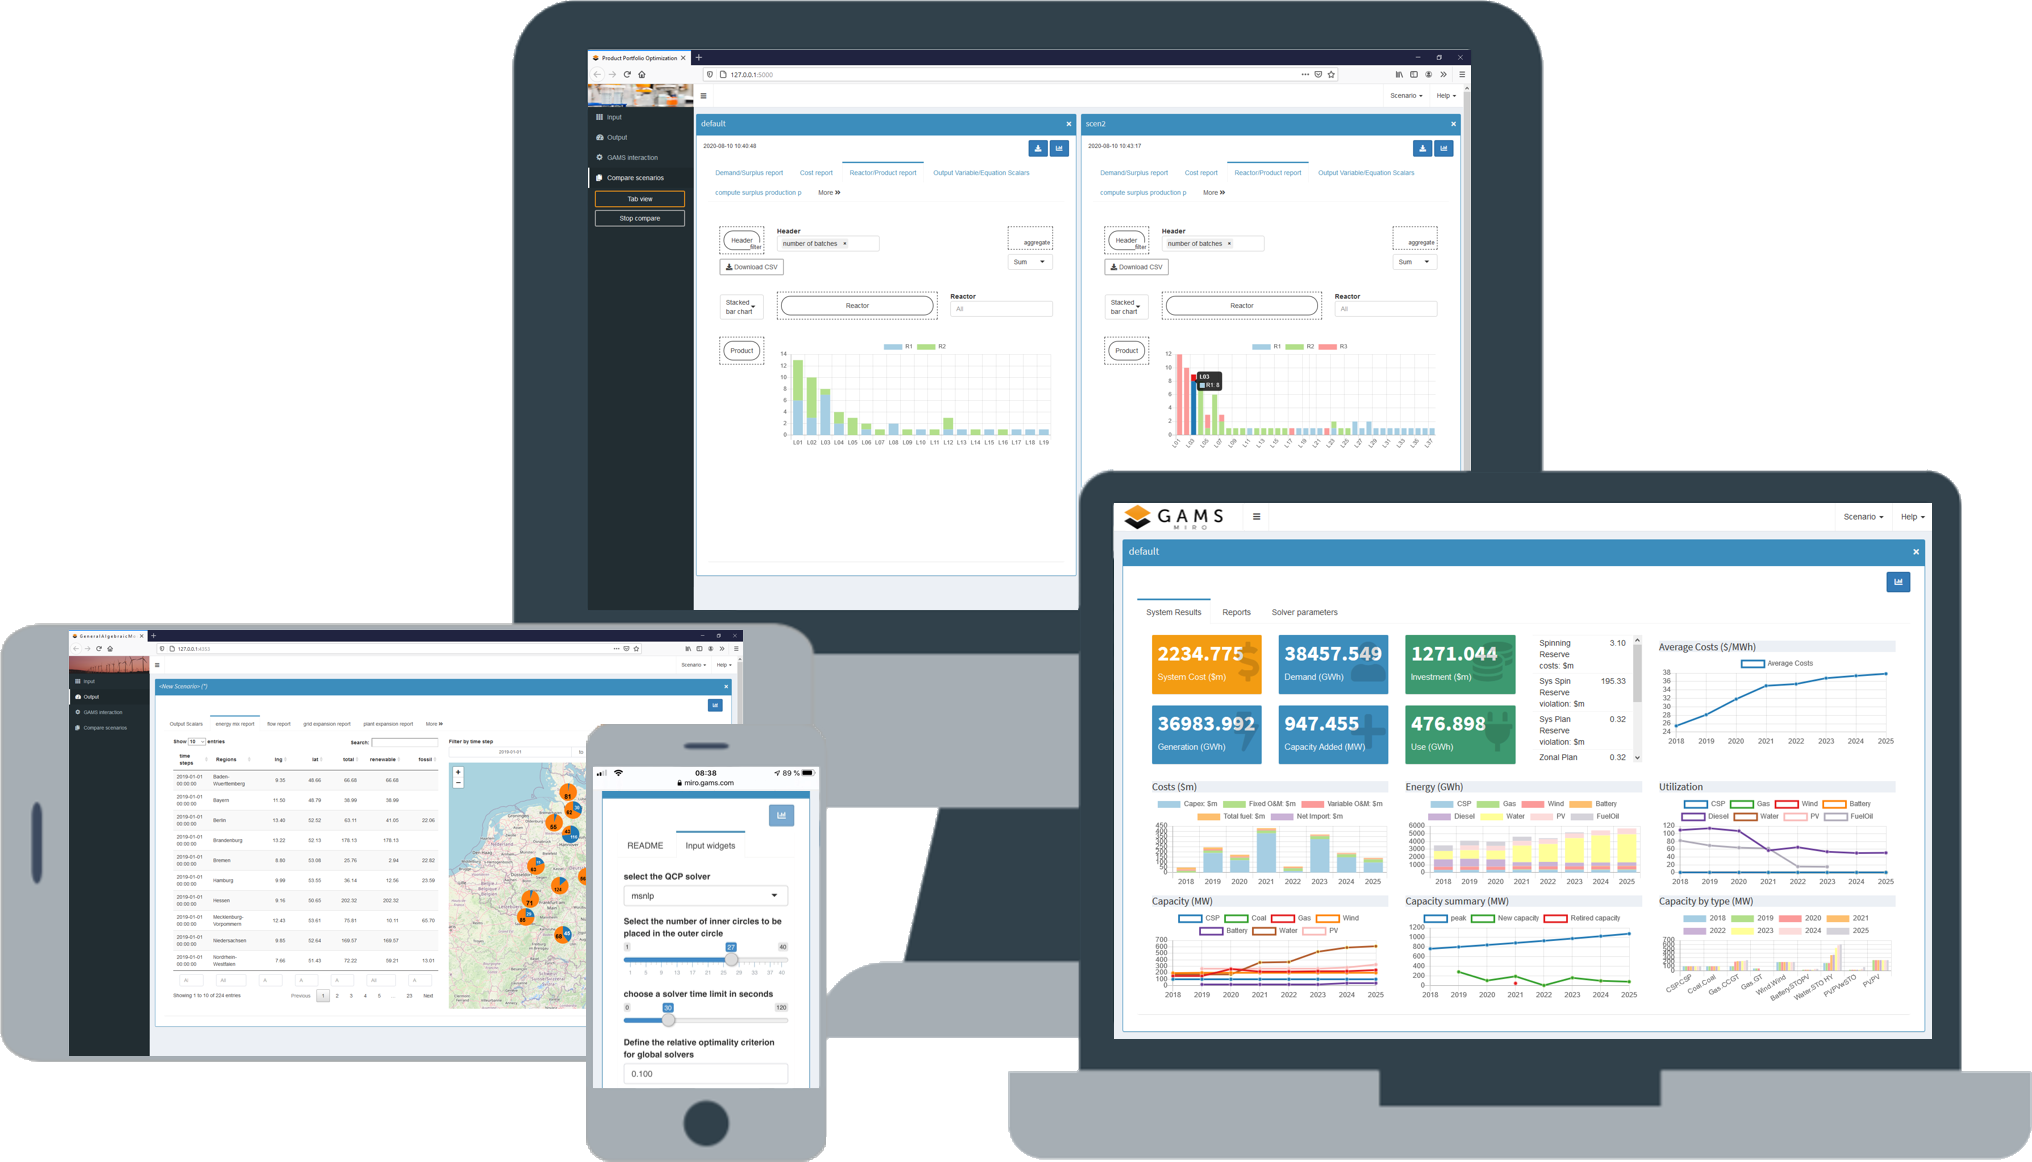
GAMS MIRO integration
With the deployment tool GAMS MIRO you can take any existing GAMS model and turn it into a deployable web application with a few lines of additional code. MIRO comes with a rich set of graphical output formats, scenario management, and much more. It is designed for people looking for an easy and automated way to make their GAMS models available to others.
GAMS MIRO is seamlessly linked to Engine and it is very easy to get their connection up and running. Once set up, you can run your CPU intense optimization problems from a tablet or even a smartphone.
You can find more details for the MIRO Server setup here. Logging into GAMS Engine from MIRO Desktop is described here.
GAMS Studio integration
GAMS Studio has built-in functionality of some basic interactions with GAMS Engine. Starting with version 1.4.2 Studio can be used to perform GAMS jobs with Engine. The feature set is constantly being extended.
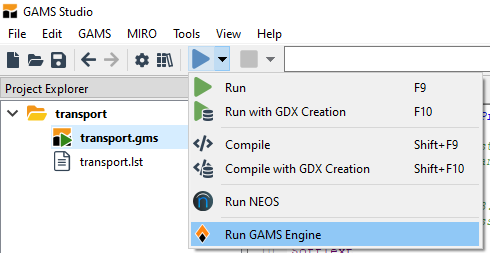
To use Engine for solving a GAMS job, select Run GAMS Engine in the Quick Access Toolbar or via the entry GAMS in the main menu.
In the dialog that appears, you will first have to authenticate with an Engine server:
- Engine URL: URL to the GAMS Engine server.
- Login via: Login method (either "Username/Password" or "JWT")
- Username (if "Username/Password" is selected): Username of the Engine user account
- Password (if "Username/Password" is selected): Password of the Engine user account
- JWT (if "JWT" is selected): JSON Web Token of the Engine user account
- Login via OpenID Connect with hidden/puplic OpenID Connect providers
Note:
When you are logging in to Engine using an identity providers such as Okta or Microsoft Azure Active Directory, you will have to use a JSON Web Token for logging in to GAMS Studio. A JSON Web Token can be generated by logging into the Engine UI and navigating to the Create Authentication Token interface. You get there by clicking on your username in the top left corner and clicking on Create auth token:
After clicking the Login button, another form will appear where you can select the namespace in which to solve your model, whether to create a GDX file of the entire GAMS database at the end of your run, and which instance to run your model on (the latter only if you are using GAMS Engine SaaS/Engine K).
With a click on OK the job is submitted. Note that the model is compiled locally and only the execution phase is performed on GAMS Engine. The results are written into a sub-folder named by the base name (i.e. main file name) of the model. Links in the log output are replaced by their local counterpart.
More Info:
You can find more information about the GAMS Engine integration in GAMS Studio here.
Note:
GAMS jobs processed via Engine are executed on a Linux operating system. Thus, the UNIX path separator ('/') is used. This is relevant for existing paths in the GAMS model as well as for paths on the command line when submitting a job. You should therefore ensure that the UNIX path separator is always used!
Custom clients
GAMS Engine provides a REST API which follows a specification called OpenAPI version 2.0. This specification defines a standard, language-agnostic interface to RESTful APIs which allows both humans and computers to easily discover and understand the abilities of the software. GAMS Engine can be accessed via client libraries in various programming languages, enabling seamless integration into diverse development environments.
There are numerous ways to access the Engine API. If you are working in Python and want to simply submit a job, you can either use the GAMS Python API, or if you are already using GAMSPy, you can use the Engine Client. However, if you want more access to the endpoints of Engine or are using a different language than Python, you need to write the HTTP requests yourself. We will go over a small example using Python, where we will generate a users list from Engine. Keep in mind that the code you need in other languages will be very similar to the Python example.
Tip:
For the communication between the client and Engine, only the REST API is relevant. You don't have to care about anything that happens inside Engine. For example, to submit a GAMS job, only the corresponding endpoint of the API must be addressed. All subsequent steps (e.g. sending the job to a free worker or queue it, calling GAMS, etc.) are taken care of by Engine.
The (technical) API documentation can be found here. You can download the definition file for the latest version of GAMS Engine here.
Python API
If you are working with Python and your main goal is to submit jobs to Engine, you can use the GAMS Python API. This approach eliminates the need to manually handle individual HTTP requests.
Tip:
If you are using GAMSPy, you can directly select the Engine Client as backend.
First make sure to install gamsapi[engine] to the environment your are working with:
> pip install
gamsapi[engine]
Next, you need to define the model you want to submit to Engine. You can either read it directly from a file, or, if your model is small, define it as a string within your Python code. In this example, we will use a simple transportation model.
Example GAMS transport model
GAMS_MODEL = """
Set
i 'canning plants' / seattle, san-diego /
j 'markets' / new-york, chicago, topeka /;

Parameter
a(i) 'capacity of plant i in cases'
/ seattle 350
san-diego 600 /

b(j) 'demand at market j in cases'
/ new-york 325
chicago 300
topeka 275 /;

Table d(i,j) 'distance in thousands of miles'
new-york chicago topeka
seattle 2.5 1.7 1.8
san-diego 2.5 1.8 1.4;

Scalar f 'freight in dollars per case per thousand miles' / 90 /;

Parameter c(i,j) 'transport cost in thousands of dollars per case';
c(i,j) = f*d(i,j)/1000;

Variable
x(i,j) 'shipment quantities in cases'
z 'total transportation costs in thousands of dollars';

Positive Variable x;

Equation
cost 'define objective function'
supply(i) 'observe supply limit at plant i'
demand(j) 'satisfy demand at market j';

cost.. z =e= sum((i,j), c(i,j)*x(i,j));

supply(i).. sum(j, x(i,j)) =l= a(i);

demand(j).. sum(i, x(i,j)) =g= b(j);

Model transport / all /;

solve transport using lp minimizing z;

display x.l, x.m;
"""
First you need to set up a GamsWorkspace:
import os
import sys
from gams import GamsWorkspace, GamsEngineConfiguration

sys_dir = sys.argv[1] if len(sys.argv) > 1 else None
work_dir = sys.argv[2] if len(sys.argv) > 2 else None
ws = GamsWorkspace(system_directory=sys_dir, working_directory=work_dir)
To connect to Engine, you need to define a GamsEngineConfiguration object. This
requires specifying the ENGINE_URL and
ENGINE_NAMESPACE. Additionally, you
must choose an authentication method. You can
authenticate using either a username
and password combination, or by
providing a JWT token, as demonstrated in this example.
# set up configuration required for any job on GAMS Engine
engine_configuration = GamsEngineConfiguration(
    host=os.environ["ENGINE_URL"],
    jwt=os.environ["ENGINE_JWT"],
    namespace=os.environ["ENGINE_NAMESPACE"],
)
With everything configured to run the model on Engine, we simply need to add the model to our workspace and execute the job using our configurations. Finally, we will print some of the results:
job = ws.add_job_from_string(GAMS_MODEL)

job.run_engine(engine_configuration)

for rec in job.out_db["x"]:
    print(f"x({rec.key(0)},{rec.key(1)}): level={rec.level} marginal={rec.marginal}")
If your model run requires additional parameters, you can define them within
the run_engine() method:
run_engine(
    engine_configuration,
    extra_model_files=None,
    engine_options=None,
    gams_options=None,
    checkpoint=None,
    output=None,
    create_out_db=True,
    databases=None,
    remove_results=True
)
Depending on your goals, you can now run multiple jobs with slightly modified parameters, or based on the results of previous jobs. For more examples, please refer here.
REST API
In the previous example, the run_engine() method handles the job
submission automatically. However, if you have specific requirements or need
more customization, its capabilities may be limiting. For finer control and
access to all API endpoints, you can use the requests library to make direct
HTTP requests.
We will use a contrived example to show the bare minimum of what you can do
with GAMS Engine, in order to give you an idea of how straight-forward it is
to use (if you know some Python and understand the requests library).
Assume we have a user called jon_doe
registered on Engine SaaS/Engine K. This
user has access to the namespace tests,
and to two different instance sizes with 16GB and 32GB labelled
'GAMS_z1d.large_A' and 'GAMS_z1d.xlarge_A',
respectively.
We will use the requests library to
explore the REST API, and submit a simple GAMS job and
fetch the results.
Authentication
First we need to import the
request
library, and take care of authenticating our user:
import requests
from requests.auth import HTTPBasicAuth
import time


au = HTTPBasicAuth("john_doe","some_password")
url = "https://engine.gams.com/api"
Note:
In practice, you should import your password from an environment variable!
Making the First Request
We can then query the API to get information about the instances our user
has access to. The results are available in json format. The value for
cpu_request corresponds to the number
of
vCPUs available in each instance,
and is slightly lower than the nominal value you will find on the AWS
homepage. This is because the Engine software stack (in particular
Kubernetes) requires some resources to work properly. The same is true for
the memory_request values, which
correspond to the available memory and
also reserve a small proportion to Kubernetes. The workspace_request
values show the amount of disk space (50 GB) available for each job.
Finally, the multiplier tells you how
many cents each instance costs per second.
with requests.get(url + '/usage/instances/john_doe', auth=au) as r:
    r.raise_for_status()
    r.json()
The API response, parsed as JSON, provides details about the user's available instances, default instance, and inheritance settings:
{
    'instances_inherited_from': 'john_doe',
    'default_inherited_from': 'john_doe',
    'instances_available': [
        {
            'label': 'GAMS_z1d.large_A',
            'cpu_request': 1.8,
            'memory_request': 15070,
            'workspace_request': 50000,
            'node_selectors': [{'key': 'gams.com/instanceType', 'value': 'z1d.large'}],
            'tolerations': [],
            'multiplier': 1.0
        },
        {
            'label': 'GAMS_z1d.xlarge_A',
            'cpu_request': 3.8,
            'memory_request': 30710,
            'workspace_request': 50000,
            'node_selectors': [{'key': 'gams.com/instanceType', 'value': 'z1d.xlarge'}],
            'tolerations': [],
            'multiplier': 1.1
        }
    ],
    'default_instance': {
        'label': 'GAMS_z1d.large_A',
        'cpu_request': 1.8,
        'memory_request': 15070,
        'workspace_request': 50000,
        'node_selectors': [{'key': 'gams.com/instanceType', 'value': 'z1d.large'}],
        'tolerations': [],
        'multiplier': 1.0
    }
}
Tip:
To get the default instance, it is safer to query /usage/instances/john_doe/default,
since the default instance may be a pool instance. In that case,
the instance endpoint could return null.
To get the available pool instances simply change the URL to:
with requests.get(url + 'usage/pools/john_doe', auth=au) as r:
    r.raise_for_status()
    r.json()
Submitting a Job
Lets move on and submit a GAMS job to Engine. We will use the trnsport model, which we have copied
into the current directory, and which will need to be zipped before we
can submit it. The zipped file is then used in a post request to the API. Also, we
will tell Engine to use the GAMS_z1d.large_A instance type.
The response contains the job token, which we need to identify our job.
from zipfile import ZipFile

with ZipFile('model.zip','w') as zip:
    zip.write('trnsport.gms')

query_params = {
    'model': 'trnsport',
    'namespace': 'tests',
    'labels': 'instance=GAMS_z1d.large_A'
}

# Create dict with model zip file
job_files = {'model_data': open('model.zip','rb')}

with requests.post(url + '/jobs/', params=query_params, files=job_files, auth=au) as r:
    r.raise_for_status()
    token = r.json()['token']
Tip:
The job runs asynchronously in the background, and we could now add more jobs or do other things.
Getting Job Results
We have to give Engine SaaS approximately 2 minutes, which is the time
it takes to spin up a fresh EC2 instance for our job. For Engine K,
this duration will vary depending on your specific Kubernetes infrastructure and autoscaling setup.
This initial waiting only applies for the first job in a row of successive jobs, because freshly
vacated instances will be re-used and will be available immediately.
You also won't need to wait if you send the job to a pool instance,
since the pool is always running and doesn't require setup.
Let's now check the status of our simple job, by sending a get request.
with requests.get(url + '/jobs/' + token, auth=au) as r:
    r.raise_for_status()
    r.json()
{'token': '842b85cd-d7e2-42dc-8268-cc25ed3d66ce',
'model': 'trnsport',
'is_temporary_model': True,
'is_data_provided': False,
'status': 10,
'process_status': 0,
'stdout_filename': 'log_stdout.txt',
'namespace': 'tests',
'stream_entries': [],
'arguments': [],
'submitted_at': '2022-01-13T15:46:32.749866+00:00',
'finished_at': '2022-01-13T15:48:39.520392+00:00',
'user': {'username': 'john_doe', 'deleted': False, 'old_username': None},
'text_entries': [],
'dep_tokens': [],
'labels': {'cpu_request': 1.8,
'memory_request': 15070,
'workspace_request': 50000,
'tolerations': [],
'node_selectors': [{'key': 'gams.com/instanceType', 'value': 'z1d.large'}]},
'result_exists': True}
Amongst other information, we can see that the result_exists field reports True, and that
the process_status field reports a
value of zero, which means the job did finish successfully. We can now
download the results in the form of a zip file, by sending another get request. The content field of the return
object contains the raw byte string representing the zip file, so we can
just write the field to disk 'as is'.
with requests.get(f'{url}/jobs/{token}/result', auth=au, stream=True) as r:
    r.raise_for_status()
    with open('results.zip', 'wb') as f:
        # Iterate over the response in 8KB chunks
        for chunk in r.iter_content(chunk_size=8192):
            # Write the chunk to the file
            f.write(chunk)
By default, the zip file contains the GAMS log for the run, a copy of the model file, and the lst file. Here is a section of the log that shows we did indeed successfully solve the model on GAMS Engine:
Iteration Dual Objective In Variable Out Variable
1 73.125000 x(seattle,new-york) demand(new-york) slack
2 119.025000 x(seattle,chicago) demand(chicago) slack
3 153.675000 x(san-diego,topeka) demand(topeka) slack
4 153.675000 x(san-diego,new-york) supply(seattle) slack

--- LP status (1): optimal.
--- Cplex Time: 0.11sec (det. 0.01 ticks)


Optimal solution found
Objective: 153.675000
For information about the other API endpoints, please refer here.