Table of Contents
- Motivation
- Central Widgets
- Further Studio Widgets
- Debugger
- Profiler
- MIRO
- NEOS
- GAMS Engine
- Dialogs and Actions
- Terminal
- Command Line Options
- General Shortcuts
- Usage Hints
- System Requirements
- Comparing GAMS Studio and GAMSIDE
GAMS Studio is a completely new integrated development environment for GAMS, which is available for Windows, macOS, and Linux. It is based on C++ and Qt.
- Note
- In addition to this technical documentation, there is also a tutorial about the usage of GAMS Studio.
Motivation
For over 20 years, the classic GAMS IDE served as the primary development environment for many GAMS users. As development practices and expectations evolved, it became clear that the IDE's underlying technology limited the ability to add modern features. To meet current and future needs, a new development environment was built from the ground up. GAMS Studio, developed in C++ and Qt, is fast, reliable, and platform-independent (Windows, macOS, and Linux), offering a modern and powerful environment for GAMS programming. An overview of the differences between GAMS Studio and the classic GAMS IDE can be seen at the end of this chapter. For long-time GAMSIDE users, especially the difference between IDE projects and Studio projects might be interesting.
Central Widgets
Welcome Page
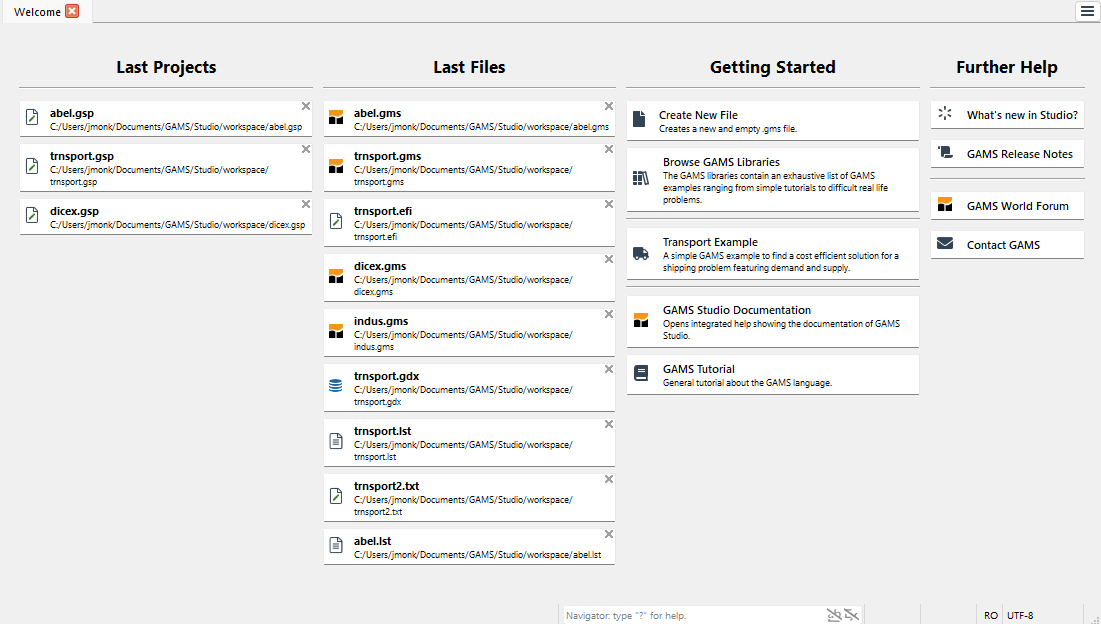
The Welcome page is the starting point of GAMS Studio. It is designed to provide quick access to common actions and offer helpful information. The page is divided into four columns.
The first two columns, labeled "Last Projects" and "Last Files", list all projects and files recently opened in Studio, with the most recent at the top. A simple left click on an item in these lists opens the corresponding file. An "x" at the top right of each entry allows you to remove it.
The third column, named "Getting Started", offers useful actions and links for new users. The upper section includes shortcuts for creating new files in user-defined locations, opening the GAMS Model Library Explorer, or loading the Transport example. The lower section contains two links to open the integrated help view, displaying either this Studio documentation or the GAMS tutorial overview page.
The rightmost column, "Further Help", contains links to the latest GAMS release notes, the recent changes in GAMS Studio, the GAMS World Forum for support, and information on how to contact GAMS.
Code Editor
The Code Editor provides common functionality for editing, with GAMS-specific syntax highlighting. On the left side, there is a special area displaying line numbers and icons for links and errors generated by the compiler.
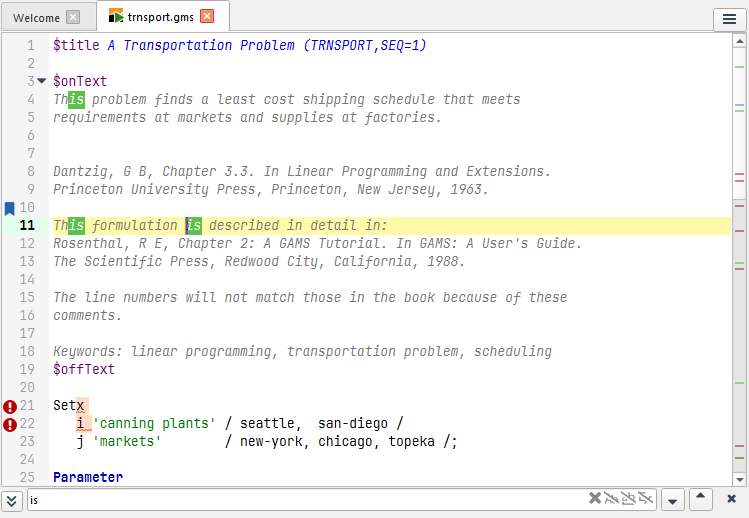
The scrollbar of the code editor shows the location of special markers all over the file. This makes it easier to get an overview and to locate errors, matches, and bookmarks even when they are outside of the visible area.
1. Basic Text Manipulation
| Action | Shortcut | macOS | Description |
|---|---|---|---|
| Copy | Ctrl - C | Command - C | Copies selected text |
| Cut | Ctrl - X | Command - X | Cuts selected text |
| Paste | Ctrl - V | Command - V | Pastes text from clipboard |
| Select All | Ctrl - A | Command - A | Selects entire document |
| Switch Comment | Ctrl - * | Command - * | (Un)Comments all lines in selection |
| Undo | Ctrl - Z | Command - Z | Reverts the latest text change |
| Redo | Ctrl - Y or Ctrl - Shift - Z | Command - Shift - Z | Restores a previous Undo |
2. Advanced Text Manipulation
| Action | Shortcut | macOS | Description |
|---|---|---|---|
| Remove Line | Shift - Del | Removes the current line | |
| Duplicate Line | Ctrl - D | Command - D | Duplicates the current line(s) |
| Lowercase | Alt - Shift - L | Option - Shift - L | Converts selection to lower case |
| Uppercase | Alt - Shift - U | Option - Shift - U | Converts selection to upper case |
| Tab | Tab | Tab | Adds spaces till next tab size |
| Untab | Shift - Tab | Shift - Tab | Removes spaces till previous tab size |
| Indent | Ctrl - I | Command - I | Indents complete line |
| Outdent | Ctrl - Shift - I | Command - Shift - I | Outdents complete line |
| Find | Ctrl - F | Command - F | Shows the Find widget, filling search field with selected text if there is any |
| Find | Ctrl - Shift - F | Command - Shift - F | Opens Search & Replace window, filling search field with selected text if there is any |
| Find Next | F3 | F3 | Jumps to next find result |
| Find Previous | Shift - F3 | Shift - F3 | Jumps to previous find result |
| Search Forward | F4 | F4 | Jumps to next search result |
| Search Backward | Shift - F4 | Shift - F4 | Jumps to previous search result |
3. Navigation & Selection
| Action | Shortcut | macOS | Description |
|---|---|---|---|
| Match Parentheses | Ctrl - B | Command - B | Jumps to matching parenthesis |
| Select Parentheses | Ctrl - Shift - B | Command - Shift - B | Selects to matching parenthesis |
| Toggle Bookmark | Ctrl - M | Ctrl - M | Toggles bookmark |
| Previous Bookmark | Ctrl - , | Ctrl - , | Goes to previous bookmark |
| Next Bookmark | Ctrl - . | Ctrl - . | Goes to next bookmark |
| Toggle Folding | Alt - L | Alt - L | Toggles the folding state of the current section |
| Fold all Sections | Alt - O | Alt - O | Folds all foldable sections |
| Fold DCO Sections | Alt - I | Alt - I | Folds all foldable DCO sections |
| Unfold all Sections | Alt - Shift - O | Alt - Shift - O | Unfolds all foldable sections |
| Open Code Completer | Ctrl - Space | Ctrl - Space | Opens the Code Completer |
| Jump to include | Ctrl - Left Mouse Button or F2 | Command - Left Mouse Button or F2 | Jumps to a file reference (e.g. $include) |
| Scroll Up | Ctrl - Up | Command - Up | Scrolls up (keeping cursor position) |
| Scroll Down | Ctrl - Down | Command - Down | Scrolls down (keeping cursor position) |
| Scroll Page Up | Ctrl - PageUp | Fn - Up | Scrolls page up (keeping cursor position) |
| Scroll Page Down | Ctrl - PageDown | Fn - Down | Scrolls page down (keeping cursor position) |
| Start of Line | Home | Command - Left | Goes to the start of line (or lines content) |
| End of Line | End | Command - Right | Goes to the end of the line |
| Start of Document | Ctrl - Home | Fn - Left | Goes to the start of the document |
| End of Document | Ctrl - End | Fn - Right | Goes to the end of the document |
| Previous Word | Ctrl - Left | Option - Left | Goes to previous start of word (or character class) |
| Next Word | Ctrl - Right | Option - Right | Goes to next start of word (or character class) |
| Start/Change Block Edit | Alt - Shift - Arrow Key | Option - Shift - Arrow Key | Starts/Changes block edit selection |
| Start/Change Block Edit | Alt - Left Mouse Button | Option - Shift - Left Mouse Button | Draws block edit selection |
| Start/Change Block Edit | Alt - Shift - Left Mouse Button | Option - Shift - Left Mouse Button | Spans block edit selection from text cursor to mouse click |
| Change Block Edit by Page | Alt - PageUp / PageDown | Option - Fn - PageUp / PageDown | Changes block edit selection by a page step |
| Change Block Edit by Word | Ctrl - Shift - Left / Right | Command - Shift - Left / Right | Changes block edit selection by word bounds |
| Change Block Edit by Word | Ctrl - Left / Right | Command - Left / Right | Changes block edit position by word bounds (skip selection) |
| Change Block Edit Anchor | Shift - Arrow Key | Shift - Arrow Key | Changes block edit anchor (start position) |
| Move Block Edit | Arrow Key | Arrow Key | Moves block edit selection |
| Move Lines Up or Down | Ctrl - Shift - Up / Down | Command - Shift - Up / Down | Moves line(s) up or down |
The Code Editor checks for parentheses to the right and left of the cursor and marks valid and invalid nesting. Hitting Ctrl - B moves the cursor to the matching parenthesis while maintaining the inside/outside state. To select the block up to the matching parenthesis, hit Ctrl - Shift - B.
To navigate to files included in the GAMS source, hover over the file name and press Ctrl - Click or place the cursor at the filename and press F2. If found, Studio will add the file to the current project and open it. Only plain text filenames are detected this way; symbols are not resolved.
Line Number Area
The Line Number Area offers several features beneath showing the line numbers:
- Folding control folding, see Code Folding
- Bookmarks The
Code Editorallows to setbookmarksin text files opened in the main tabs. Bookmarks are kept when a tab is closed. When Studio is closed, the bookmarks are stored and restored when Studio is opened again. When a file is removed from Studio and doesn't appear in any project, the bookmarks for this file are deleted. A bookmark is placed at the current position in the active file using thetoggle bookmarkkey. Each line in the editor can hold only one bookmark; if a bookmark already exists on the line, it will be removed. The next/previous bookmark keys allow navigation through bookmarks across file boundaries. - Errors When a GAMS run results in errors, these errors are shown beneath the line number. Hovering with the mouse over the error shows details in a tooltip. The context menu opened with a right-click on the Line Number Area allows to clear all errors.
- Breakpoints control breakpoints, see Debugger
Code Folding
The Code Editor detects several types of sections in the source code that can be folded. These sections include all types of matching parentheses that extend over more than one line, as well as several Dollar Control Options that need to appear in pairs. To toggle the folding state of a section, either click the fold-marker or press the shortcut Alt - L when the cursor is in a foldable line. To fold or unfold all foldable sections, the main menu contains entries in the View menu. Additionally, the shortcuts Alt - O to fold and Alt - Shift - O to unfold can be used.
To define individual folding blocks, the Dollar Control Options $onFold and $offFold can be added to the source.
The fold state of a block is stored as long as the file is referenced in the Project Explorer.
List of Dollar Control Options that create a fold section:
$OnText/$OffText$OnEmbeddedCode[V/S]/$OffEmbeddedCode$OnEcho[V/S]/$OffEcho$OnPut[V/S]/$OffPut$OnExternalInput/$OffExternalInput$OnExternalOutput/$OffExternalOutput$ifThen[I/E]/$endIf$onFold/$offFold
Syntax Highlighting
The GAMS Studio syntax highlighter recognizes different kinds of source code, such as:
- dollar control option with some special treatments (like
$OffText,$OnText, etc.) - comments, e.g.
line commentsandcomment block - keywords like
declarationsorloops - description as
descriptive textforidentifiers - data statements for
identifiersortable data - ...
For optimal highlighting, it is recommended to use strict GAMS syntax.
Code Completion
GAMS Studio offers static code completion for fixed internal keywords recognized by the compiler. The code completer appears after pressing Ctrl - Space and displays keywords that match the current syntax and begin with the already typed characters to the left of the cursor. Moving the cursor to the left shortens the matching pattern, while moving it to the right extends it. The keys up/down, pageUp/pageDown, and home/end can be used to navigate the results list while the completer is visible. The selected word can be inserted using the tab or enter/return keys, or by double-clicking a word in the list. To hide the completer, press esc or click outside the completer window. The completer also hides automatically if there is no match for the current start of the word.
Automatic closing of brackets and quote characters
This feature is designed to enhance convenience for users typing source code. In GAMS, as in pretty much every other programming language, opening brackets or quote characters are eventually followed by a closing equivalent. When a user types one of the following characters, the matching closing character will be automatically inserted after the text cursor, allowing the user to easily type content in between. When typing the closing character, which should be right after the cursor, the cursor will jump over the existing character. This way, if a user types the closing character by habit, the autoclose feature does not interfere or cause syntax errors. It is also possible to select text, then type a bracket or quote character to surround the selected text with the chosen character pair. In GAMS Studio, under Settings > Editor > "Auto close opening brackets and quotes", a switch is available to turn off this auto-close feature.
List of characters that trigger insertion of a closing character:
- (
- {
- [
- "
- '
Other editors also close the < character, but in the GAMS language context, it is used differently (e.g., as a comparison operator), making auto-closing unnecessary. In some cases, users may not want the closing character to be inserted automatically; however, this is difficult to predict. Other editors, like Qt Creator, check the character immediately after the cursor, limiting auto-insertion of closing characters to specific cases.
The following characters allow auto-closing when they are the next character after the text cursor:
- Whitespace
- ,
- ;
- )
- ]
- {
- }
All other characters will prevent the insertion of closing characters.
File Encoding
When opening a file, Studio attempts to determine the valid file encoding. Since it is not always possible to accurately identify the encoding, the Edit > Encoding menu provides assistance. To reload a file using another codec, use the reload with ... submenu. The convert to ... submenu allows the current file to be converted to another codec. A selection of encodings is preselected, and this selection can be adjusted using the Select encoding submenu, which opens a dialog for choosing active encodings. One of the encodings is marked as the Default encoding, initially set to UTF-8.
Listing Viewer
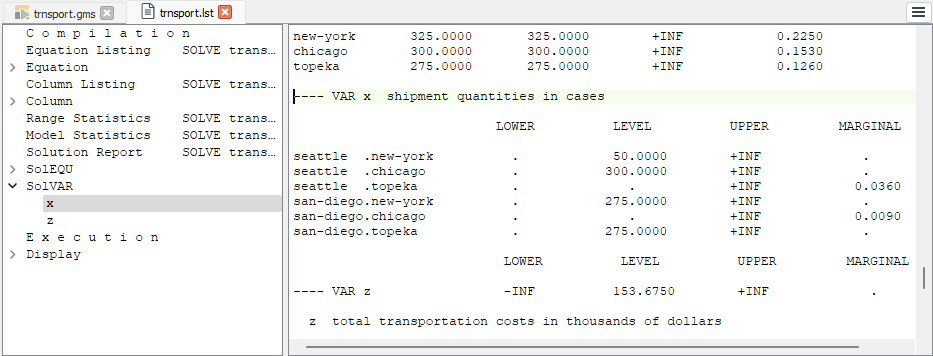
The Listing Viewer displays a GAMS output or listing file (*.lst) generated when running a GAMS (.gms) file. The Listing Viewer is divided into two sections. On the left side, the content of the listing file is shown in a tree structure for easy navigation, while the right side displays the listing file itself.
By clicking on a specific item in the tree on the left side, the listing file will automatically jump to the corresponding location. Any changes to the cursor position in the listing file are dynamically reflected in the tree, selecting the item that matches the current section of the listing file.
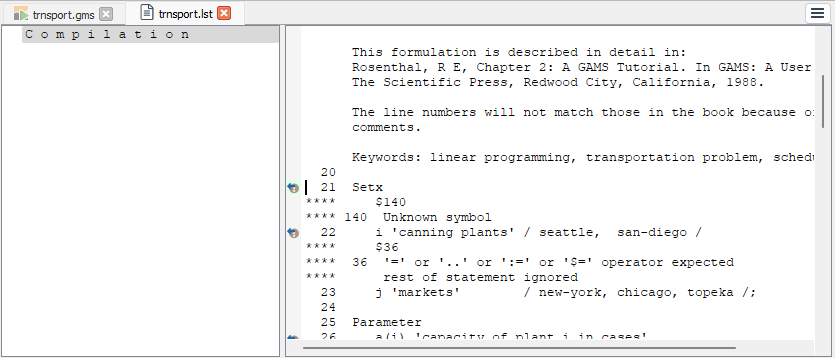
When the GAMS process returns a compilation error, the Listing Viewer includes links to the source file. If the source file no longer exists, the link will still be shown but will appear struck through.
GDX Viewer
The GDX Viewer is used to open and inspect GDX (GAMS Data eXchange) files. A GDX file contains GAMS symbols, such as sets, parameters, variables, and equations, in a binary format that serves as input and output to GAMS. The GDX Viewer component consists of two sections. The left side displays the symbol table of the open GDX file in a table format. Each entry represents a symbol and includes the following information:
- Entry: The index of the symbol
- Name: The identifier of the symbol
- Type: The type of the symbol (Alias, Equation, Parameter, Set, or Variable), including the subtype if available
- Dim: The dimension of the symbol
- Records: The number of records of the symbol
- Text: The explanatory text of the symbol
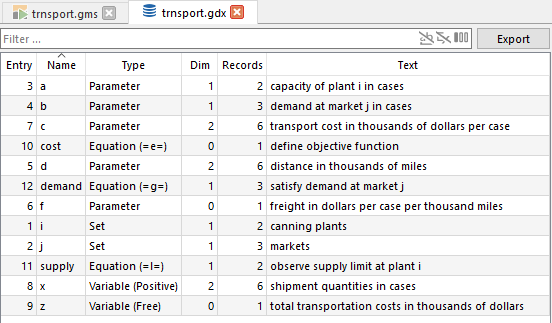
Columns can be sorted by clicking on the respective column header; clicking again toggles the sorting direction. The Filter feature provides dynamic filtering of the symbol list in the GDX file. By default, only the Name column is considered by the filter. The Export button opens the export dialog.
The right side of the GDX Viewer displays the actual data of the symbol selected in the symbol table. Data can be shown in either the List View or the Table View, which can be toggled using the button in the upper part of the GDX Viewer.
The GDX Viewer automatically saves and restores its state when closing or whenever data is reloaded due to changes to the underlying GDX file. Changes such as applied filters or the currently selected symbol are retained. Each symbol maintains its applied filters and view settings (e.g., the currently selected view — List View or Table View — preferences, and visible attributes for variables and equations) as long as the name, type, and dimension of the symbol remain unchanged during the update of the GDX file. Resetting a symbol’s state can be done by clicking the Reset button. For each GDX file known to the Project Explorer, the state is saved in the Settings. The Project Explorer’s context menu provides an option to reset the GDX Viewer state for that file. Removing the GDX file from the project also clears its state.
- Note
- The GDX Viewer currently supports displaying up to ~107 million records for an individual symbol. If a symbol reaches this limit, a warning is added to the system log, and any records beyond this limit are truncated from view. A note about truncated data is also shown in the GDX Viewer. Applying filters can reduce the number of displayed records, allowing the full filtered dataset to be displayed again, after which the note about truncated data is removed.
List View
The List View is the default representation for viewing data in the GDX Viewer. Data is presented as a table where each row represents a record of the symbol. Each record consists of key columns corresponding to the symbol's dimensions, and value columns that vary according to symbol type:
- Set/Alias: Column
Textcontains the explanatory text of a record, orYif no explanatory text is available. - Parameter: Column
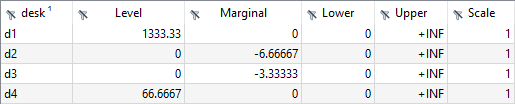
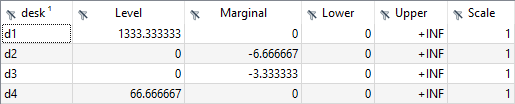
Valuecontains the numerical value of a record. - Variable/Equation: Five numerical columns: (
Level,Marginal,Lower,Upper,Scale).
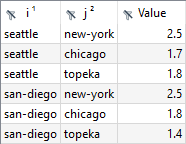
d from the trnsport modelThe header displays individual domains and the original index position using superscript notation, which is especially useful if the column order has been changed. The header also allows data manipulation. By left-clicking a column header, the corresponding column is sorted with a stable sorting mechanism that maintains the order of equal entries. Clicking again toggles the sorting direction. Due to Extended Range Arithmetic used by GAMS, columns containing numerical data may include special values, which are handled uniquely during sorting:
- -INF: Smallest numerical value.
- EPS: Treated as a value very close to but not equal to 0.
- +INF: Largest numerical value.
- NA: Treated as the first non-numerical value (sorted as greater than +INF).
- UNDEF: Sorted as greater than
NA. - ACRONYMS: Sorted as greater than
UNDEF, with relative order by internal number.
Column order can be changed by dragging a column header to a different position. Resizing columns can be done by dragging the border between headers. The columns in List View offer a filter facility, accessible by right-clicking the column header or left-clicking the filter icon. The toggle button in the top right corner can be used to toggle visibility of both the search bar as well as the symbol info (symbol name and explanatory text). The Reset button resets the view to defaults, removing all filters, resetting sorting and numerical format, and switching back to List View if Table View was active.
The Preferences button opens a menu with settings for the current symbol. Squeeze Defaults hides columns with default values for variables and equations, and Squeeze Trailing Zeroes toggles the truncation of trailing zeros. Numerical value display format can be customized using the Format dropdown and the Precision spin box.
The available options for Format are:
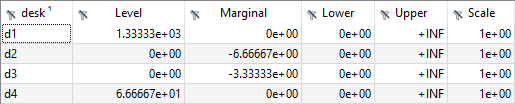
- g-format: The display format is chosen automatically:
f-formatfor numbers closer to one ande-formatotherwise. ThePrecisionsetting specifies significant digits, orFullfor the least digits needed to match the stored value in GDX. No trailing zeros are displayed whenprecision=Full.
mix from the prodmix model using g-format with precision=6 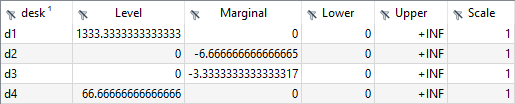
mix from the prodmix model using g-format with precision=Full - f-format: Values are displayed in fixed format unless too large, in which case scientific format is used. The
Precisionsetting specifies decimal places.
mix from the prodmix model using f-format with precision=6 - e-format: Values are displayed in scientific format. The
Precisionsetting specifies significant digits, orFullfor the least digits needed to match the stored value in GDX. No trailing zeros are displayed whenprecision=Full.
mix from the prodmix model using e-format with precision=6 The Precision spin box specifies the number of decimals or significant digits, depending on the format:
- g-format: Significant digits [1..17, Full]
- f-format: Decimals [0..14]
- e-format: Significant digits [1..17, Full]
Next to Preferences is the Attributes button, which opens a menu to hide specific attribute columns for variables and equations, particularly useful when using Table View.
Table View
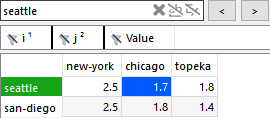
Switching to the Table View is possible for symbols with at least two dimensions. This mode has two parts: a separate header view displaying the symbol's domains and attributes, and the actual data. The header view also provides access to the filter facility and uses visual separators to highlight specific domain positions (left to right: rows, columns, attributes). The data is reshaped so that labels of the last dimension appear in the column header, while the remaining dimensions are placed in the row header. Each table entry contains the numerical values (or explanatory text, in the case of GAMS sets) corresponding to the labels in the headers.
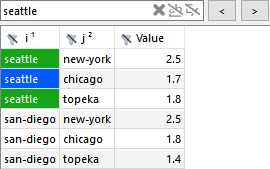
The following image shows the List View of a GAMS Parameter on the left side and its Table View representation on the right side:
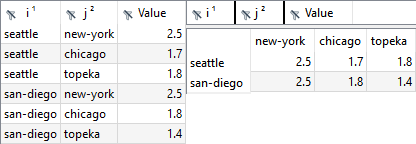
For GAMS variables and equations, a virtual dimension for the five numerical values (Level, Marginal, Lower Bound, Upper Bound, Scale) is introduced and displayed in the column header. When working with variables or equations, it can be useful to focus on a specific attribute like variable levels. This can be done via the Attributes menu at the top of the GDX Viewer, where specific attributes can be hidden by disabling their checkboxes.
The column and row header dimensions can be rearranged by dragging them to different positions. To move an index, click and hold the left mouse button while hovering over the index, then drag it to the desired location. A thin line drop indicator will appear to preview the new position before releasing the mouse button. In general, all index positions can be moved freely, but there are a few restrictions:
- The (virtual) numerical dimension of variables and equations (Level, Marginal, Lower Bound, Upper Bound, Scale) cannot be moved and always remains the last dimension in the column header.
- If a header (row or column) has no dimensions left, a dummy header (Value, Text) is introduced. This cannot be moved but can serve as a drop target for additional drag-and-drop operations.
While filters applied in List View also apply to Table View and vice versa, sorting does not affect the labels in Table View; they remain in internal order, which cannot be modified by the user. For large datasets, it’s recommended to limit visible records by applying filters in List View and by disabling specific value columns for variables and equations. Once the data has been reduced, switching to Table View allows viewing the data in a compact format.
Filter Facility
Filters can be applied in both the List View and the Table View through the header view, which displays the domains and (numerical) attributes. In List View, the header is part of the data view itself, while in Table View, it appears as a separate header above the data. The filter dialog can be opened by right-clicking the header or by left-clicking the filter icon. Depending on the column type (key or value), the appropriate filter dialog for labels or numerical values will open.
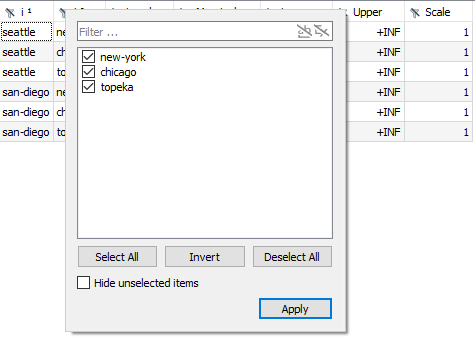
The filter dialog for a key column lists all occurring labels for that column. By default, all labels in all columns are visible. To narrow down the displayed data, uncheck one or more labels, then click the Apply button. Instead of manually selecting labels, you can also use the filter at the top of the dialog, as explained in the Filter Section. The filter automatically applies to the list of labels, selecting matching labels and deselecting all others.
The Hide unselected items checkbox hides all deselected labels automatically, which is especially useful for large sets of labels. Only matching labels will remain in the list as you type. The Select All, Invert, and Deselect All buttons allow faster selection. You can also quickly select one specific label while deselecting all others by using middle-click or Ctrl - left-click (or Command - left-click on macOS). This applies the filter automatically and closes the dialog without needing to click Apply.
To select or deselect a range of labels, first select a label, then Shift - left-click another label to change the selection state of all labels within that range. If no label is initially selected, the range starts from the first label by default.
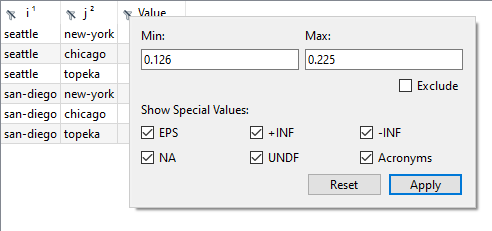
j for variable x in trnsport.gdxNumerical columns provide a different filter type, allowing you to specify a range of values to include or exclude from view. The Min value is the lowest, and the Max value is the highest included in the view. When the Exclude checkbox is activated, the specified range is excluded instead of included. The lower part of the filter dialog contains checkboxes for special values like +INF and EPS. Checking or unchecking these options will show or hide the corresponding values in the view. The Apply button adds the filter, refreshing the view accordingly, and the Reset button removes any active filter.
- Note
- When a filter is applied to a numerical column, the values used for comparison are the actual values from the GDX file. Since displayed values are influenced by the
FormatandPrecisionsettings, they may differ from the internal GDX values. For example: Suppose we have a parameterp(i)withp("i1")=1.34andp("i2")=2. With format set tog-formatand precision set to2, the values are displayed as1.3and2. When applying a filter with the bounds (Min,Max) set to1.33and2, both records still appear, even though1.33is greater than the displayed1.3. This is because the internal GDX value used for comparison is actually1.34.
Value for parameter c in trnsport.gdxSearch Facility
Both the List View and Table View can be searched by entering a term into the search field located above the Data View. The search behavior can be customized using the buttons on the right side of the search field. See Filter in Tables and Trees for more details. As soon as the search term is entered, all matches in the Data View are highlighted automatically. The Search Forward (F3) and Search Backward (Shift - F3) buttons allow you to select the next or previous element that matches the search criteria. The search continues from the beginning of the Data View when the end is reached, and vice versa.
In List View, all cells except for the header are considered in the search. In Table View, all cells and header entries are searched, except for symbol type-specific headers such as Value (parameters), Text (sets/aliases), Level, Marginal, Lower, Upper, and Scale (variables/equations).
Export Dialog
The GDX Viewer offers export functionality accessible by clicking the Export button above the symbol table on the left side of the GDX Viewer. The export dialog uses GAMS Connect to export data from a GDX file into another data format.
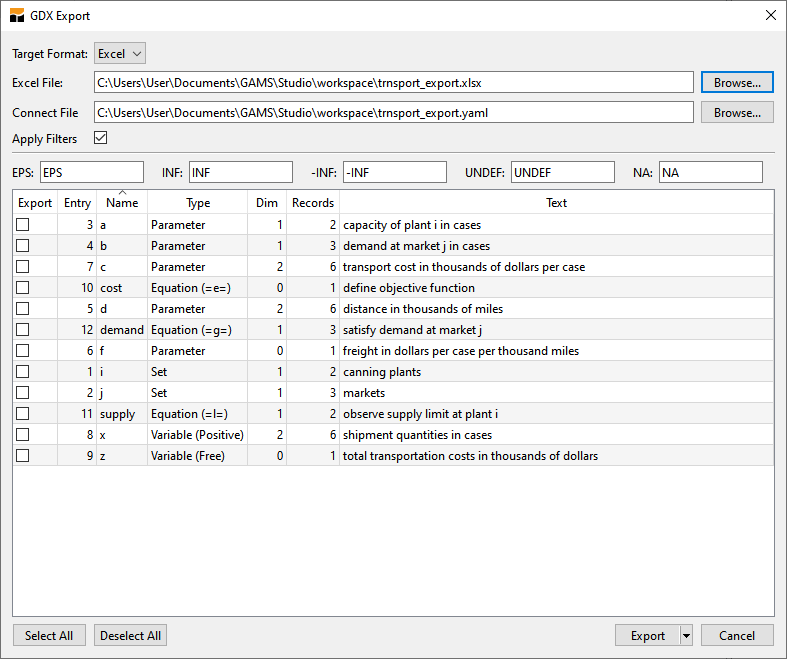
The Target Format dropdown menu allows selection of the export format (currently, only Excel is available). The upper part of the dialog also provides options to specify the Excel output file and the GAMS Connect instructions file in YAML format. The Apply Filters checkbox controls whether active filters in the GDX Viewer are applied to the exported data. The Hidden Attributes checkbox controls whether hidden attributes of equations and variables will be contained in the exported data or not.
The input fields for GAMS special values allow customization of their representation. For instance, to export the GAMS special value EPS as 0 instead of its default string representation EPS, change the corresponding input field to 0.
Symbols can be selected for export using the checkboxes in the Export column of the symbol table. The Select All/Deselect All button can be used to select or deselect all symbols for export. Clicking Export generates and executes the GAMS Connect instructions file, while Save generates the instructions file without executing it. The dialog is disabled while the export process is running. Clicking Cancel closes the dialog and halts any unfinished export process.
The export mechanism uses the GDX file currently opened in the GDX Viewer. If a symbol is displayed in Table View mode, the order and placement of individual dimensions are maintained in the Excel output. Sheet names in the resulting Excel file are derived directly from the symbol names. Because Excel limits sheet names to a maximum of 31 characters, longer symbol names will be automatically truncated.
Summary of Actions and Shortcuts
| Action | Shortcut | macOS | Description |
|---|---|---|---|
| Jump to Symbol Search/Data View Search | Ctrl - F | Command - F | Focuses on either the Symbol Search input above the symbol table or the Data View Search, depending on the focus |
| Find Next | F3 | F3 | Jumps to the next match in the Data View search |
| Find Previous | Shift - F3 | Shift - F3 | Jumps to the previous match in the Data View search |
| Select All | Ctrl - A | Command - A | Selects all data (right side only) |
| Copy (comma-separated) | Ctrl - C | Command - C | Copies selection to clipboard with commas as separators |
| Copy (tab-separated) | Ctrl - Shift - C | Command - Shift - C | Copies selection to clipboard with tabs as separators (right side only) |
| Copy Without Labels (comma-separated) | context menu only | context menu only | Copies selection to clipboard without labels using commas as separators (Table View only) |
| Copy Without Labels (tab-separated) | context menu only | context menu only | Copies selection to clipboard without labels using tabs as separators (Table View only) |
| Auto Resize Columns | Ctrl - R | Command - R | Resizes all columns to fit content (right side only) |
Reference File Viewer
The Reference File Viewer is a useful tool for navigating the source code of GAMS models via a reference file, especially when multiple files are involved. A reference file contains all symbol references of a GAMS model and is created using the reference (rf) parameter when running the model.

When the model is compiled, a reference file with the ".ref" extension is created, which can be opened either through the File > Open menu or by double-clicking the RefFile entry in the Process Log:
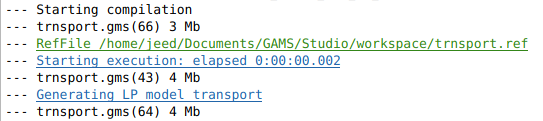
With GAMS > Run With... menu and submenenu GAMS > Run With... > Create RF checked, a reference file is to be created every time a GAMS Model is compiled.
A Reference File Viewer shows the horizontal tabs on the left, the table in the middle with details of the selected tab, and on the right (for some tab categories) the reference list containing reference location of the selected entry in table.
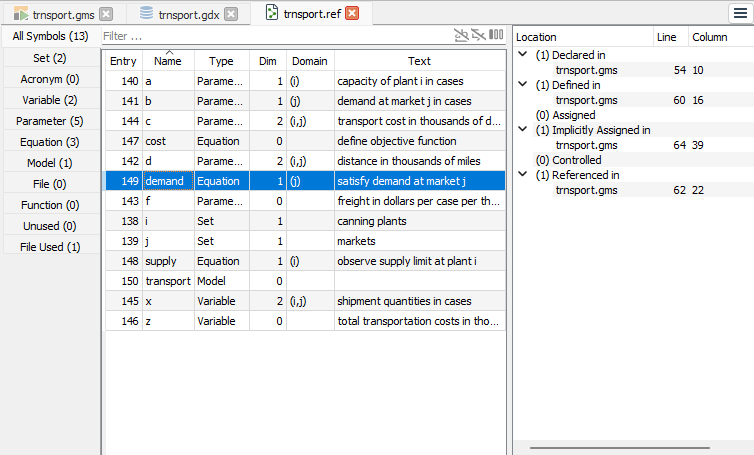
The tabs on the left shows different categories of the references. These are:
- All Symbols, the table displays an alphabetical listing of all symbols used in the model with
Entry,Name,Type,Dimension,Domain, and explanatoryTextinformation as the symbol has been defined in the model. - Set, Acronym, Variable, Parameter, Equation, and Model, the table provides an alphabetical listing of symbols of each GAMS data type with
Entry,Name,Type,Dimension,Domain, and explanatoryTextinformation as the symbol has been defined in the model. For more information on GAMS data types, see Data Types and Definitions. - File, the table lists all file statements used in the model, in alphabetical order.
- Macro, the table lists the GAMS Macros used in the model.
- Function, the table lists the GAMS built-in functions used in the model.
- Unused, the table displays an alphabetical listing of symbols declared in the model but not used.
- File used, the table lists the hierarchy of all files according to the order they have been used in the model. The first column shows the file location, the second column shows the file type, and the third column shows the line number the file has been referenced from.
- The files shown are of the following types: INPUT, INCLUDE, BATINCLUDE, LIBINCLUDE, SYSINCLUDE, GDXIN, and GDXOUT. Other types from the file types are not supported in the reference file viewer.
- By default, the File Used show the file location only the first time the file is referenced or used in the model (
Compact Viewis checked). UncheckCompact viewto show all locations of all files according to the order they have been used in the model.
The number next to each tab name indicates the count of elements in that category. The number in the All Symbols tab is the sum of symbols in all other tabs, except the File used tab.
Clicking on an entry in the table (for all tabs except File Used) shows a detailed reference entry list of the selected entry in the right with referred location, line number, and column number. The reference entry in the list is organized by the following reference types:
| Reference Type | Description |
|---|---|
declared | Declaration of the symbol or files or macros or functions |
defined | Defined using a data statement |
assigned | Symbol appears on the left side of an assignment statement |
implicitly assigned | Implicit assignment, such as a variable in a model |
control | Set is used as a control set |
reference | Referenced in a statement |
index | Set is used as index |
For a detailed description of reference types and their shorthand symbols or files or macros or functions, refer to Reference Types in GAMS Output.
Navigate the reference entries
The referenence file viewer supports both mouse and keyboard navigation through tabs, tables, and reference entry lists.
- Click or Press
UpandDownto navigate tabs, table, or reference entry list. - Press
Enterto navigate from one tab into a table of that tab and from the table into a reference entry list of that table. - Press
Escto navigate from a reference entry list back to its table and from the table back to the tab on the left. - Hovering over an entry in the reference entry list shows a tooltip with file location in full path, line number, and column number.
When navigating a valid reference entry in the list for the first time (with either mouse or keyboard), the Pin View will be activated showing the reference file viewer on the right and the referred contents in Code Editor on the left. This allows the referred contents in Code Editor to be visible simultaneously while navigating the referece file viewer.
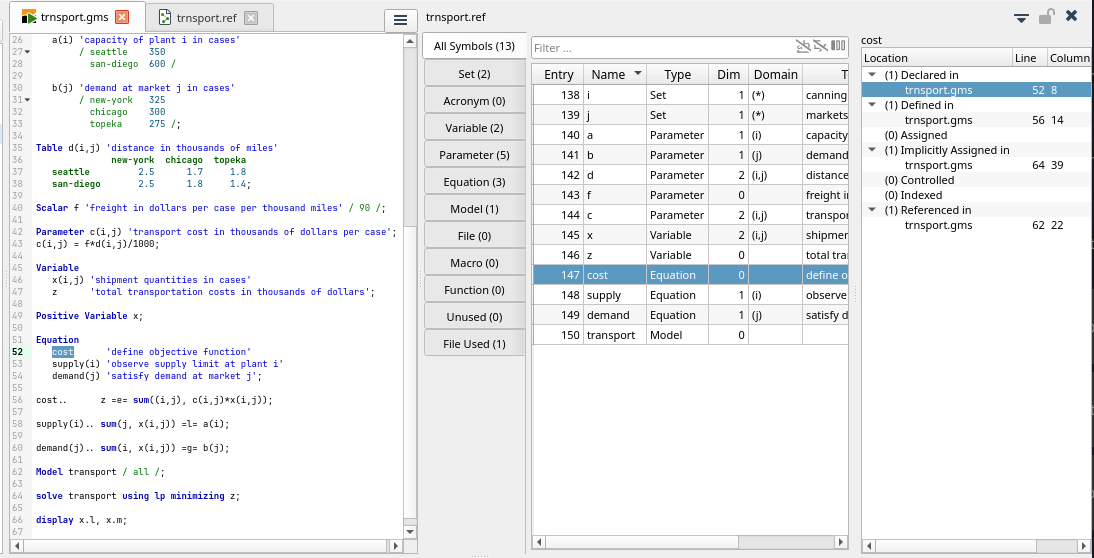
During navigation, the contents with the location shown in Code Editor on the left will be highlighted at the referred line and column when the location is valid.
- Press
Enteror double clicking at a reference entry in the list will jump to the reference location and the focus will be transfered to Code Editor (for all tabs except File Used). - Process
Enteror Double-clicking a row entry will jump to the line and column of the parent file location and the focus will be transfered to Code Editor (only for File Used tab).
Sort and Filter referenced symbols
- Sort: Clicking a column header in the reference table sorts the symbols by
Entry,Name,Type,Dimension(Dim),Domain, orText. - Filter: Entering text in the
Filter boxfilters the symbols in the reference table byName. More details about the filter can be found in the Filter Section.
Summary of Actions and Shortcuts
| Action | Shortcut | macOS | Description |
|---|---|---|---|
| Symbol Filter | Ctrl - F | Command - F | Jumps to the Symbol Filter input field located above the symbol table |
| Auto Resize Columns | Ctrl - R | Command - R | Resizes all columns to fit content (right side only) |
Solver Option Editor
The Solver Option Editor allows viewing and editing of a solver-specific option file to control solver settings and interpret results. For more details on using The Solver Options File, refer to Solver Usage. See how to set the optFile parameter to instruct GAMS to read an option file in The GAMS Call and Command Line Parameters.
The Solver Option Editor provides a table-form editor where each row corresponds to a line in the solver option file. It also includes a browser for solver option definitions, which can be grouped, filtered by term, and directly added to or removed from the editor.
The Solver Option Editor consists of the contents editor in the left pane, the option definition browser in the right pane, and a message and configuration tab in the bottom pane.
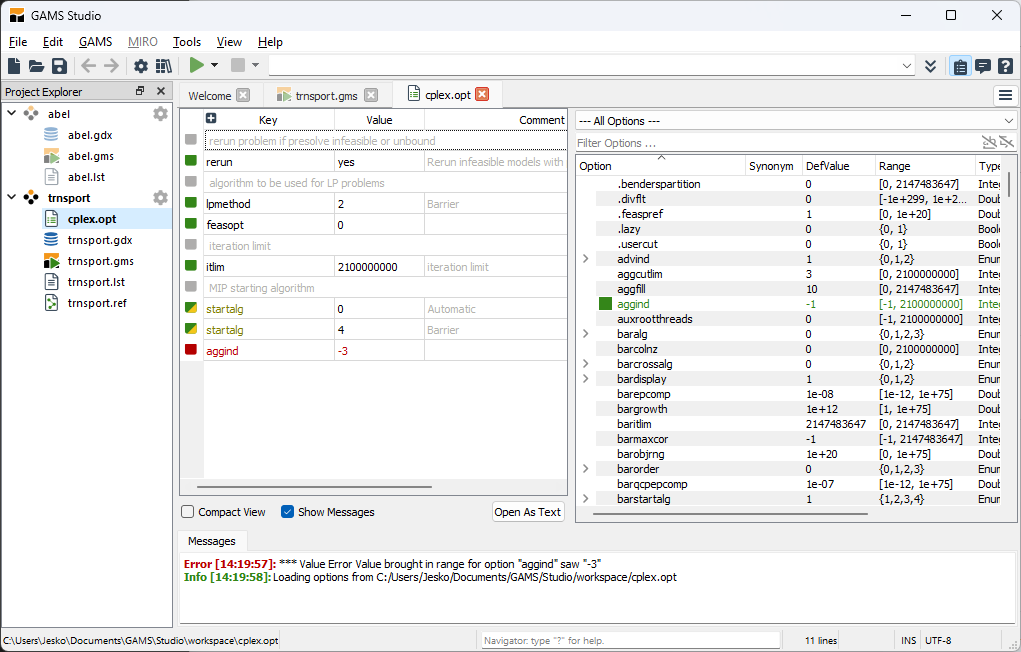
- The left pane displays the contents editor in a table format. Each row entry is either an option entry with an option key, value, and optional end-of-line comment (shown if end-of-line comment characters are defined for the solver option file) or a comment entry.
- Option keys and values appear in green when defined correctly and red when there’s an error. End-of-line comments and comment entries are shown in grey. (For toggling an option entry to a comment entry and vice versa, see Toggle comment/option selection).
- Comment rows display in merged cells, as differences between option keys and values are not relevant for comment lines.
- The
Compact Viewcheckbox hides comments in the display, though some editing actions are disabled in this view (see Compact View for details). - The
Show Messagescheckbox toggles the display of the message log at the bottom. - The
Open As Textbutton allows reopening the file in a text editor (see Open an existing solver option file and Save a solver option file in Basic Operations for details).
- The right pane contains the solver option definitions browser.
- The lower part lists all option definitions with columns for
Name,Synonym,Default Value,Range,Type, andDescription. Options can be sorted alphabetically by clicking theNameheader. A checkbox beside each option indicates if it is defined in the left pane editor. Options with enumeration types (EnumStrorEnumInt) can be expanded to show all enumerated values by clicking the bullet beside the entry; clicking it again hides them. - Double-clicking an entry or dragging it into the left pane adds the option key with its default value (see Summary of Actions and Shortcuts for details on adding or inserting an option).
- Above the option definitions list is a grouping selector and a filter box. The grouping option filters definitions by group name; by default, all definitions are shown. The filter box, labeled
Filter Options ..., filters option definitions as terms are typed. For more on filtering, see Filter Section.
- The lower part lists all option definitions with columns for
- The bottom pane shows the message log, reporting operations such as loading, saving, and any errors from editing. By default, the log is shown unless
Show Messagesis unchecked in the left pane.
Basic Operations
- Create a solver option file: via either the Studio menu or the project context menu in Project Explorer.
- From the Studio menu, choose
File > New...then enter a valid solver option file name and suffix in the file dialog. ChoosingAdd new fileby right-clicking on the project name in Project Explorer brings up the same file dialog for entering a valid solver option file name and suffix (see how to set different suffix values for solver option files with the optFile parameter). - From the project context menu, right-click on the project name in Project Explorer and choose
Add new solver option fileto see a list of solver names. Selecting a solver name from the list opens a file dialog with the selected solver name as the file name and the default option file suffixopt(see how to set different suffix values for solver option files with the optFile parameter).
- From the Studio menu, choose
- Open an existing solver option file: via either the Studio menu or project context menu in Project Explorer.
- From the Studio menu, choose
File > Open...and selectOption FilesorAll Filesin the file dialog, then select a solver option file. - From the project context menu, right-click on the project name, choose
Add Existing file, then chooseOption FilesorAll Filesin the open file dialog, and select a solver option file. - If a solver option file is already open in the Solver Option Editor, you can reopen it in the text editor by choosing
Reopen File As Textfrom the file context menu in Project Explorer. - It is possible to open the solver option file in either the Solver Option Editor or text editor:
- If a solver option file is already open in the Solver Option Editor, choosing
Reopen File As Textfrom the file context menu in Project Explorer closes the editor and reopens the file in the text editor. TheOpen As Textbutton in the left pane editor performs the same function. - If a solver option file is already open in the text editor, choosing
Reopen File using Solver Option Editorfrom the file context menu in Project Explorer closes the text editor and reopens the file in the Solver Option Editor. - If a file is already listed under the project but not yet opened, choosing
Open Filefrom the project context menu opens the file in the Solver Option Editor; choosingOpen File As Textopens the file in the text editor.
- If a solver option file is already open in the Solver Option Editor, choosing
- From the Studio menu, choose
- Save a solver option file: via the
File > Savemenu orCtrl - Sshortcut. ChoosingFile > Save Asor using theCtrl - Sshortcut again opens a file dialog to save the file with a different name (see how to set different suffix values for solver option files with the optFile parameter).
Navigating the contents
When a component of the solver option editor is in focus, further actions can be performed (see Summary of Actions and Shortcuts for the list of actions and shortcuts). Clicking on a component brings it into focus or selection. In addition to using the mouse, navigation within the solver option editor components is possible with the keyboard. Pressing the Tab key navigates between components, moving from the left pane editor to the right pane option group box, the right pane Filter box, and the right pane definition browser in that order. In the left pane editor, press Up, Down, Left, and Right keys to navigate within the table. In the right pane browser, Up and Down navigate the entries, Right expands enumerated entries, and Left collapses them.
A connection exists between an option entry in the left pane editor and a definition entry in the right pane browser. This connection can be identified from both the left pane editor and the right pane browser.
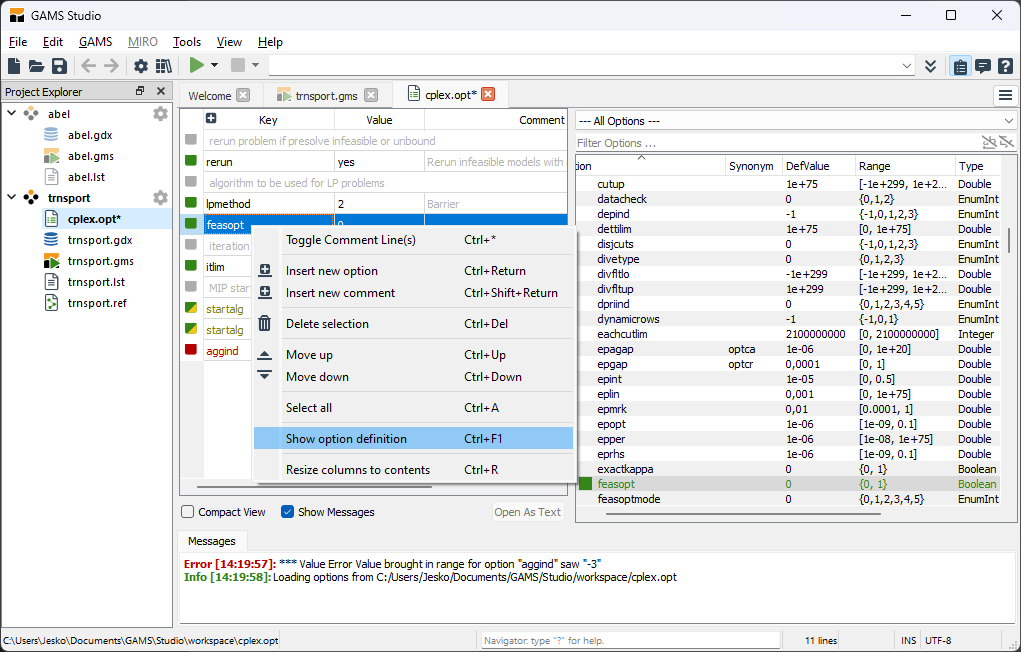
- From the left pane editor, right-click on a selected entry and choose
Show option definitionfrom the context menu. The entry in the right pane browser that contains the definition for the selected entry is highlighted and selected. When a cell or row is already selected, the shortcutCtrl - F1performs the same function.
- From the right pane browser, clicking or selecting an entry highlights all corresponding entries in the left pane editor if the definition has already been added; otherwise, there is no selection in the left pane editor.
Further editing actions can be performed in both the left pane editor and the right pane browser (see Editing the Contents for details).
Editing the Contents
The following actions can be performed when editing the contents:
- Edit option key, value, and comment: This action is performed in the left pane editor.
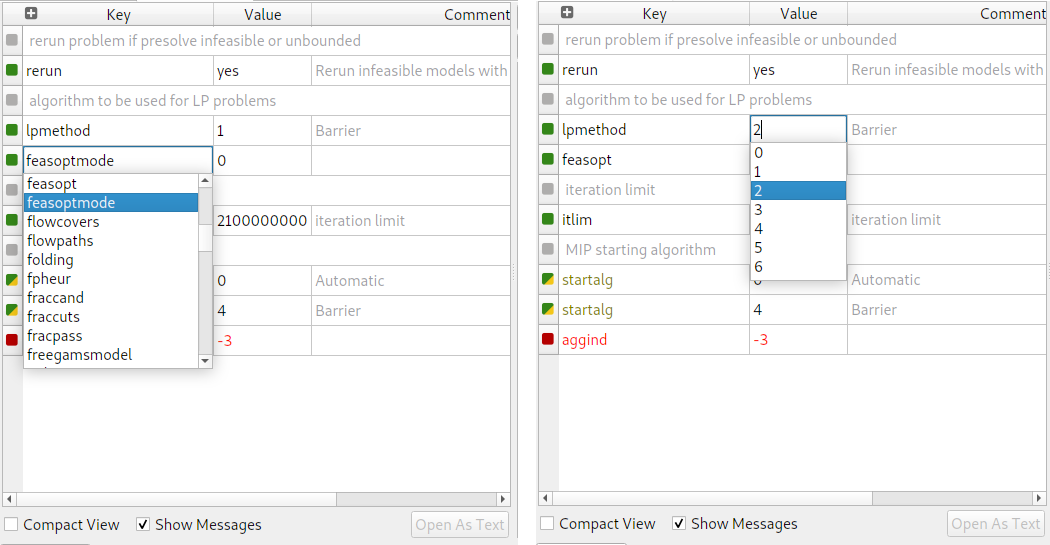
- When a cell in the left pane editor is selected, double-click on the cell or press the platform-dependent edit key (e.g.,
F2) to edit the option key, value, or comment (if available). A drop-down list suggests possible option keys and values when available. PressEnterto confirm the edit andEscto cancel the edit.
- When a cell in the left pane editor is selected, double-click on the cell or press the platform-dependent edit key (e.g.,
- Add new option: This action appends a new option entry as the last entry in the left pane editor. There are several ways to add a new option entry.
- Click on the plus icon in the header of the left pane editor; a new option entry with dummy option key
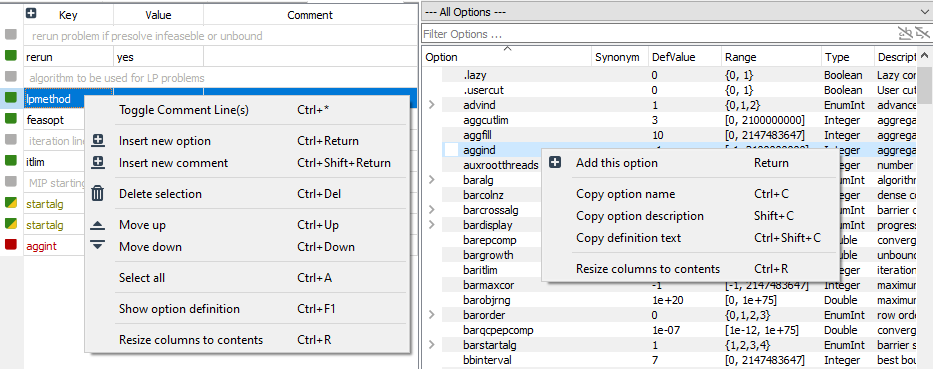
[KEY], option value[VALUE], and option comment[comment](if available) is appended as the last entry. - It is also possible to add a new option from the right pane browser. Select the definition entry in the right pane browser that has not been added/inserted into the left pane editor (a solid checkbox in front of the entry is not marked), double-click or right-click on the selection, then choose
Add this option. A new option entry with the option key and default value of this definition will be added as the last entry in the left pane editor.
- Click on the plus icon in the header of the left pane editor; a new option entry with dummy option key
Insert new option and comment: This action can be performed from the left pane editor and from the right pane browser in several ways.
- Right-click on the selected entry in the left pane editor and choose
Insert new optionfrom the context menu. A new option entry with dummy option key[KEY], option value[VALUE], and option comment[comment](if available) will be inserted before the selected entry. When a cell or row is already selected, the shortcutCtrl - Returnresults in the same behavior. - Right-click on the selected entry in the left pane editor and choose
Insert new commentfrom the context menu. A new entry with dummy text[COMMENT]will be inserted before the selected entry. When a cell or row is already selected, the shortcutCtrl - Shift - Returnresults in the same behavior. Double-click on a definition entry in the right pane browser.
- If this definition has not yet been added (a checkbox in front of the entry is not marked), a new option entry with the option key, default value, and comment (if available) of this definition will be added as the last entry in the left pane editor. When a cell or row is selected, the shortcut
Returnresults in the same behavior. - If this definition has already been added (a checkbox in front of the entry is marked), by default, the studio option editor will prompt to override an existing option if it has already been added to the left pane editor. A pop-up message box appears with three options:
Replace existing entry,Add new entry, orAbort.Replace existing entryremoves all other entries of this definition key but the first one in the left pane editor and replaces the option value of the entry with the default value.Add new entryadds a new option entry with the option key and default value of this definition in the left pane editor.Abortcancels the action. See override existing option on how to suppress this default behavior.
When double-clicking an enumerated value entry of the definition, a new option entry will be added with the option key of the parent entry and the selected enumerated value.
- If this definition has not yet been added (a checkbox in front of the entry is not marked), a new option entry with the option key, default value, and comment (if available) of this definition will be added as the last entry in the left pane editor. When a cell or row is selected, the shortcut
- Drag a definition entry from the right pane browser and drop it in the left pane editor.
- If this definition has not yet been added (a checkbox in front of the entry is not marked), a new option entry with the option key, default value, and comment (if available) of this definition will be dropped before the selected entry in the left pane editor.
- If this definition has already been added (a checkbox in front of the entry is marked), by default, the studio option editor will prompt to override an existing option if it has already been added to the left pane editor. A pop-up message box appears with three options:
Replace existing entry,Add new entry, orAbort.Replace existing entryremoves all other entries of this definition key but the first one in the left pane editor and replaces the option value with the default value.Add new entryinserts a new option entry with the option key and value of this definition before the selected entry in the left pane editor.Abortcancels the action. See override existing option on how to suppress this default behavior.
See also the Settings section on how to insert a new option together with a comment from the definition.
- Right-click on the selected entry in the left pane editor and choose
- Toggle comment/option: This action is performed in the left pane editor, turning an option entry into a comment entry and vice versa.
- Select the option entry, right-click on the selection, then choose
Toggle comment/option selectionfrom the context menu. In the case of an option entry, this action turns the entry into a comment entry (shown in grey color). In the case of a comment entry, this action turns it into an option entry (shown in either green or red depending on whether or not there is an error). When a cell or row is selected, the shortcutCtrl - *results in the same behavior. Clicking on the color box in front of the entry row also results in the same behavior, even without selection.
- Select the option entry, right-click on the selection, then choose
- Move up and down: These actions change the order of the option and comment entries in the left pane editor.
- To move an entry up: select the option entry, right-click on the selection, and choose
Move upfrom the context menu. The selected option entry will be moved up by one position in the option entry table. When a cell or row is selected, the shortcutCtrl - Upresults in the same behavior. - To move an entry down: select the option entry, right-click on the selection, and choose
Move downfrom the context menu. The selected option entry will be moved down by one position in the option entry table. When a cell or row is selected, the shortcutCtrl - Downresults in the same behavior.
- To move an entry up: select the option entry, right-click on the selection, and choose
- Delete option: This action can be performed from the left pane editor and from the right pane browser.
- From the left pane editor, select the option entry, right-click on it, then choose
Delete selection. The selected option entry will be deleted from the option entry table. When a cell or row is selected, the shortcutCtrl - Deleteresults in the same behavior. - From the right pane browser, select the definition entry that has already been added to the left pane editor (indicated by a marked checkbox), right-click on it, then choose
Remove this option. All entries in the left pane editor defined by this definition will be deleted. When a definition row is already selected, the shortcutDeleteresults in the same behavior.
- From the left pane editor, select the option entry, right-click on it, then choose
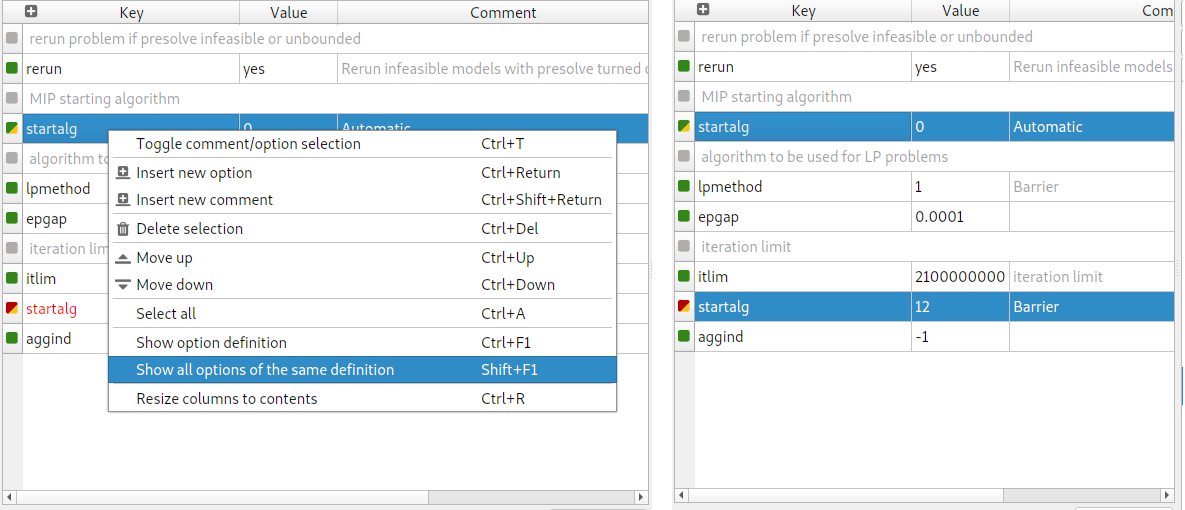
- Show option definition: This action is performed in the left pane editor. Right-click on the left pane of the option editor and choose
Show option definition. The option definition entry on the right pane will be highlighted. The shortcutCtrl - F1results in the same behavior. - Show all options of the same definition: This action is performed in the left pane editor. Right-click on the left pane of the extended editor and choose
Show all options of the same definition. All option entries in the left pane will be highlighted. The shortcutShift - F1results in the same behavior.
Compact View
Compact View in the solver option editor allows viewing and editing solver options without comments. Comments in a solver option file are not interpreted by either GAMS or the solver and are used only for documentation purposes. As a solver option file grows with many comment lines, it can be difficult to see which options will be interpreted. The compact view is helpful here, hiding all comments and displaying only non-comment lines. In the right pane editor, check the Compact View checkbox to activate compact view, and uncheck it to deactivate compact view. Comment entries reappear once compact view is deactivated.
Note that some actions may not show visible results in compact view. For example, the toggle comment/option selection action, when performed on an option row entry, turns the entry into a comment entry, which is hidden in compact view. Similarly, the delete selection action, when used on an option row entry, removes the entry, which is then no longer visible in compact view.
Certain editing actions that change the order of contents are also suppressed in compact view. These include insert new option, insert new comment, move up, and move down. Adding or inserting options from the right pane is allowed, but any comment inserted with an option (if set) is not visible in compact view. See also Settings on how to insert a new option along with a comment from the definition.
Settings
The Settings tab allows configuring behaviors for inserting new options from definitions and for deleting options. Access the settings by opening the Settings dialog (File > Settings) and switching to the Misc. tab. The configurations available are:
Override existing option. This setting allows Studio to override an existing option when an option entry is added or inserted from the right pane browser. If there are multiple entries of the same option, Studio displays a pop-up offering three choices:
replace existing entry,add new entry, orabort.- Replace existing entry removes all other entries of this definition key except the first entry from the left pane editor and replaces the option value of the entry with the default value defined in the definition.
- Add new entry adds or inserts a new option entry with the option key and default value from the definition into the left pane editor.
- Abort cancels the action.
This behavior is enabled by default. In the Settings dialog, uncheck the checkbox in front of Override existing option to suppress this behavior, or check it to enable the behavior.
- Add option description as comment above. This setting allows Studio to add an option description as an additional comment entry above an option entry added or inserted from the right pane browser. The description is taken from the option definition in the right pane browser. This behavior is disabled by default. In the Settings dialog, check the checkbox in front of Add option description as comment above to enable this behavior, or uncheck it to suppress the behavior.
- Add option description as end-of-line comment. This setting allows Studio to add an option description as an additional end-of-line comment to an option entry added or inserted from the right pane browser. The end-of-line comment is available only if the solver defines valid end-of-line characters. The end-of-line comment column will appear in the solver option editor only if this is defined for the solver option file. This behavior is disabled by default. In the Settings dialog, check the checkbox in front of Add option description as end-of-line comment to enable this behavior, or uncheck it to suppress the behavior.
- Delete all immediate comments above. This setting allows Studio to delete any immediate comments (if present) above an option when the option is deleted. This behavior is disabled by default. In the Settings dialog, check the checkbox in front of Delete all immediate comments above to enable this behavior, or uncheck it to suppress the behavior.
Summary of Actions and Shortcuts
Actions and their shortcuts that can be performed via the left pane of the solver option editor are:
| Action | Shortcut | macOS | Description |
|---|---|---|---|
| Toggle option/comment selection | Ctrl - * | Command - * | Toggles between option and comment |
| Insert new option | Ctrl - Return | Command - Return | Inserts a new option |
| Insert new comment | Ctrl - Shift - Return | Command - Shift - Return | Inserts a new comment |
| Delete selection | Ctrl - Delete | Deletes the selected option/comment | |
| Move up | Ctrl - Up | Command - Up | Moves the selected option/comment up by 1 row |
| Move down | Ctrl - Down | Command - Down | Moves the selected option/comment down by 1 row |
| Select all | Ctrl - A | Command - A | Selects all options |
| Show option definition | Ctrl - F1 | Command - F1 | Shows definition of the selected option in the right pane |
| Show all options of the same definition | Shift - F1 | Shows all options of the same definition in the right pane | |
| Resize columns to contents | Ctrl - R | Command - R | Resizes the columns in the left pane to fit contents |
Actions and their shortcuts that can be performed via the right pane of the solver option editor are:
| Action | Shortcut | macOS | Description |
|---|---|---|---|
| Option Filter | Ctrl - F | Command - F | Jumps focus to the Option Filter input field |
| Add this option | Return | Return | Adds option in the left pane from the selected definition |
| Remove this option | Delete | Removes option defined by this definition from the left pane | |
| Copy option name | Ctrl - C | Command - C | Copies option key from the selected definition |
| Copy option description | Shift - C | Shift - C | Copies option description from the selected definition |
| Copy definition text | Ctrl - Shift - C | Command - Shift - C | Copies option text from the selected definition |
| Resize columns to contents | Ctrl - R | Command - R | Resizes columns in the right pane to fit contents |
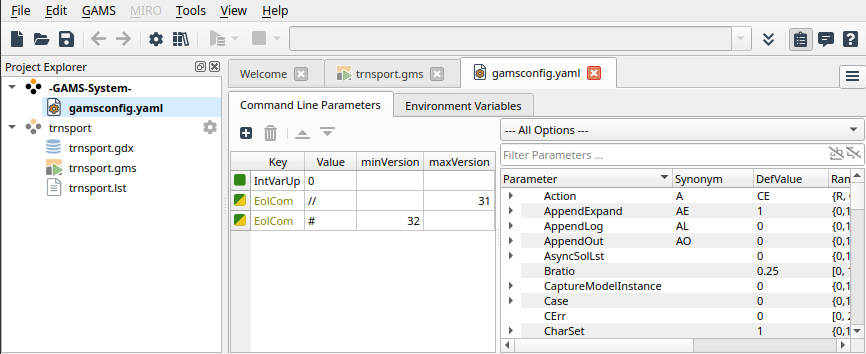
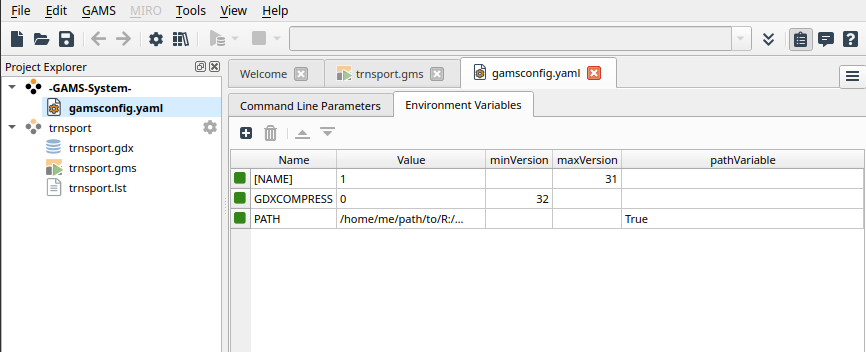
GAMS Configuration Editor
The GAMS Configuration Editor is used to view and edit a GAMS configuration file in YAML Format. The editor shows two configuration sections: command line parameters (commandLineParameters) and operating system environment variables (environmentVariables), in separate tabs.
Note that the GAMS Configuration Editor does not show the contents of the third section: external solver configuration (solverConfig), if it exists. However, the contents in this section will be saved to the file when saving the file via the editor. It is possible to use Reopen File as Text from the Project Explorer context menu to reopen and edit the file contents in the text editor when the file is already opened in the GAMS Configuration Editor, or Open File as Text from the Project Explorer context menu to open the file in the text editor when the file is not yet opened in any editor. See section The GAMS Configuration in YAML Format for the syntax of the gamsconfig.yaml file.
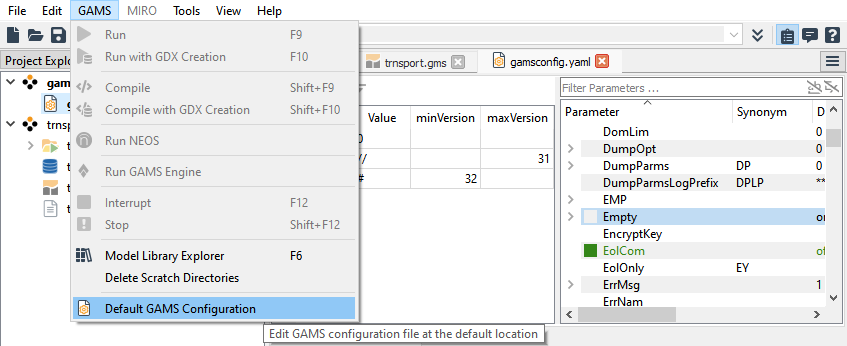
GAMS processes a sequence of gamsconfig.yaml files from different locations (see section The GAMS Configuration in YAML Format for the location of GAMS configuration files and Order of Precedence for Options for the order of precedence for command line parameters). Studio can create a new gamsconfig.yaml file at the default user-specific location and open the file in the editor if the file does not already exist at this location. This can be done by choosing GAMS > Default GAMS Configuration. If the file already exists at the default location, choosing GAMS > Default GAMS Configuration will not override the existing gamsconfig.yaml in the default user-specific location but will open the file in the editor.
It is possible to save the gamsconfig.yaml file to a different location using File > Save As....
Connect Editor
The Connect Editor allows creating, viewing, and editing a GAMS Connect file, which contains instructions in YAML syntax to be processed by the GAMS Connect interfaces. The instructions in the Connect Editor are created and edited according to the definition of available Connect Agents.
Creating or Opening GAMS Connect File
A new Connect file can be created by selecting File > New.. menu or Add new file from the project context menu in Project Explorer. An existing Connect file can be opened by selecting File > Open... menu or Add existing file from the project context menu in Project Explorer. In both cases, a file dialog opens to select the project folder, and you should choose GAMS Connect YAML File (*.yaml) as the file type.
When preferred, it is possible to view and edit the file contents without Connect Editor. Clicking the Open As Text button in Connect Editor or selecting Reopen File as Text from the file’s context menu to reopen the file with text editor, where the file content will be displayed and edited as plain text. When the file has unsaved changes that have been edited with Connect Editor, a dialog to report modified content is opened and offered options to either Discard and Open As Text, or Save and Open As Text, or Cancel before reopening the file.
- If discarding the content, Studio will discard all the modified contents and open the original file content with text editor.
- If saving the content, Studio will save the file before switching to the text editor.
- If canceling the operation, Studio will return to the current modified state in the Connect Editor.
Viewing and Editing the File Contents
Three main sections of Connect Editor are:
- the left section displays instructions from the Connect file in a tree structure. The top-level entries are Connect agent names with option entries as their children. Clicking an agent name or option entry will display relevant definition in the other two sections when applicable.
- the middle section lists all available Connect Agents. Double-clicking or drag-and-dropping an agent name from this section into the left section will add or insert instructions for the selected agent.
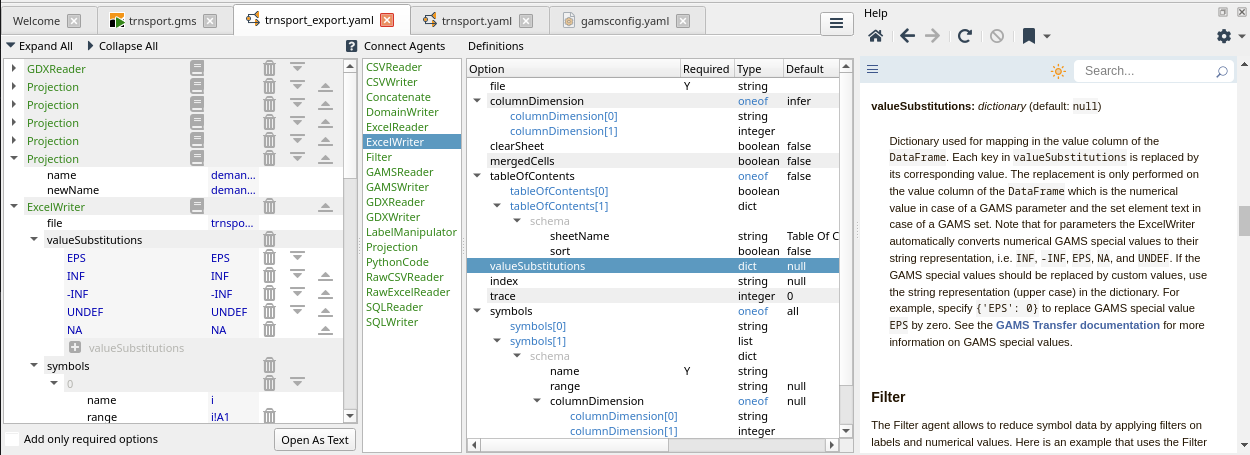
- the right section shows the option definition of the Connect agent that is selected in the middle section. Clicking an agent name in the middle section will display the definition of the selected agent in this section.
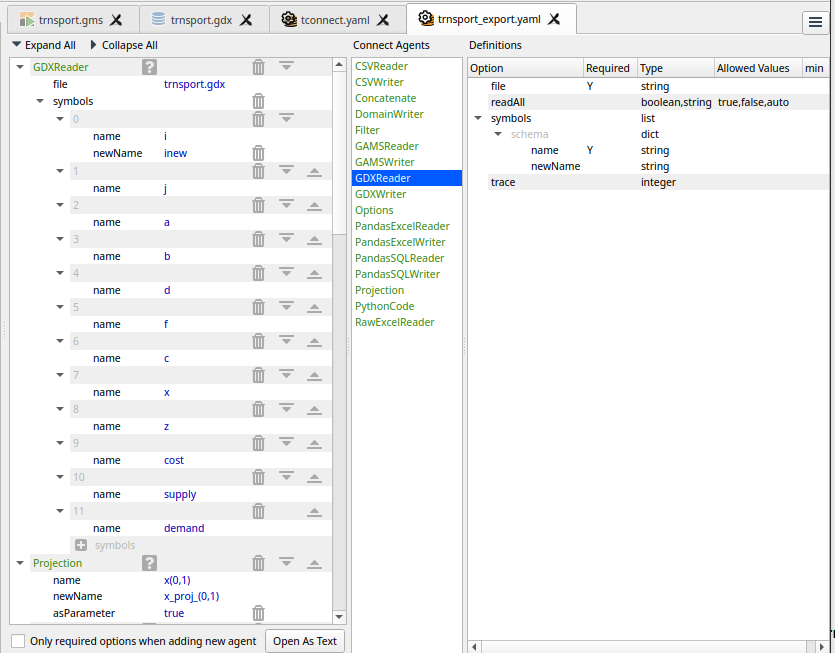
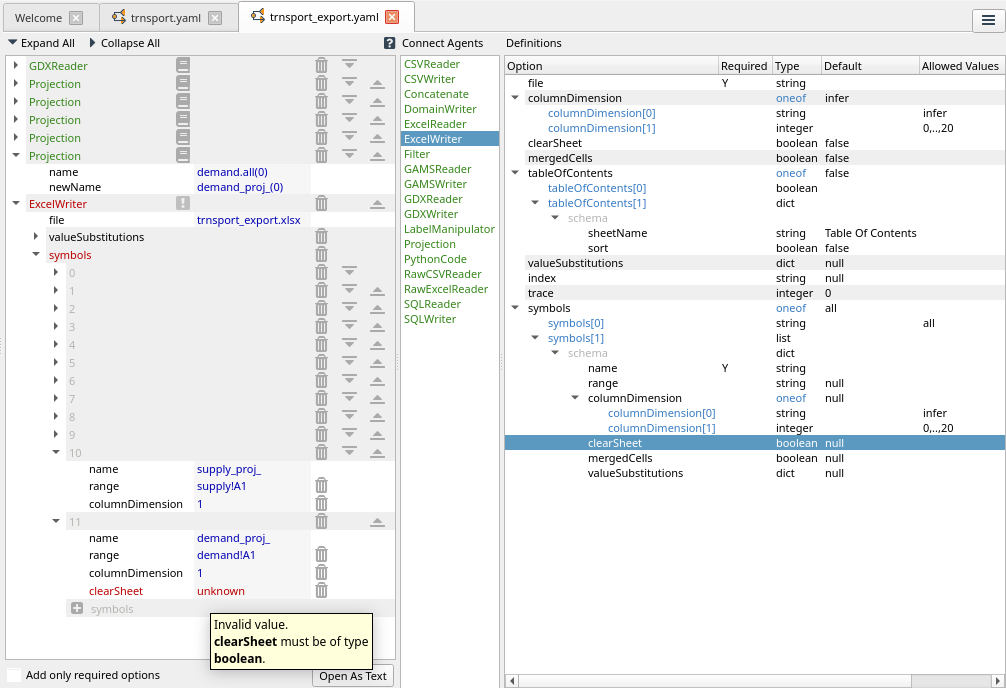
Top-level entries of a tree structure are instructions of Connect agents, each with option entries as its children. Each option entry is either a map of option key to option value, or an option key entry, or a list of option values, depending on the agent’s definition. Only option value can be edited, shown in the editor with different text color and background color. Double clicking an option value to edit the value of the option or list value.
An edited option value that does not conform to the definition (e.g. wrong type or disallowed value) will be highlighted in red text color, as well as its the agent name. Hover a mouse over agent or option or icon will show a tooltip with descriptive text explaining either a reason for being non-conformance, or the current status, or the function of the agent or option or icon.
By clicking the Help icon next to the agent name at the top-level entry, the agent name in the middle section will be selected, and the definition of the agent will be shown in the right section. Press F1 on the agent name or option name will show the documentation in the Help View with the detailed description of the agent or option (see also Integrated Help).
Add or append a new agent to the instructions in the left section by double-clicking an agent name in the middle section. Double-clicking an agent will append it at the last entry in the left section. Dragging an agent and dropping it at the end of the entries will append an agent as the last entry in the left section.
Insert or append a new agent by dragging an agent name in the middle section and dropping it to the desired position in the left section. Dropping the agent onto an agent name entry will append it after the dropping position, dropping the agent between two entries of the same level will insert it at the position in between.
Insert or append a missing option by dragging an option in the right section and dropping it to the desired position in the left section. Dropping the option onto an entry will append it as the last child entry of the entry, dropping the option between two entries of the same level entries will insert it at the position in between.
- Note
- Dropping an agent or an option will be allowed only at specific appointed position according to the definition. The mouse pointer will turn green at the allowed dropping position and turn red at a forbidden position.
When the Only required option when adding new agent checkbox is checked, only the agent's required options will be added when adding an agent. Dragging and dropping a non-required option is not allowed until the checkbox is unchecked. Unchecking the Only required option when adding new agent checkbox before adding or appending a missing but non-required option.
Expand or collapse an option entry with children by either clicking at expanded icon or collapsed icon in front of the entry. The tree structure can be fully expanded by clicking Expand All and collapsed by clicking Collapse All at the top of left section.
Deleting an agent or option entry by clicking delete icon at end of each entry. It is not possible to delete a required option. If needed to, reopen the file contents as text and delete it with text editor.
Changing order of options entries by clicking move up icon or move down icon at end of each entry.
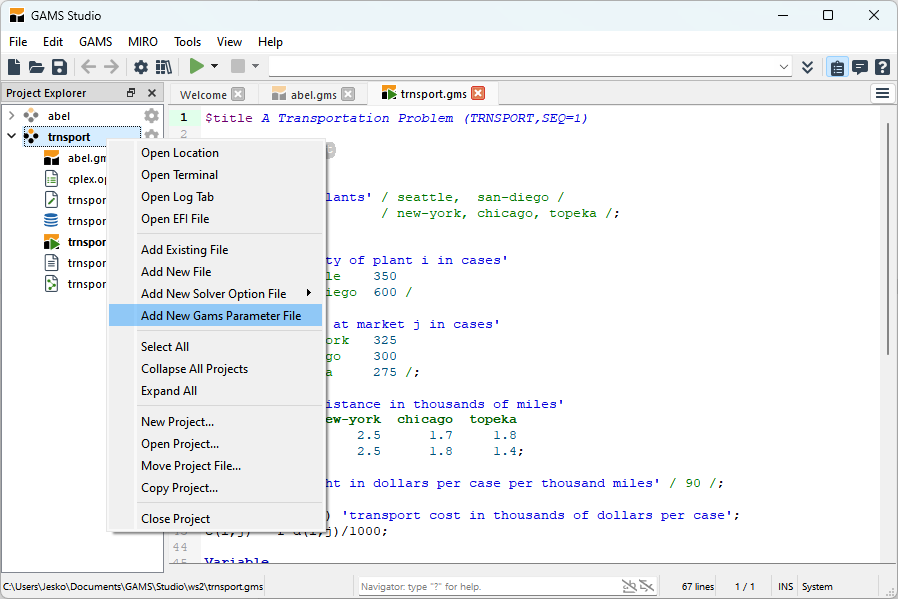
Parameter File
To support fast switching between parameter sets, Studio contains an editor for "GAMS Parameter Files". To create a Parameter File, open the context menu of a project and select "Add New Gams Parameter File". The project settings contain a box to switch between different parameter files or to deselect a file for the project.
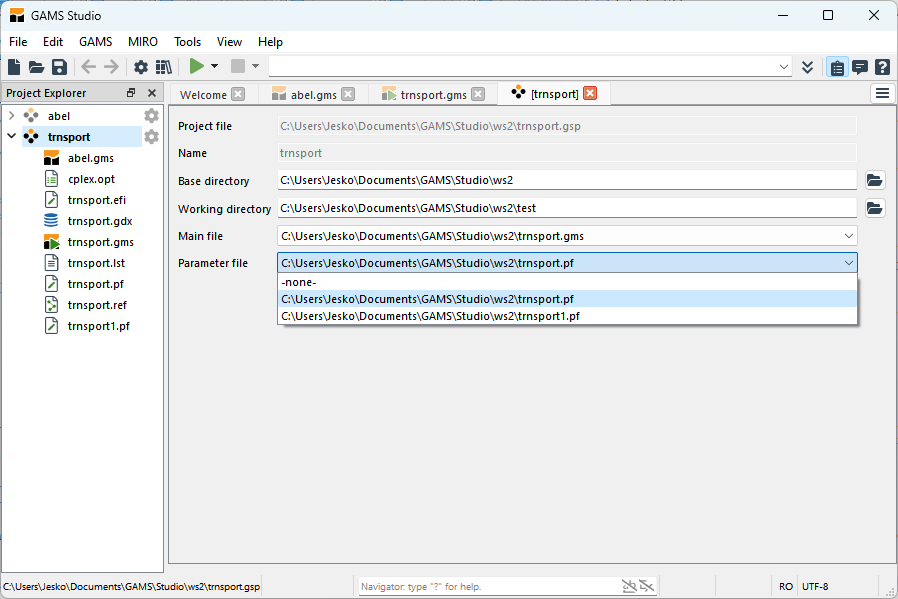
Parameters defined in the parameter file will override parameters defined in the GAMS configuration file. The usage of this editor is equivalent to the Solver Option Editor.
Tab Browser (Deprecated)
Deprecation Notice: This feature will be removed in a future version of GAMS as it is replaced by the Navigator.
The Tab Browser can be accessed with a button next to the main tab bar or via the shortcut Ctrl - 4. It opens a list of all open files and includes a search input field. When opening the tab browser, the search field is already focused. Typing updates the list in real time. Pressing Enter selects the first item in the list and opens it. It is also possible to use the up/down arrows to navigate the list and select an item with Enter. The filter supports wildcard syntax.
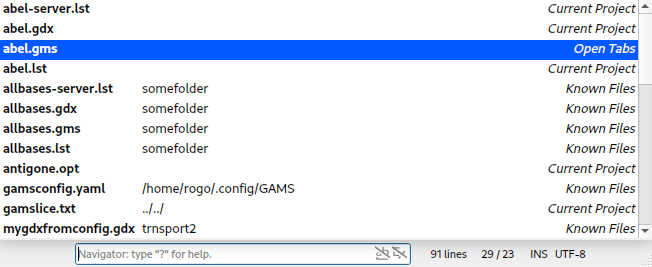
Navigator
The Navigator allows users to quickly navigate between files and can be opened with the shortcut Ctrl - K or by clicking in the Navigator input field located in the Status Bar in the bottom right. The default view shows a list of all files from the Project Explorer with three columns. The first column contains the file name, the second shows the path relative to the current project's directory (if it is the same path, the field is empty), and the third column contains additional information, such as the type of result by default. Typing in the input field filters this list. Using the arrow keys, a result can be selected and confirmed with Enter. The filter also supports wildcards: for example, typing *.gdx will find all ".gdx" files.
To narrow a search further, the Navigator supports different modes accessed with prefixes in front of the search term. Typing "?" in the input field shows a list of all available modes, allowing, for example, filtering for files currently opened in a tab (t), files associated with the current project (p), or all open log tabs (l). Additionally, using the : prefix followed by a number lets users jump to a certain line in the current file. There is also an option to jump to files not yet known to Studio: using the f prefix allows navigation of the filesystem from the current project's workspace. With the quick action prefix (x), users can call frequently used Studio functions like "Open Model Library Explorer", "Clean Scratch Directories", and "Run Engine". For a complete list, type x into the Navigator.
Pin View
Studio provides a Pin View to keep a clone of a selected tab, allowing two file contents to be visible simultaneously. To pin a tab, there are two options in the tab bar: "Pin right" (shortcut Ctrl - Click) splits the edit area horizontally and opens the Pin View to the right of the main tabs, while "Pin below" (shortcut Ctrl - Shift - Click) splits the edit area vertically and opens the Pin View below the main tabs. The state and size of the Pin View are restored upon restarting Studio.
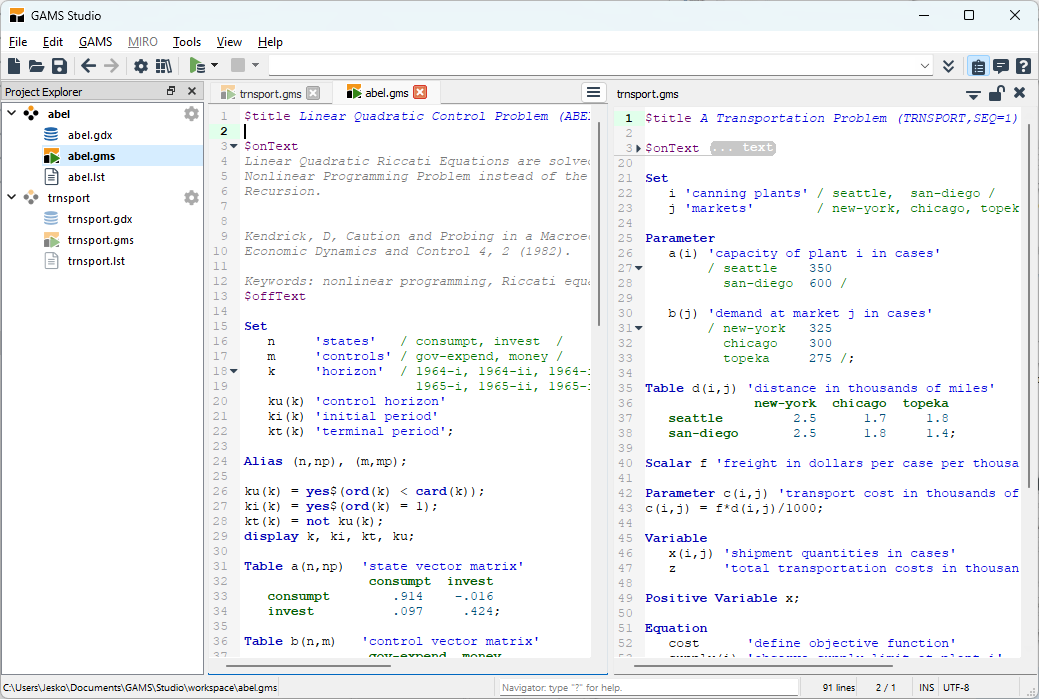
The Pin View provides additional buttons. The first button switches the split orientation from right to below and vice versa. The second button enables synchronized scrolling for the two visible editors. Synchronization is always passed from the active editor to the passive editor, so scrolling with the mouse wheel in the passive editor doesn’t affect the active editor, allowing adjustments without toggling the function off and on. The last button closes the Pin View.
Navigation History
The Navigation History records a navigation history event each time the cursor moves in any text file opened in the Studio central widget. This allows the user to quickly jump back (and forward again) to text passages that were recently edited. To reduce clutter, some events overwrite the previous event. This happens when the cursor is moved by only a single position in either direction, so that when a user jumps through text or types, only the latest position is stored in the history. The purpose is to make it easier and more convenient to jump to positions that actually matter. Using the navigation history is not limited to a single file; it is easy to jump between multiple files to go back and review recent changes. If a file was closed in the meantime, it will be reopened when navigating through the history. This even includes files that were completely removed from Studio. When such a file is reopened through the Navigation History feature, due to technical limitations, the file’s affiliation with its previous project is lost. Please note that after navigating back in the history, all "future" history events will be deleted and overwritten if the user creates new history events.
| Action | Shortcut | macOS | Alternative Shortcut |
|---|---|---|---|
| Go Back | Alt - Left Arrow | Ctrl - [ | Mouse Button 4 |
| Go Forward | Alt - Right Arrow | Ctrl - ] | Mouse Button 5 |
Further Studio Widgets
Project Explorer
The Project Explorer organizes files opened in Studio into projects. Each project has its own base directory. All files associated with the project are organized in a hierarchical tree structure of folders relative to this base directory. A project’s tooltip shows its location in the file system, displaying the project file’s path (the .gsp file - gsp stands for Gams Studio project). To support faster identification, there are several icons for different file types:
- Runnable GAMS files (default:
.gmsand.inc) are marked with a GAMS icon. - The main GAMS file assigned to the project additionally shows a green play symbol.
- GDX files (.gdx) are represented with a database icon.
- Reference files (.ref) have a reference nodes icon on a sheet.
- Editable files (e.g.,
.txt) display a pen on a sheet. - Read-only files (e.g.,
.log) are indicated by lines on a sheet.
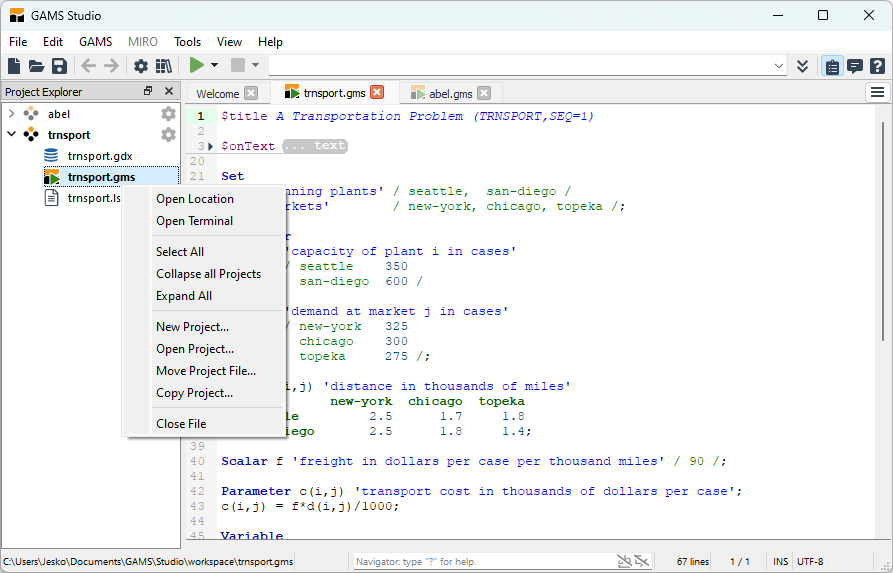
A file or folder entry’s tooltip shows its location in the file system. The file, project, and folder locations can be opened in the default file system explorer via the context menu’s "Open Location". Selecting "Open Terminal" opens the system’s terminal window at the location of the selected file, project, or folder. The context menu of a .gdx file provides a special option "Open in GDX Diff" to open the GDX Diff Dialog.
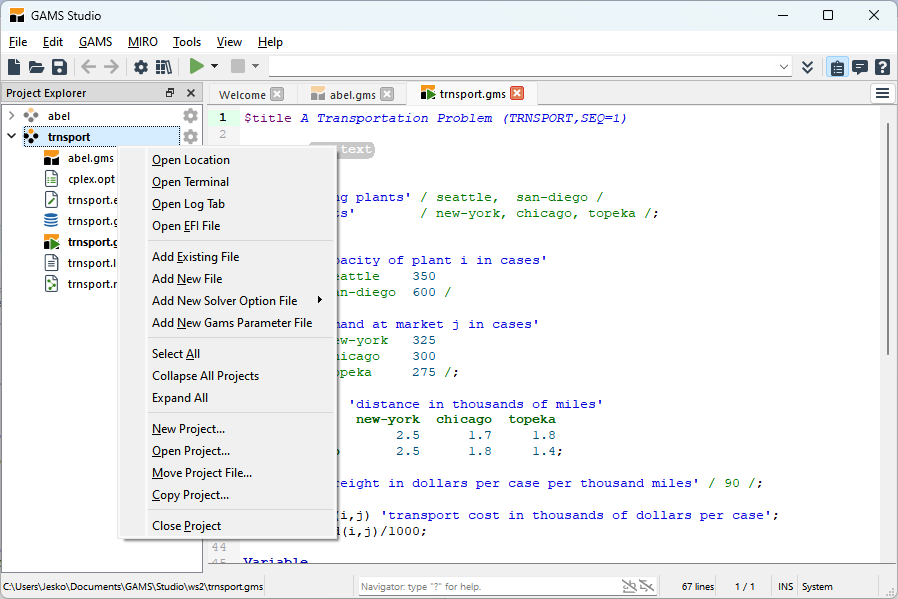
An empty project can be created by selecting "New Project..." from the "File" menu or from the Project Explorer context menu. The Project Options will open to assign the project name and Working Directory. If a project with that name already exists, Studio will look for a number to append until the project name is unique. A project is also created automatically when opening a file; the project’s name and location are based on the file’s name and location. It is possible to add projects with the same name to Studio; a gray number helps to differentiate them.
One project may contain multiple runnable GAMS files, but only one can be set as the main file, marked with a green arrow overlay. By default, the first runnable GAMS file in a project is considered the main file. The tooltip of a project also shows the folder’s location and the current main file name. After the first run, it also shows the name of the most recent output file (.lst). You can change the main file for a project at any time. To set a different runnable GAMS file as the main file, use the "Set as Main File" option from the context menu in the Project Explorer. Alternatively, you can enable the "Dynamic main file" option in the Project Options. Note that changing the main file does not alter the project's base directory.
The Main File of the active project is executed by pressing F9 or clicking the execute button (see Quick Access Toolbar and GAMS Parameter Editor for setting GAMS parameters and executing the main file). To identify the active project, the current file and its project appear in bold text, and icons of other projects are slightly dimmed. After executing the main file, the generated listing file (.lst) is added to the project, and the output view (see Process Log) is opened. A clickable log line in the process log may add the corresponding file to the project and open it in the Central Widgets area. Users can manually add more files to a project by right-clicking and selecting "Add Existing File" or "Add New File" from the context menu. Drag and drop from the system’s file explorer is also supported.
Multiple items can be selected in the Project Explorer, but a selection contains only items of one kind (either files or projects, not both), depending on the first selected item. Folders count as multiple file selections. The context menu then applies to all selected items.
Files can be removed from a project, and projects can be removed from the Project Explorer using the "Remove from Project" and "Close Project" actions from the context menu. The action "Close Project" closes all open files in the selected project(s) and removes all file entries as well as the project entry from the Project Explorer without affecting the files on the file system. The action "Remove Files in This Folder" removes all files in this folder and its subfolders. The action "Remove from Project" closes the selected file(s) if opened and removes the file entry from the project. If the removed file is the only entry in a folder, the folder is also removed. A project can be empty during the current session, but an empty project will not be restored on Studio restart. If there are unsaved changes, a message popup will appear, asking the user how to proceed.
Selected files and folders can be deleted by selecting "Delete File" from the context menu. Be aware that files that are part of multiple projects will be deleted too and will be removed from the other projects that contain the files. When selecting a folder entry, only the files that are part of the project will be deleted, no other files and not the folder itself. The context menu for a project allows you to delete the project file.
Each project is usually stored in its own file, but projects with fewer than six files or without a runnable GAMS file are stored internally (this can be changed in the Project Options). Related paths are stored relative to the project file’s location, enabling easy sharing of the project and its files. You can use "Move Project File" to rename a project or to move it to another folder. In this case, the relative paths are adjusted to reach the original referenced files. The option "Copy Project" allows creating a copy of the project file and all of its referenced files.
Selected files can be dragged to another project. Dropping them moves them to the destination project. If a folder is empty after this action, its representation is removed from the project. Pressing the Ctrl key creates a copy of the file reference in that project (without copying the file itself). If the project already contains a specific file, it is ignored.
The currently opened file can be copied by selecting "File" > "Save As ..." from the main menu. This updates the reference to this file in the Project Explorer. If the selected destination file is already in the same project, this reference will be replaced. An open editor of the destination file will be closed before.
Project Focus
Having multiple projects with many files in the Project Explorer can get confusing. The drop-down box at the top of the Project Explorer allows focusing on one project at a time.
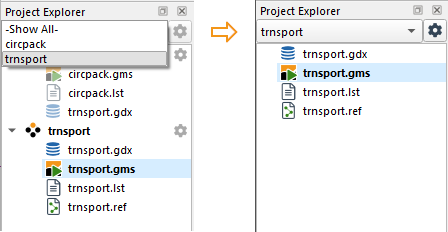
When a project is focused, only the files referenced in this project will be shown in the Project Explorer. Additionally, Studio hides all other process logs and all open tabs that are not referenced in the focused project. The hidden files remain open in the background and will become visible if their project or -Show All- is selected. This allows instant switching to another project without needing to reopen or modify files. If the open tabs do not contain any file from the focused project, the main file of that project will open.
Project Sort and Filter
When the Project Explorer gets too crowded either with multiple projects or many files per project it may get difficult to keep the overview. GAMS Studio supports you to find the files by providing a sort and filter utility.
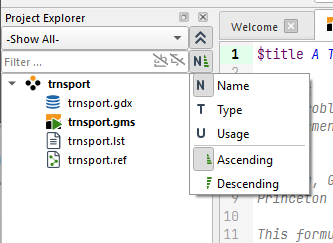
It can be accessed using the unfold arrows trailing the Project Focus field (see above). The sorting allows to sort the entries by filename, suffix, or last usage. E.g. selecting last usage and descending, the most recently ran project and the most recently changed file will get the top position. The filter allows to reduce the visible entries to the ones matching the text. The first additional switch forces a complete match, the second switches to Regular Expression.
Project Options
Next to each project, there is a cog wheel button that opens the Project Options page. It contains these actions:
- Project file: shows the location of the project file or [internal] for internally stored projects. The button next to the location allows creating or deleting the project file. The file name always corresponds to the project name.
- Name: shows the name of the project. When changing the name of a project stored in a project file, the file name is also changed to the new name. In this case, a red name indicates that this file already exists in the current directory.
- When one ore more projects with the same name from different paths are opened in Studio, a virtual continuous number is added in the alphanumeric order of the project path. This "complete name" is shown in the field right to the name field.
- Working directory: defines the directory where the main GAMS file associated with the project will be executed.
- Base directory: defines the directory from which the folders to each file of the project are generated. By default this equals to the
Working directory. To have a differentBase directoryactivate the checkbox and the input can be edited. Changing this updates the visible folder structure for all files of this project. - Main file: shows the current main file and allows changing it. The drop-down box lists all runnable files in the project.
- Dynamic main file: when active, this option automatically sets the currently active
.gmsfile in your editor tab as the main file for execution. This means you don't have to manually specify a main file; GAMS Studio will simply run the file you are currently working on. - Parameter file: shows the current parameter file and allows changing it.
Changes to the Project Options are stored instantly on leaving the input field as long as the paths to the working and base directory exists. Otherwise the changes needs to be applied manually by selecting "File > Save" or pressing Ctrl-S.
Classic IDE import
Projects that have been stored with the classic GAMS IDE can be imported to Studio using "File > Import GAMS IDE project (.gpr)". This creates a GAMS Studio project containing all files from the .gpr file and the assigned command line parameters. Files that have been open in a GAMS IDE window will be opened in GAMS Studio as well.
The GAMS IDE project stores the files with absolute paths. When the .gpr file and all referenced files are moved to a different path keeping the relative location to each other, GAMS Studio tries to estimate the relocation. When all files from the IDE project are found, the GAMS Studio project is created without further request. If one ore more files are missing a dialog shows the original and the estimated relocation path. The relocation path can be edited before the GAMS Studio project is created. This also allows to import a classic GAMS IDE project on macOS or Linux assuming the referenced files can be found in their relative location.
- Note
- For long-time users of the classic GAMS IDE, the section about the differences between IDE projects and Studio projects may be of particular interest.
Process Log
After starting a GAMS process, the LogViewer opens to view the process log. Usually, the log stays at the bottom to display the latest log lines. Tracking can be paused by clicking the up arrow on the vertical scrollbar. To resume tracking, scroll to the bottom.
The log typically contains various links:
- Compilation errors (red): Links to the GAMS file where the error occurred. Also includes a link to the listing file (.lst) at the beginning of the line (blue).
- Listing links: Links to a specific line in the listing file.
- File link (green): Links to a file without line numbers, such as .gdx or .ref.
Clicking a link takes the focus to that file (and line). Double-clicking in the log finds the nearest link to the listing file and takes the focus there. Files not part of the current project are added when opened via link.
For general messages, there is the System Log, stacked with all Process Logs. It keeps track of Studio-related messages not originating from a specific GAMS run.
Quick Access Toolbar and GAMS Parameter Editor
The toolbar contains two parts: a quick access section and a GAMS Parameter editor to customize how GAMS executes the model (see The GAMS Call and Command Line Parameters).

The quick access section contains icons for performing common File actions like New, Open, and Save , as well as accessing Settings dialog, Model Library Explorer dialog, Project Explorer view, Process Log, and Help view.
The GAMS Parameter Editor provides a way to control and customize the execution of a GAMS model. The editor displays the parameters of the project associated with the file currently open in Central Widgets (see also Project Explorer for project and its runnable files). The parameters can be typed into a combobox, and the execution of a GAMS model can be carried out using the following pre-customized execution commands:
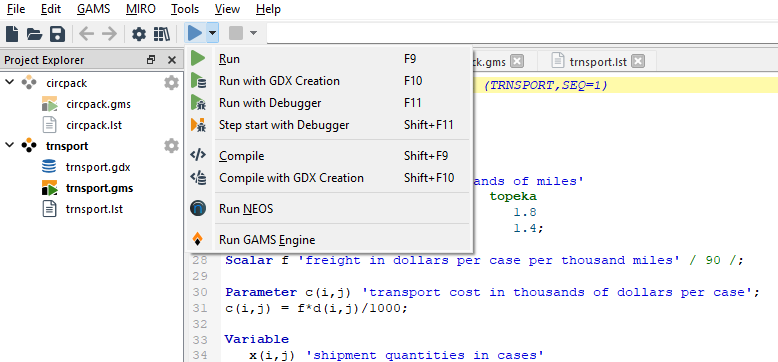
- Run: Choose this or press
F9to compile and execute GAMS statements in the main runnable file. This execution command is equivalent to running GAMS with the default parameter action=CE (Compile and Execution). - Compile: Choose this or press
Shift - F9to compile GAMS statements in the main runnable file. This execution command is equivalent to running GAMS with the parameter action=C (CompileOnly). - Run with Debugger: Choose
Run with Debuggeror pressF11(macOSMeta - F11) to compile and execute GAMS statements in the main runnable file with the debugger enabled. - Step start with Debugger: Choose
Step start with Debuggeror pressShift - F11to compile and execute GAMS statements in the main runnable file with the debugger enabled and pause the process at the first possible line. - Run with ...: Choose this or press
F10to compile and execute GAMS statements in the main runnable file regarding the additional options:- Create GDX: Check this to let Run with ... create a GDX file. This is equivalent to adding gdx=default to the run parameters.
- Create RF: Check this to let Run with ... create a RF file. This is equivalent to adding rf=default to the run parameters.
- Profiling: Check this to let Run with ... activate profiling. This is equivalent to adding profile=300 to the run parameters.
- Compile with ...: Chose this or press
Shift - F10to compile GAMS statements in the main runnable file regarding the additional options below.- STUDIO_TOOLBAR_OPTION_GDX Create GDX: Check this to let Compile with ... create a GDX file. This is equivalent to adding gdx=default to the run parameters.
- STUDIO_TOOLBAR_OPTION_RF Create RF: Check this to let Compile with ... create a RF file. This is equivalent to adding rf=default to the run parameters.
- Run NEOS: Choose
Run NEOSto compile GAMS statements in the main runnable file locally and pass the execution to the NEOS server. - Run GAMS Engine: Choose
Run GAMS Engineto compile GAMS statements in the main runnable file locally and pass the execution to the GAMS Engine server.
The recent used run option will be written to the settings and restored when GAMS Studio is restarted.
The main menu GAMS contains the actions of the run menu. Usually the options for Run with ... and Compile with ... are shown beneath the action. On macOS the main menu isn't part of the application and the options won't pop up here. To change the selected options on macOS use the run menu.
The pre-customized execution command will operate on the main file (marked with a little green arrow over the regular icon) of the active project (see how to manage the main file in section Project Explorer). If GAMS parameters have been set, they will be appended to the pre-customized commands. Like in the GAMS Terminal, when identical parameters have different values, the last one "wins" and overwrites the previous ones. This allows users to change and override GAMS Studio default parameters, which can lead to problems if done incorrectly. In such cases, Studio prints a warning message to inform users about potential issues. To debug Studio’s actions, the full GAMS call parameters are printed in the System Log. After execution, parameters are added to the projects main file history. This can also be switched to be shared across all files in the project in Settings > General > Store options for each, see General page. Previous GAMS parameters can be recalled from the main file or project history via the drop-down menu of the combobox. Switching files in Central Widgets will activate a different project history only if the newly opened file belongs to a different project.
The GAMS Parameter Editor provides options to interrupt or stop a running GAMS model job (identified by an animated icon over the project folder icon in Project Explorer):
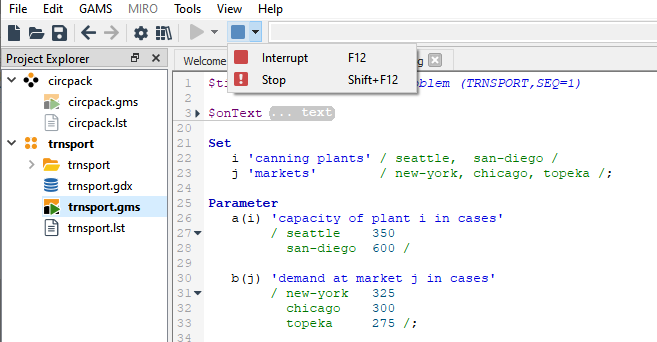
- Interrupt: Click the
Interruptbutton or pressF12to send an interrupt request to the running job to perform a graceful stop and collect an incumbent result from the execution if the solver supports this feature. This command is enabled when there is an active job in the project and disabled when no job is running. - Stop: Click the
Stopbutton or pressShift - F12to send a request to immediately stop the running job. This command is enabled when there is an active job in the project and disabled when no job is running.
The Extended GAMS Parameter Editor allows configuration of GAMS parameters. The editor appears when the Show button next to the parameter combobox is clicked, or with the shortcut Ctrl - Alt - 3. Clicking the button again hides the editor. When shown, the GAMS parameters from the parameter combobox appear as a list of entries in the left pane of the extended parameter editor, each entry displaying the Key and Value.
Note that the GAMS parameter combobox is disabled when the extended parameter editor is active; all editing must be done in the extended editor.
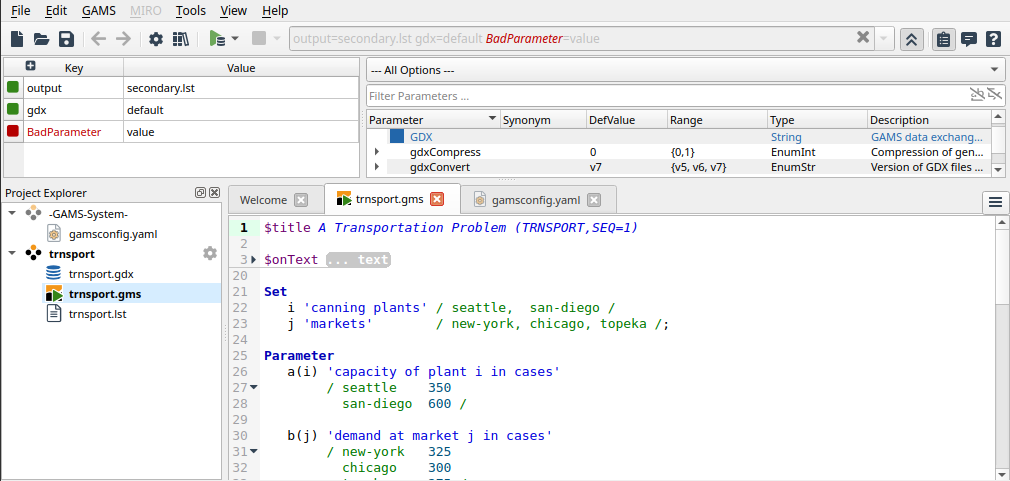
The right pane of the extended editor displays the list of all valid parameter definitions, each containing Parameter Name, Synonym, Default Value, Type, and Description. Definitions with enumeration types (EnumStr or EnumInt) can be expanded by clicking the bullet in front of the entry to show all possible values; clicking the bullet again collapses the list. A filter box (with placeholder text Filter Parameter...) above the definitions list allows filtering parameters. Typing a filter term displays matching results in the list below. More information on filtering is in the Filter Section.
The parameter editor highlights potential errors in red in both the combobox and the left pane of the extended editor. Hovering over an error key or value displays a tooltip with further error details.
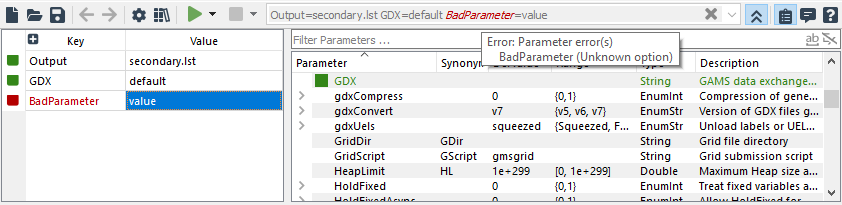
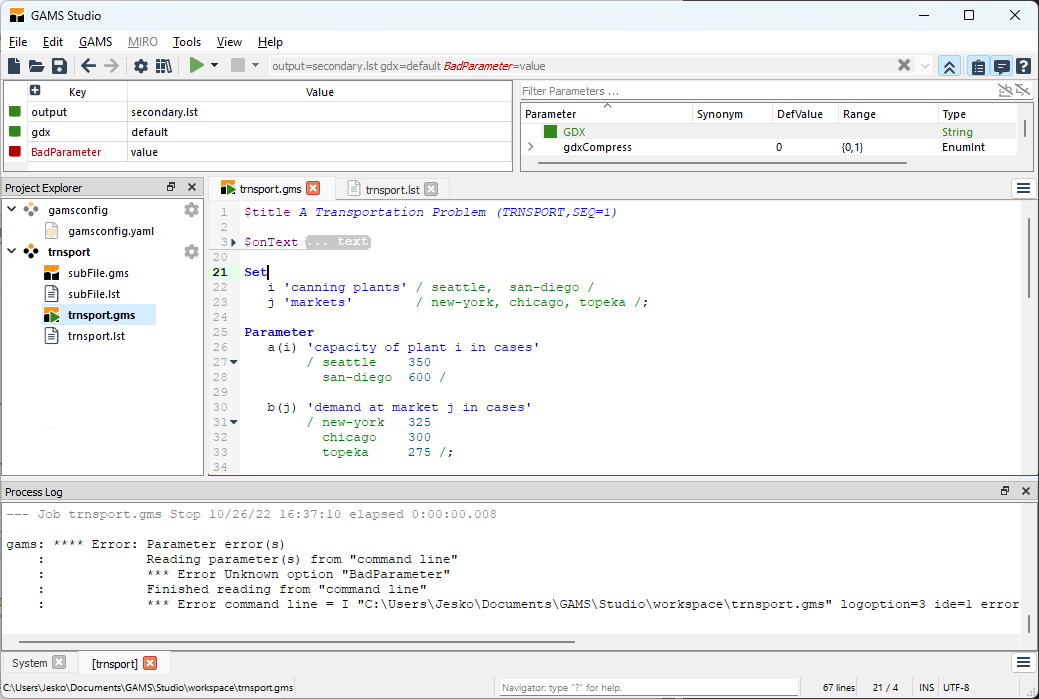
When there are multiple entries of the same parameter, only the last entry is considered when GAMS executes the model. In such cases, the parameter editor combobox displays a warning in yellow, and the icon beside the parameter in the extended editor turns half-yellow combined with another color, red or green, depending on whether an error exists.


Refer to edit parameter key and value for guidance on editing a parameter key or value that shows an error or warning. Refer to show all parameters of the same definition for locating all entries of the same parameter.
Below are all editing actions available in the extended parameter editor:
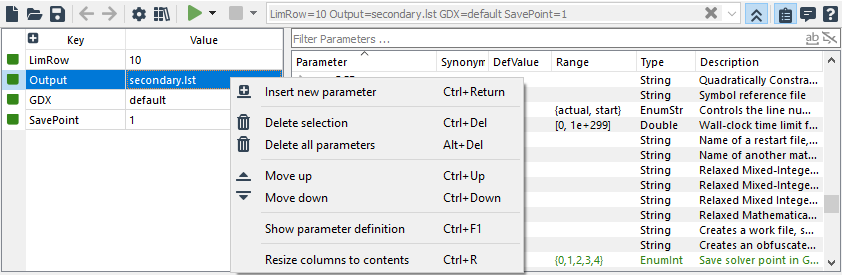
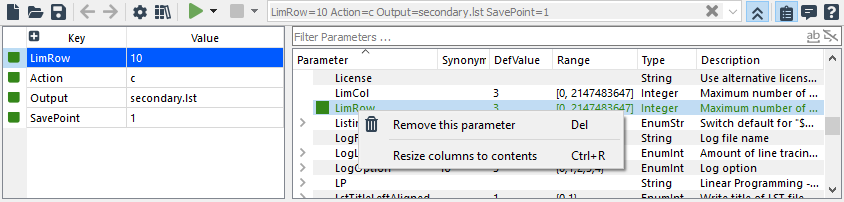
- Edit parameter key and value: Double-click on the key cell to edit
Keyand on the value cell to editValueof an entry. A drop-down list suggests possible keys and values when available. PressEnterto confirm the edit andEscto cancel.
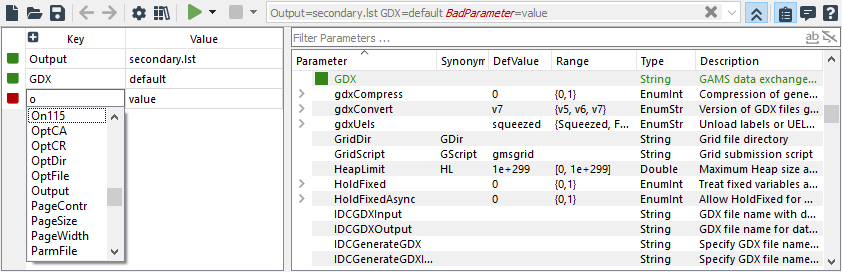

Add new parameter: There are several ways to add a new parameter in the extended parameter editor.
- Right-click on the left pane of the parameter editor and choose
add new parameterfrom the context menu. - Right-click on a selected parameter entry in the parameter table and choose
add new parameterfrom the context menu. - Click on the add new parameter button located next to the
Keytable header in the left pane.
A new entry will be added at the end of the parameter entry table with a placeholder key
[KEY]and placeholder value[VALUE]. Refer to edit parameter key and value for instructions on editing the key and value.Additionally, a new parameter can be added from the right pane by double-clicking a definition entry. The selected definition entry will be added as a new parameter at the end of the left pane table.
If you double-click an enumerated value entry of a parameter definition, it will be added with the selected enumerated value. If not, the default value for the entry is added.
- Right-click on the left pane of the parameter editor and choose

- Insert new parameter: Right-click on the selected entry and choose
insert new parameter. A new entry will be inserted before the selected entry, with a placeholder key[KEY]and placeholder value[VALUE]. Refer to edit parameter key and value for instructions on editing key and value. - Move up: Right-click on the selected entry and choose
Move Up. The selected entry will move up one position in the table, changing the parameter order. - Move down: Right-click on the selected entry and choose
Move Down. The selected entry will move down one position in the table, changing the parameter order. - Delete selection: Right-click on the selected entry and choose
Delete Selection. The selected entry will be removed from the table. - Delete all parameters: Right-click on the left pane of the extended editor and choose
Delete all Parameters. All entries will be removed from the table. - Show parameter definition: Right-click on the left pane of the extended editor and choose
Show parameter definition. The corresponding parameter definition entry in the right pane will be highlighted. - Show all parameters of the same definition: Right-click on the left pane of the extended editor and choose
Show all parameters of the same definition. All parameter entries of the same definition on the left pane will be highlighted.
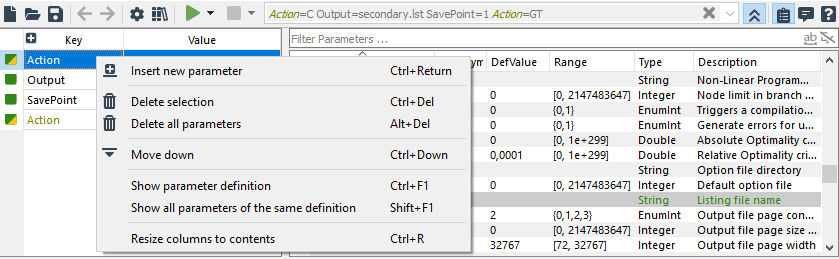
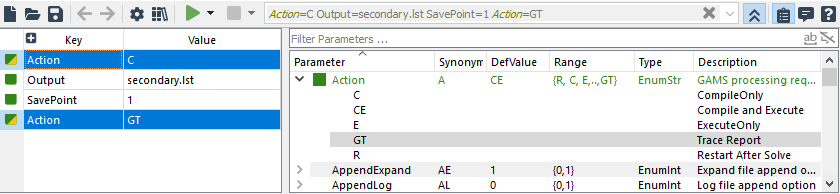
- Resize columns to contents: Right-click on the left or right pane of the extended editor and select
Resize columns to contents. All columns will be resized based on their contents.- Add this parameter: Right-click on the right pane of the extended editor and select
Add this parameter. The parameter, with its default value if defined, will be added as the last entry on the left pane of the extended parameter editor. This option is enabled only if the parameter does not already exist in the left pane. Note that double-clicking the parameter definition will also add it. If the parameter is already present, a dialog will appear with options to:- Replace the existing entry if only one exists, or replace the first and delete duplicates if there are multiple entries,
- Add a new entry with the same definition,
- Show details of all instances of the parameter, or
- Abort the action.
- Add this parameter: Right-click on the right pane of the extended editor and select
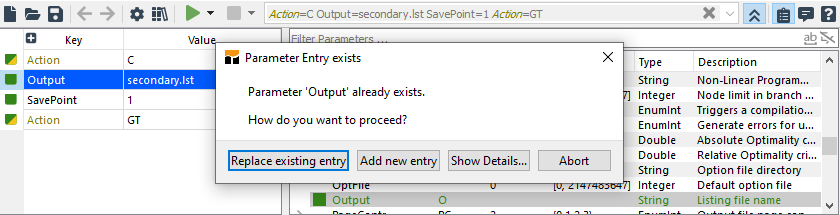
- Remove this parameter: Right-click on the right pane of the extended editor and select
Remove this parameter. The selected parameter definition will be deleted from the left pane of the extended parameter editor. This action is enabled only if the parameter is present in the left pane. If multiple entries exist, all instances will be removed.
Press F1 on a parameter entry in the extended parameter editor to open the GAMS Call and Command Line Parameters help page for a detailed description of the GAMS parameter.
Summary of Actions and Shortcuts
Actions and their shortcuts that can be performed via the Toolbar and GAMS parameter editor are:
| Action | Shortcut | macOS | Description |
|---|---|---|---|
| New | Ctrl - N | Command - N | Opens new file dialog |
| Open | Ctrl - O | Command - O | Opens file dialog |
| Save | Ctrl - S | Command - S | Saves the current file; opens save file dialog if file does not exist |
| Settings | F7 | Command - , | Opens the Settings dialog |
| Model Library | F6 | F6 | Opens the Model Library Explorer dialog |
| Run | F9 | F9 | Runs main file of current project with GAMS |
| Run with ... | F10 | F10 | Runs main file, creating GDX and Reference file and profiling data if selected |
| Compile | Shift - F9 | Shift - F9 | Compiles main file without execution |
| Compile with ... | Shift - F10 | Shift - F10 | Compiles main file without execution, creating GDX and Reference file if selected |
| Interrupt | F12 | F12 | Gracefully interrupts current GAMS job |
| Stop | Shift - F12 | Shift - F12 | Stops current GAMS job immediately |
| Show extended parameter | Shift - Ctrl - 3 | Control - Option - 3 | Opens the extended GAMS parameter editor |
| Project Explorer | Ctrl - 1 | Command - 1 | Opens Project Explorer |
| Process Log | Ctrl - 5 | Command - 5 | Opens Process Log |
| Help | F1 | F1 | Opens the GAMS Help |
Actions and their shortcuts that can be performed via the left pane of the extended GAMS parameter editor are:
| Action | Shortcut | macOS | Description |
|---|---|---|---|
| Insert new parameter | Ctrl - Return | Ctrl - Return | Inserts a new parameter |
| Delete selection | Ctrl - Delete | Deletes the selected parameter | |
| Delete all parameters | Alt - Delete | Deletes all parameters | |
| Move up | Ctrl - Up | Command - Up | Moves the selected parameter up one row |
| Move down | Ctrl - Down | Command - Down | Moves the selected parameter down one row |
| Select all | Ctrl - A | Command - A | Selects all parameters |
| Show parameter definition | Ctrl - F1 | Shows definition of selected parameter in the right pane | |
| Show all parameters of the same definition | Shift - F1 | Shows all parameters of the same definition | |
| Resize columns to contents | Ctrl - R | Command - R | Resizes columns to contents in the left pane |
Actions and their shortcuts that can be performed via the right pane of the extended GAMS parameter editor are:
| Action | Shortcut | macOS | Description |
|---|---|---|---|
| Parameter Filter | Ctrl - F | Command - F | Focuses on the Parameter Filter input field |
| Add this parameter | Return | Return | Adds parameter to the left pane from the selected definition |
| Remove this parameter | Delete | Removes parameter defined by this definition from the left pane | |
| Resize columns to contents | Ctrl - R | Command - R | Resizes columns to contents in the right pane |
Integrated Help
The Help View integrates GAMS documentation navigation directly into GAMS Studio. Press F1 or select Help > GAMS Documentation or check View > Help to open the Help View and browse the documentation. The Help View start page is the main document page available in the GAMS distribution used for GAMS Studio. See Home to return to this start page at any time. Alternatively, select Help > Studio Documentation to directly access the GAMS Studio documentation start page. Click the Close button or uncheck View > Help to close the Help View. GAMS Studio will remember the last viewed page and its browsing history until GAMS Studio restarts.
The Help View starts in a docked state and can be repositioned around the editor in the central widget area by dragging it to a preferred location. Studio will remember the last Help View state before it was closed.
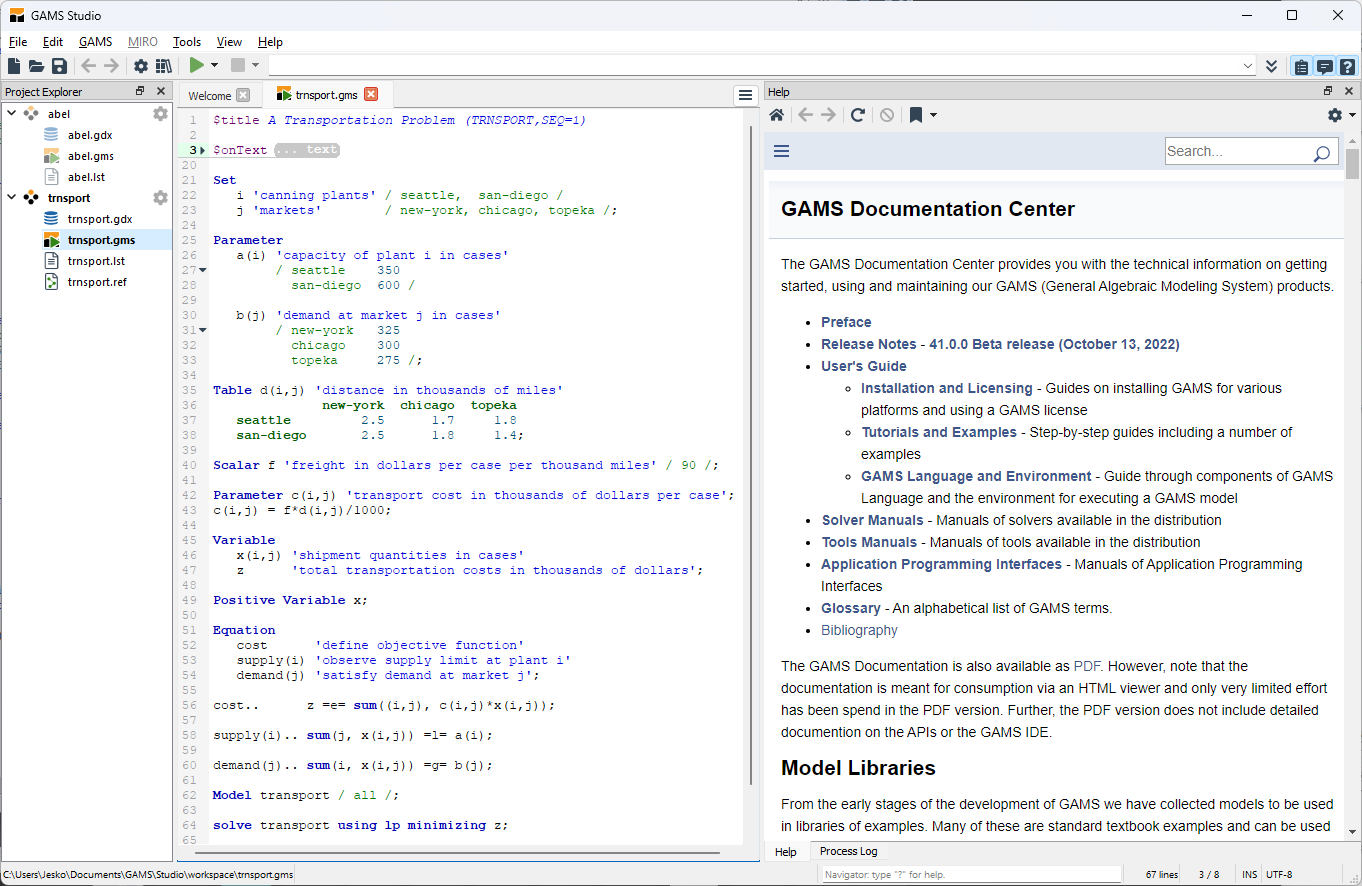
The Help View can also be floated by double-clicking its title bar. Double-clicking the title bar again will dock the Help View back.
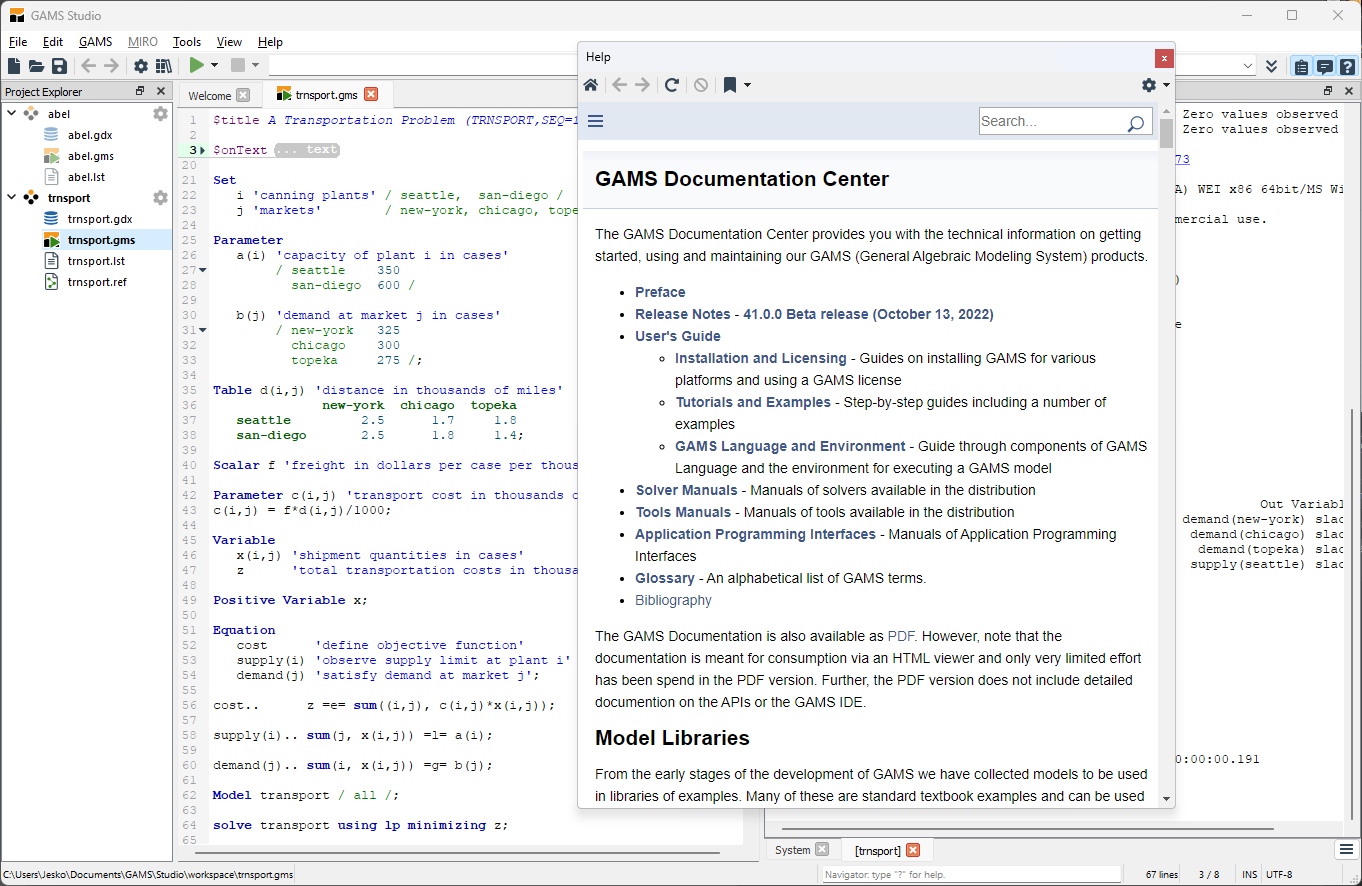
Note that the Help View does not support all browsing features of a web browser. However, it provides an Open this page in Default Web Browser button to access the full features of a web browser.
Help integration to various widgets
You can link from various widgets (Welcome Page, Code Editor, Listing Viewer, GDX Viewer, Reference File Viewer, Connect Editor, and Solver Option Editor) to related documentation sections.
From Code Editor, you can link to documentation on Dollar Control Options or the index pages for Data Types and Definitions and Language Items, and from the parameter editor to GAMS parameter descriptions in The GAMS Call and Command Line Parameters by:
- Press
F1on a Dollar Control Option within the editor to activate Dollar Control Options in the Help View, jumping to the corresponding description in Dollar Control Options chapter.
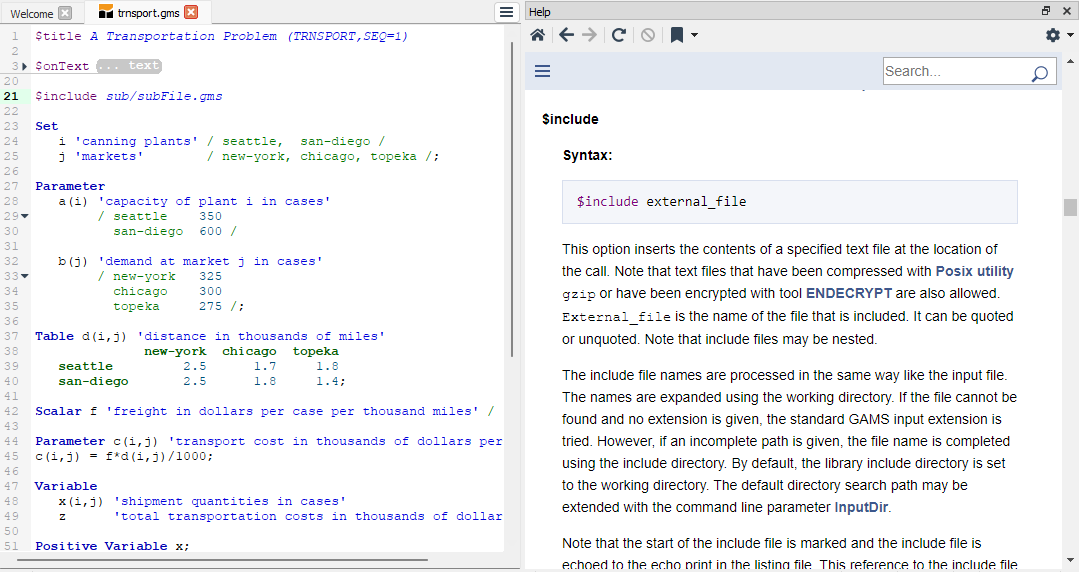
- Press
F1on a keyword in Data Types and Definitions or Language Items within the code editor to activate the Index Page, listing related index entries for the keyword.
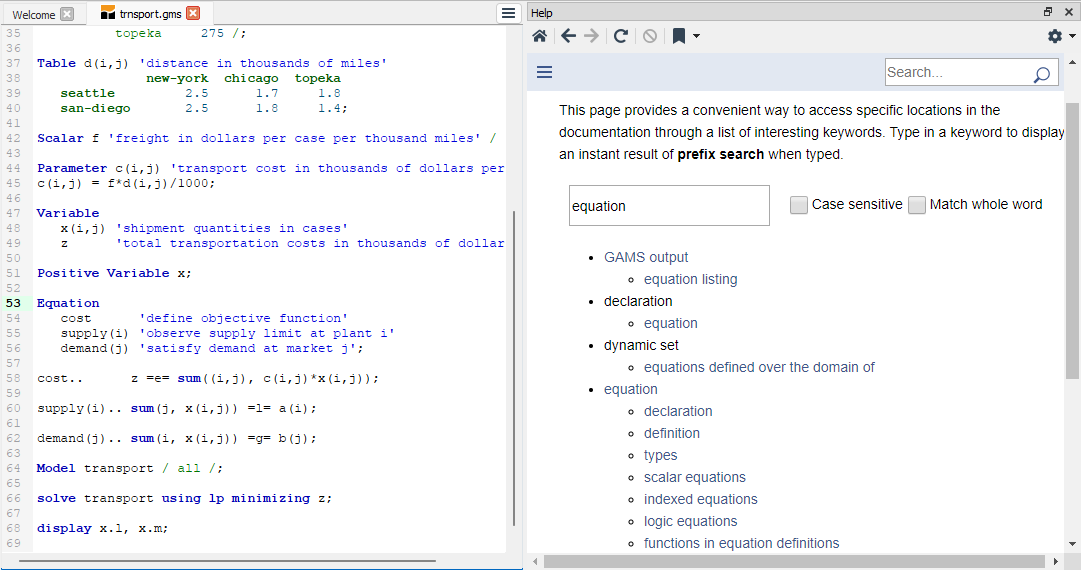
From the GAMS Parameter Editor, pressing F1 on a parameter entry opens the The GAMS Call and Command Line Parameters help page for more detailed parameter information.
- Press
F1on a parameter entry within the extended parameter editor to open the help page with a detailed description of GAMS parameters in The GAMS Call and Command Line Parameters.
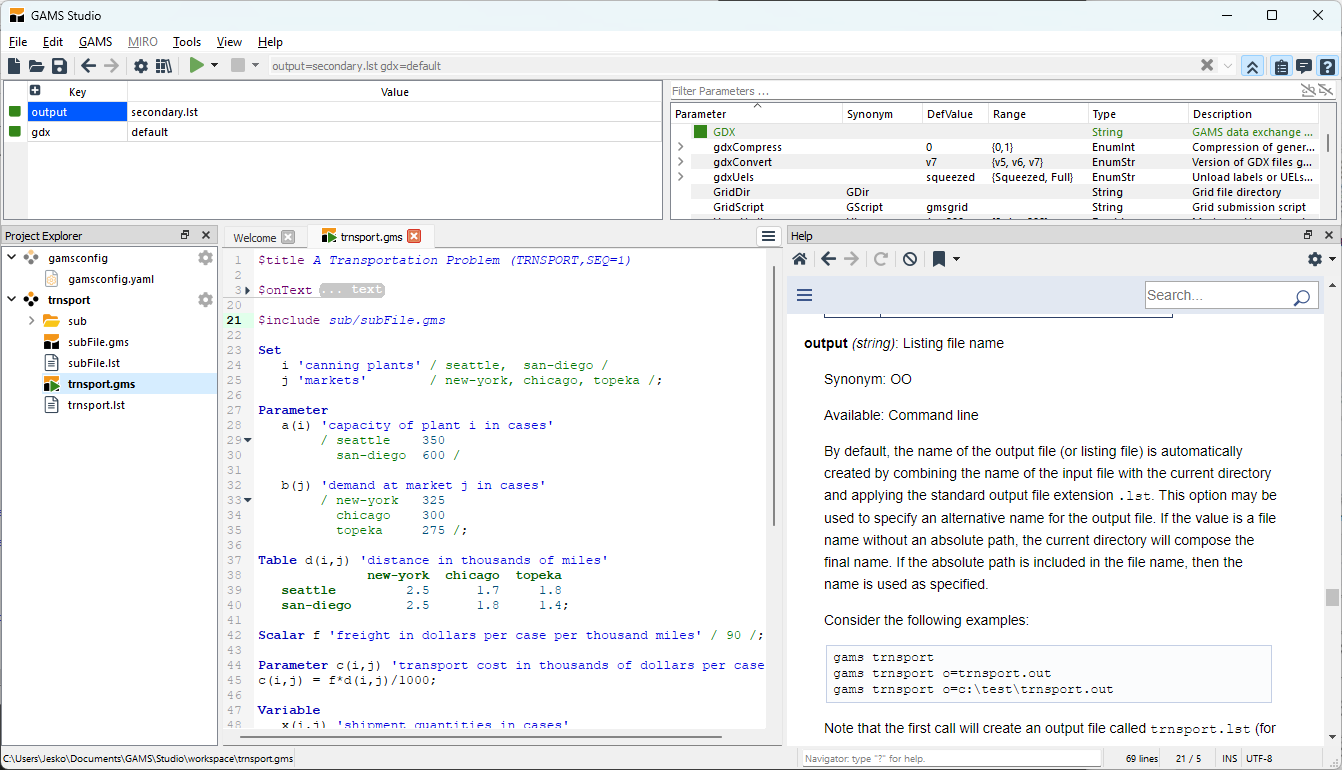
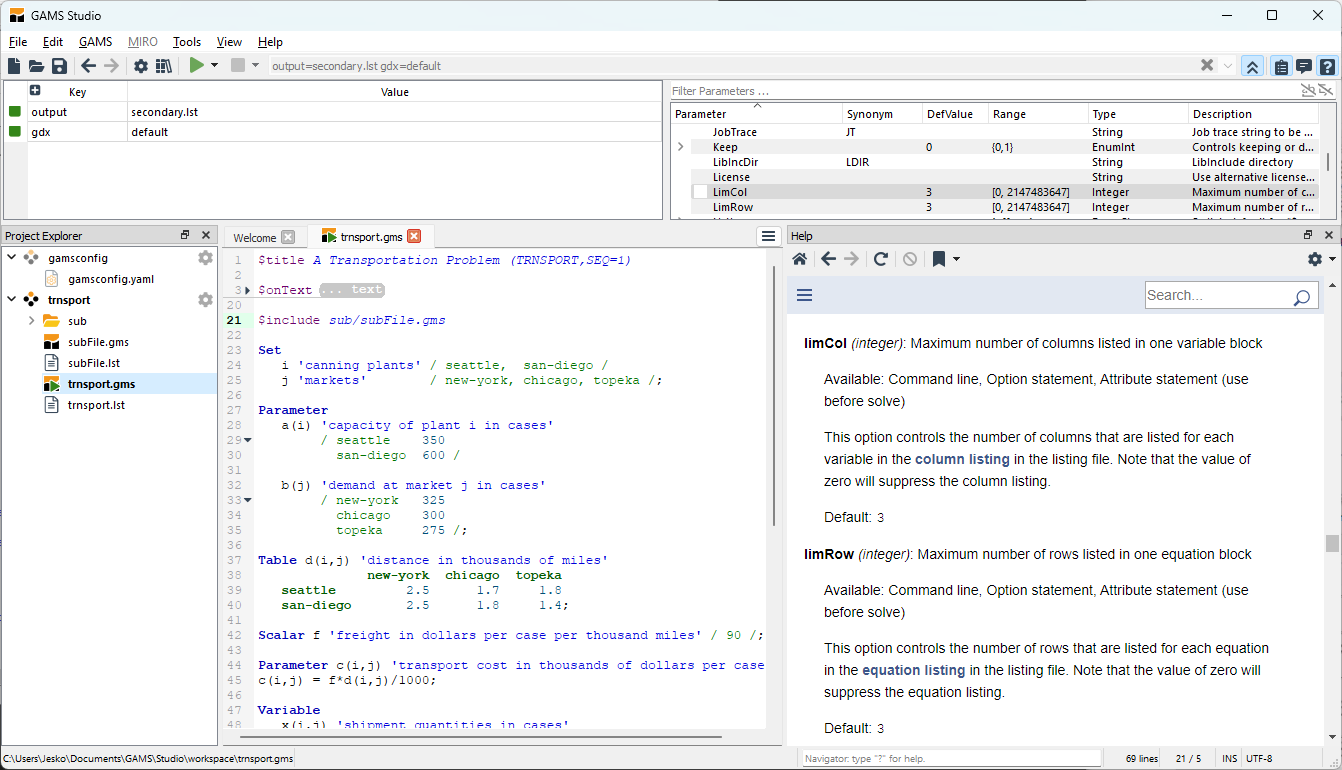
From Connect Editor, you can link to the description of the agent and its options in GAMS Connect chapter.
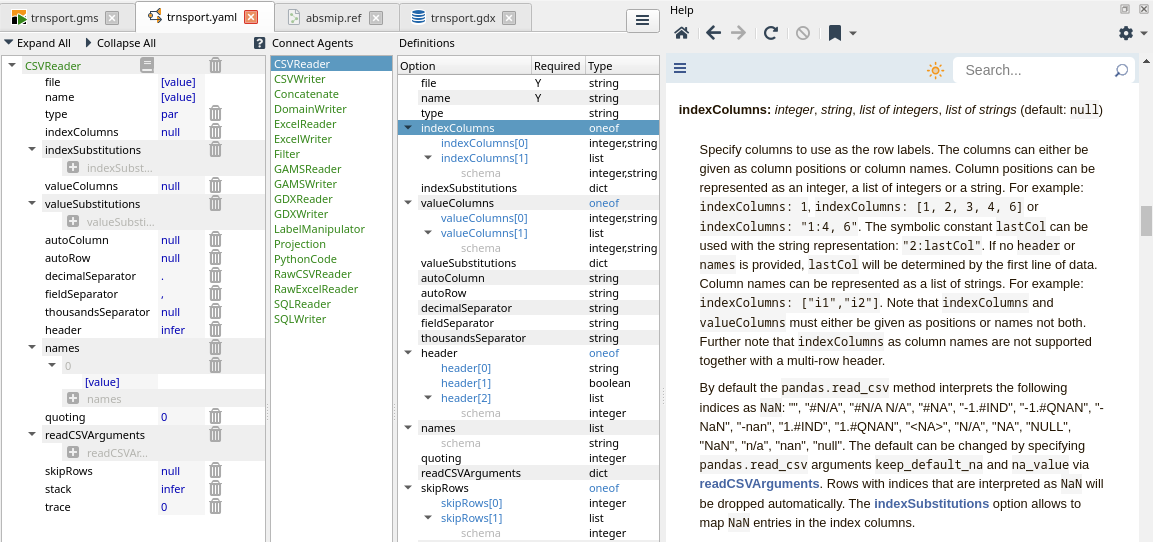
From Solver Option Editor, pressing F1 on an option entry opens the solver page with a detailed option description.
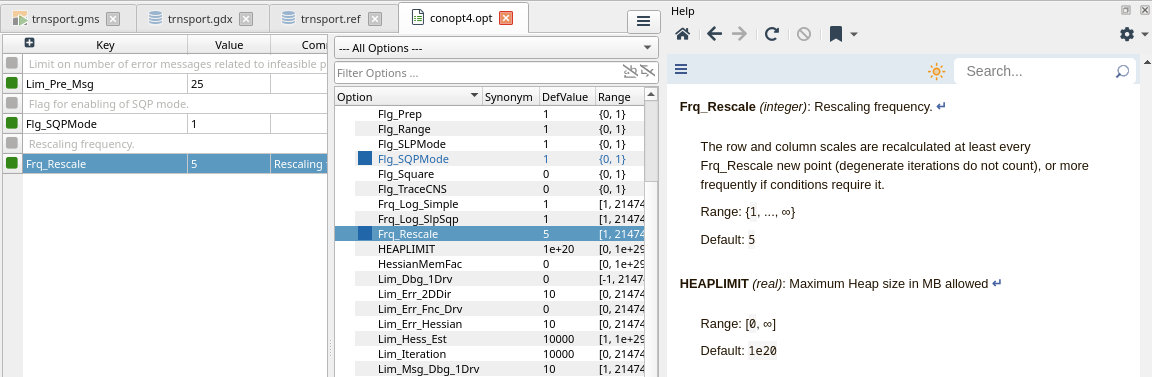
From Welcome Page, Listing Viewer, GDX Viewer, and Reference File Viewer, pressing F1 activates the GAMS Studio page, navigating to the relevant section for each widget.
Overview of Help features
- Home: Start the help page
[GAMSDir]/docs/index.html - Back: Return to the previous page
- Forward: Go to the next page
- Reload: Reload the current page’s content
- Stop: Stop loading the current page
- Bookmarks:
- Bookmark this page: Save the page title as the bookmark name along with its location. The bookmark will appear below the Organize Bookmarks section. Click a bookmark entry to jump to the saved page.
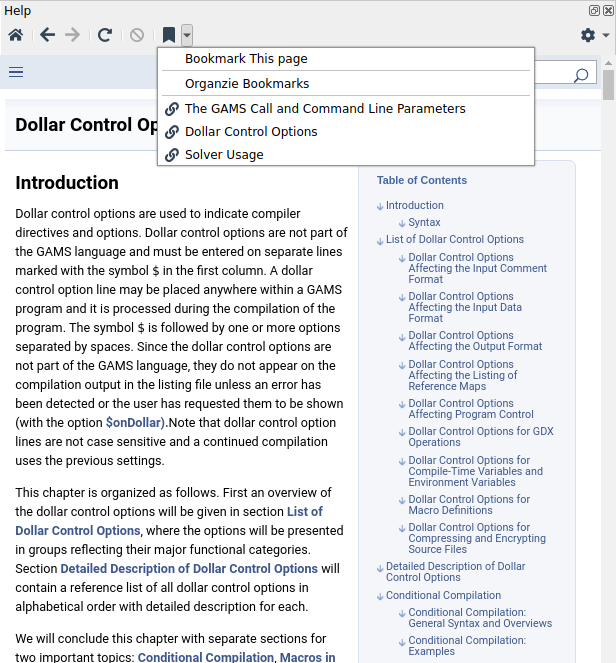
- Organize Bookmarks: Opens the bookmark dialog to edit or delete bookmark entries. Right-click on an entry in the bookmark table to load or delete it in the Help View. The selected bookmark's Name and Location can be edited in the dialog’s lower section. Press
Enterto save changes, orEscto cancel. Click the close button to exit the bookmark dialog.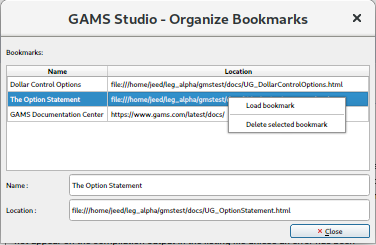
- Bookmark this page: Save the page title as the bookmark name along with its location. The bookmark will appear below the Organize Bookmarks section. Click a bookmark entry to jump to the saved page.
- Zoom In: Zoom in on the page to increase font size. Press
Ctrl - +,Ctrl - Mousewheel Up, or chooseView > Zoom In. - Zoom Out: Zoom out to decrease font size. Press
Ctrl - -,Ctrl - Mousewheel Down, or chooseView > Zoom Out. - Reset Zoom: Reset font size to the original. Press
Ctrl - 0or chooseView > Reset Zoom. - Help Option:
- View This Page Online: Opens the same documentation on the GAMS website. This allows use of advanced search functionalities across all GAMS documentation of version 54.2, browsing different versions, or exploring the GAMS website from the Help View.
- Open in Default Web Browser: Opens the document in the default web browser. This enables browsing with full web browser features, as the Help View does not support all browser functionalities.
- Copy page URL to Clipboard: Copies the URL of the current page to the clipboard, useful for viewing the address of the currently viewed document page.
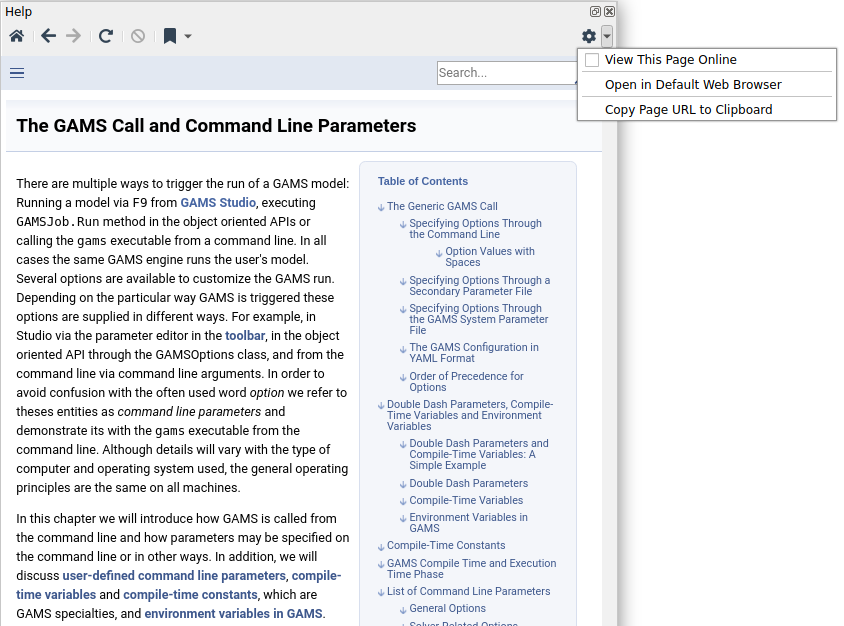
- Find in page...: Press
Ctrl - For selectEdit > Searchto activate a search at the bottom of the Help View. Type a word to search within the page. Matches will be highlighted as you type, and the scrollbar will indicate the number of occurrences. Clickprevious buttonto move to the previous occurrence,next buttonor pressEnterfor the next. EnableCase Sensitivityto search case-sensitively. Highlights persist as you navigate pages until the keyword is cleared, the search is dismissed, or the Help View is closed. Click the close button or press Esc to exit the search.
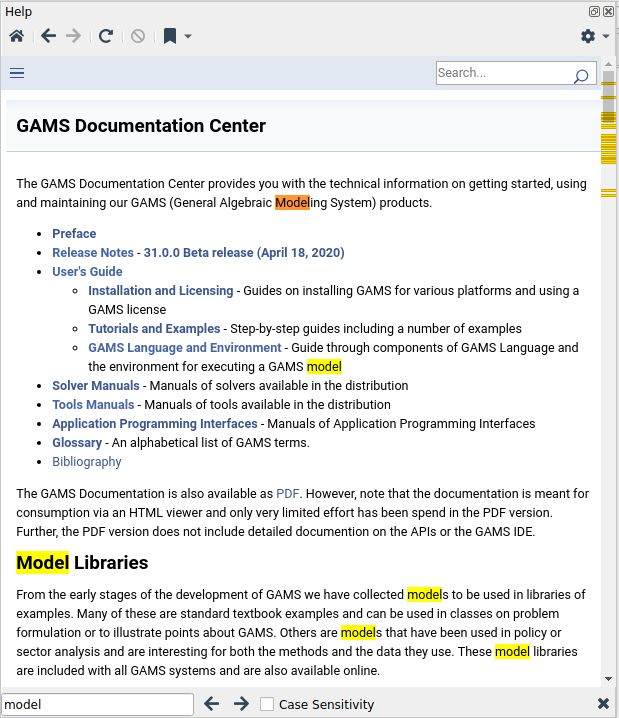
Summary of Actions and Shortcuts
| Action | Shortcut | macOS | Description |
|---|---|---|---|
| Zoom In | Ctrl- + or Ctrl - Wheel Up | Command - + or Command - Wheel Up | Zooms in the page to increase the font size |
| Zoom Out | Ctrl- - or Ctrl - Wheel Down | Command - - or Command - Wheel Down | Zooms out the page to reduce the font size |
| Reset Zoom | Ctrl - 0 | Command - 0 | Resets the font size of the page to its original size |
| Search | Ctrl - F | Command - F | Jumps to the help search box to search for a keyword in the current page |
Debugger
GAMS Studio provides a debugger to detect errors. It is started by selecting Run with Debugger or Step start with Debugger from the GAMS menu or the Quick Access Toolbar. When pausing the process, GAMS Studio marks the line in the source code that will be processed next and opens a temporary GDX file in the Pin View containing the current data state. It is possible to have more than one active debug session.
To pause a debug process, you can:
- set a breakpoint
- use step
- use pause
Breakpoints can be set on any line in the source code, though not all lines are valid spots where the process can be paused. GAMS can pause on lines containing an operation. If a breakpoint is set to an invalid line (e.g., empty line, comment, or declaration), it will move to the next possible line or the last possible line in this file. The original line keeps a mark until the end of the debug session, showing its new line number.
Step can be triggered initially by selecting the menu GAMS > Step start with Debugger or by using the shortcut F11 (Meta - F11 on macOS). During the debug session, step can be triggered in the debug pane below the editor and also using the shortcut.
Pause can be triggered when a debug session is running and not paused. This is available in the debug pane below the editor.
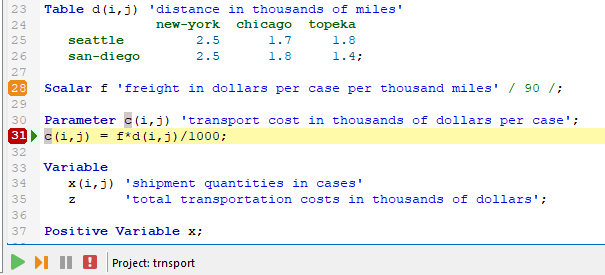
During a debug session, the Debug Pane below the editor allows control over the flow:
- Continue - resumes execution until the next breakpoint or the end of the program is reached.
- Step - advances to the next possible pause line or the program's end.
- Pause - pauses the process at the next possible pause line.
- Stop - halts the execution of the process.
- The name of the active project appears to the right of these buttons.
Debugger Shortcuts
| Action | Shortcut | macOS | Description |
|---|---|---|---|
| Run Debugger | F11 | Meta - F11 | Runs main file of the current project in debug mode |
| Step Run Debugger | Shift - F11 | Shift - F11 | Runs main file of the current project in debug mode and pause at the first possible line |
Profiler
If a GAMS run contains the command line parameter profile, Studio displays the profiling results at the start of each line in the code editor. Quick access to the profiler is added to the run menu when using the configurable F10 option.
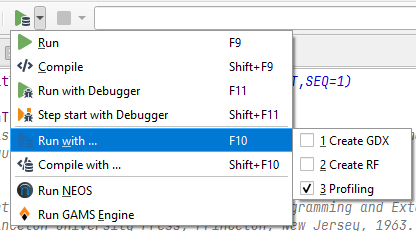
Often the profiling values of one line are a result of multiple execution steps. Moving the mouse over the profiling data shows the different kind of steps with the minimum and maximum values, and the resulting sum. Also for lines containing file includes, the sums are calculated to add an overview to the included part.
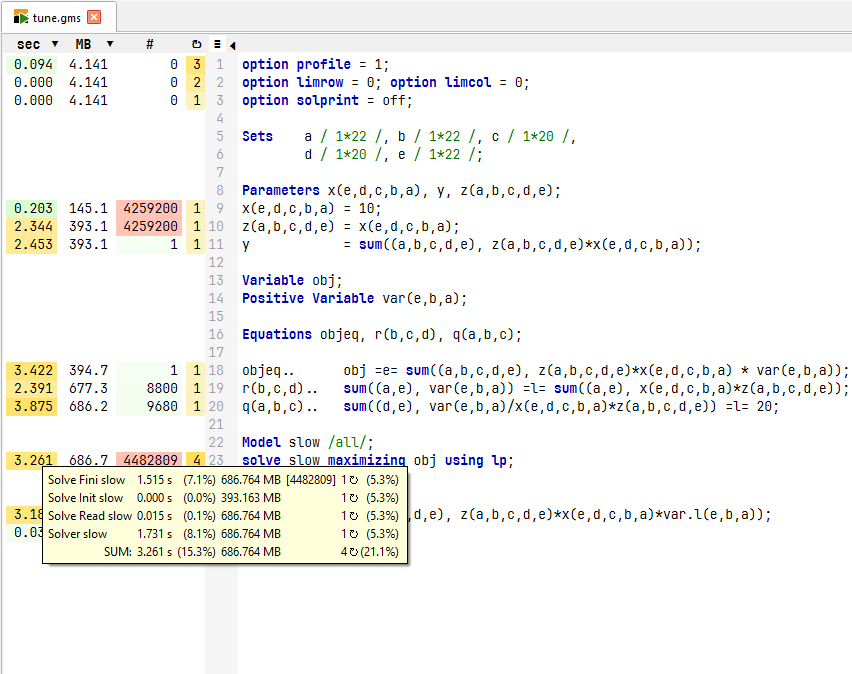
The profiler offers four columns: elapsed time, memory usage, number of assignments, and execution steps. For the columns elapsed time and memory usage the optimal units are estimated but can be changed manually. If a column isn't of interest it can be hidden using the the 3-bars menu on top of the line numbers. The triangle on the right beneath the 3-bars menu allows to hide the profiler data to get more space in the code editor. A switch in the main menu View > Show Profiler allows to hide the profiler completely.
Changes to the profiler affects all projects and are restored on the next GAMS Studio start.
MIRO
GAMS Studio can be used to develop models for GAMS MIRO. Please refer to the GAMS MIRO documentation to learn more about the features and workflow of the MIRO integration.
GAMS MIRO Shortcuts
| Action | Shortcut | macOS | Description |
|---|---|---|---|
| Run Base Mode | F8 | F8 | Runs main file of current project with MIRO in Base Mode |
| Run Configuration Mode | Shift - F7 | Shift - F7 | Runs MIRO Configuration Mode |
NEOS
GAMS Studio can remotely execute models on the NEOS server. The model is compiled locally before the compilation object is sent to NEOS. Note that a GDX file can be created but will always have the name out.gdx. When running, a dialog pops up to enable further setup:
- Email - The email address to use for submitting a job. It can be predefined by setting NEOS_EMAIL in the GAMS User Configuration or by defining the environment variable NEOS_EMAIL.
- Create a GDX file - Option to create a GDX file even if the command line parameter is not set.
- Short priority - Execution may start earlier and provides intermediate log output, but is limited to a five-minute execution time.
- Long priority - Execution may start later and provides no intermediate log output, but is not limited in execution time.
Selections from the dialog are saved in the settings. To re-enable the Terms of Use after checking Don't show Terms of Use again, there is a checkbox in Settings > Misc.
The results of the remotely executed model are placed in a sub-folder named after the base name of the model. The log output from remote execution has a different background color, configurable in the settings dialog (Default Text, 3rd color). Links in the remote execution log are replaced by their local counterparts.
GAMS Engine
GAMS Studio can remotely execute models on your own GAMS Engine server. The model is compiled locally before the compilation object is sent to GAMS Engine. Additional files can be sent to the server by creating a file with the name of the model and the extension ".efi" (for "External Files"). Each line in this file addresses an additional file. Files defined in the EFI file that should be updated locally from the GAMS Engine server can be marked by adding a < separated by a space.
Example: if an EFI file named trnsport.efi contains these lines:
inc/trnsport.inc
inc/data.txt <
and the model trnsport.gms is executed, both files will be transferred to GAMS Engine. After solving, inc/trnsport.inc will stay unchanged, but inc/data.txt will be replaced by the version returned from the server.
GAMS Studio provides an EFI editor to select files. The context menu of a project in the Project Explorer allows creating or opening the EFI file matching the current runnable GAMS model. The editor enables file selection, with an option to mark selected files for local updates. Switching an open EFI editor to a text editor can be done by selecting Reopen as text after saving changes. All operations (check, uncheck, select all, and clear) apply to visible files, and directory checkboxes reflect the select state of all files (visible and hidden by filter).
On running, a dialog appears for login. If previously logged in and valid, this page is skipped. The login page offers several authorization methods:
- Login page
- Engine URL - The
URLto your GAMS Engine server - Login via - A list of available authorization methods:
- Username / Password - Enter username and password
- JWT Token - Use a token for login
- SSO - Select an authorization provider
- Additional predefined authorization providers (depending on the GAMS Engine installation)
- Engine URL - The
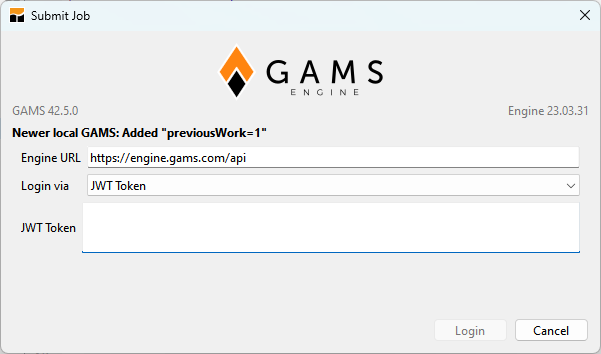
When changing the URL, Studio attempts to directly access the server and request version information. If successful, it displays the GAMS Engine version on the right and the server’s GAMS version on the left. If the local GAMS version is newer, the command line parameter "previousWork=1" is added automatically unless "previousWork" is already specified. Dialog entries (excluding the password) are saved in settings, with further configuration available in the settings dialog.
To log in via an authorization provider, an SSO name can be entered, or one of the predefined providers can be selected. After clicking "Login", Studio contacts the provider and displays a code and a link where it can be entered to verify identity. For convenience, the "Copy and Visit" button copies the code to the clipboard and opens the link in the system’s default browser. The code can then be pasted (Ctrl + V) on the provider’s site.
Once logged in, the submit page allows configuration of the remote job:
- Submit page
- "Namespace" - Specifies the
namespaceto be used on the server - "Instance" - Allows selection of the user instance or instance pool for GAMS Engine SaaS
- With sufficient rights the size of an instance pool can be changed here
- "Create a GDX file" - Enables GDX file creation even if not set by the command line parameter
- "Namespace" - Specifies the
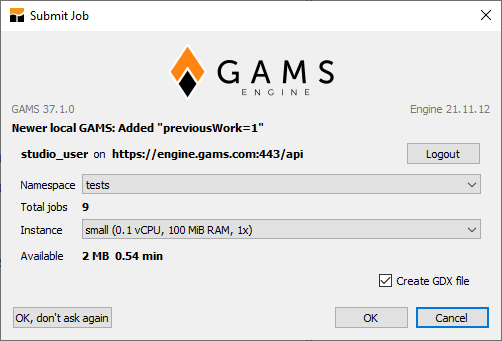
To return to the login page, click the "Logout" button. The job is submitted to the GAMS Engine server by clicking "OK." To skip this prompt in future runs, select "OK, don't ask." During this Studio session, jobs will then submit directly without the dialog. To show it again, Ctrl-Click on the Engine icon or select "Settings > Remote > Reactivate Dialog."
Selecting a user instance and viewing space and time quotas is available only when connected to a GAMS Engine SaaS server. The instance list shows all instances and instance pools available for the user. For instance pools the pool size can be changed here if the user has sufficient rights. It may take some time until the pool size is scaled up. Please use reload to update the instance list and the current number of available instances in the pools.
To support the identification of different jobs an optional job tag can be assigned. The priority selection is only available if it is supported by the GAMS Engine server.
When a job is submitted, GAMS Studio continuously displays output from the GAMS Engine server. Since this may take time, Studio can be closed during remote execution. If closed, a prompt will ask if the remote job should be kept or canceled. If "keep" is chosen, the job token is stored, and on restarting Studio, a dialog will allow resuming the job. On resume, pending messages are retrieved from the Engine server, and execution continues as if Studio was uninterrupted.
The results from the remotely executed model are saved to the working directory:
- LST and LXI files from the server are renamed to
"<model>-server.lst"and"<model>-server.lxi"to avoid overwriting local files. - All generated files will overwrite existing files of the same name (e.g., GDX, REF, and LOG files).
- Files listed in the EFI file ending with
" <"will replace local versions.
The remote execution log has a distinct background color, configurable in settings (Default Text, 3rd color). Links in the remote log output are replaced with local equivalents.
Dialogs and Actions
GAMS Licensing
The GAMS Licensing dialog is accessible from the license field in the statusbar and from the GAMS Studio Help menu. It provides information about the current GAMS version, available solvers, licenses, and capabilities. The dialog offers multiple ways to install or update your GAMS license, including an easy way to check out a network license for offline use. Depending on what you received, follow one of the methods below. You can find all additional information about the license setup in general here.
Installing a License with an Access Code
If you received a 36-character access code (e.g., from the GAMS Academic Portal):
- Open GAMS Studio and go to Help → GAMS Licensing.
- In the GAMS Licensing dialog, find the "Access Code" field.
- Paste or type the 36-character access code.
- (Optional, for network licenses) Set the checkout duration to check out a license for offline use (in hours).
- Set the on-prem license server URL if the default server is not used by your organization (optional)
- Click "Install License".
Once GAMS Studio has a valid license, the Access Code field is prefilled to ease the checkout of a network license. If the code is valid, GAMS Studio automatically retrieves and installs your license. If a checkout duration is specified, a checked-out license is created that remains valid without server contact for the selected period.
The license field in the statusbar shows the current license status. It also provides a tooltip containing the license type and duration of validity. With a click, it grants direct access to the licensing dialog.
Installing a License from the Clipboard
If you received the license contents (eight lines of text):
- Copy the entire license text to your clipboard.
- Open GAMS Studio and go to Help → GAMS Licensing.
- If GAMS detects valid license text in the clipboard, a prompt appears:
- Click "Yes" to install the new license and display it.
- Click "No" to cancel and keep the existing license.
GAMS Studio also checks the clipboard at startup, prompting the same dialog if a license is found.
Installing a License from a File
If you have a license file (commonly named gamslice.txt):
- Open GAMS Studio and go to Help → GAMS Licensing.
- Click "Install License File".
- Browse to and select your license file.
- If the file is valid, the new license is installed; otherwise, the old license remains active.
Default License Storage Location
When installing a license via GAMS Studio, the license file is stored by default in the user-specific directory. On Windows, for example, this is:
For standard locations on other systems see here.
The license location can be customized using the GAMS configuration file. In particular, if the license option is set in gamsconfig.yaml, this location is used by both GAMS and GAMS Studio. In this case, licenses installed via GAMS Studio are written to the configured location instead of the default user-specific directory.
This is particularly relevant for scenarios such as machine-wide installations, where the license should be accessible to all users (e.g., when using a system-wide directory like C:\GAMS\<version> or C:\ProgramData\GAMS instead of a user-specific folder).
For more details, see:
- The GAMS Configuration in YAML Format
- GAMS Configuration Editor in Studio
- The license command-line parameter
- Install a License for Multiple Users
Check for Update
Studio can check for updates at startup, which can be enabled in the settings. To manually check for updates for GAMS and GAMS Studio, go to Help > Check for Update or File > Settings > Update. This opens a dialog where you can enable/disable the startup check and configure the check interval.
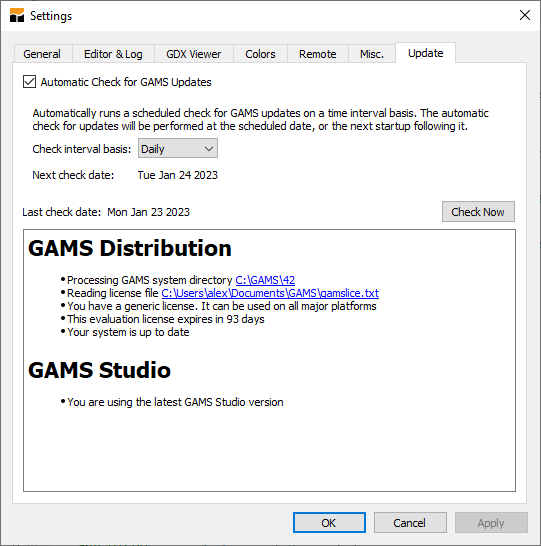
Quick Find and Replace
| Action | Shortcut | macOS | Description |
|---|---|---|---|
| Open/Focus Find widget | Ctrl - F | Command - F | Opens the find widget or focuses it if already open |
| Open/Focus Find Replace | Ctrl - R | Command - R | Opens the find widget and sets the focus to the replace input |
| Find next | F3 or Enter | F3 or Enter | Jumps to the next match that fits all search criteria |
| Find previous | Shift - F3 | Shift - F3 | Jumps to the previous match |
| Stop Find & Close | Esc | Esc | Sets the focus to the assigned edit / viewer. Pressing Esc again closes find and removes highlights |
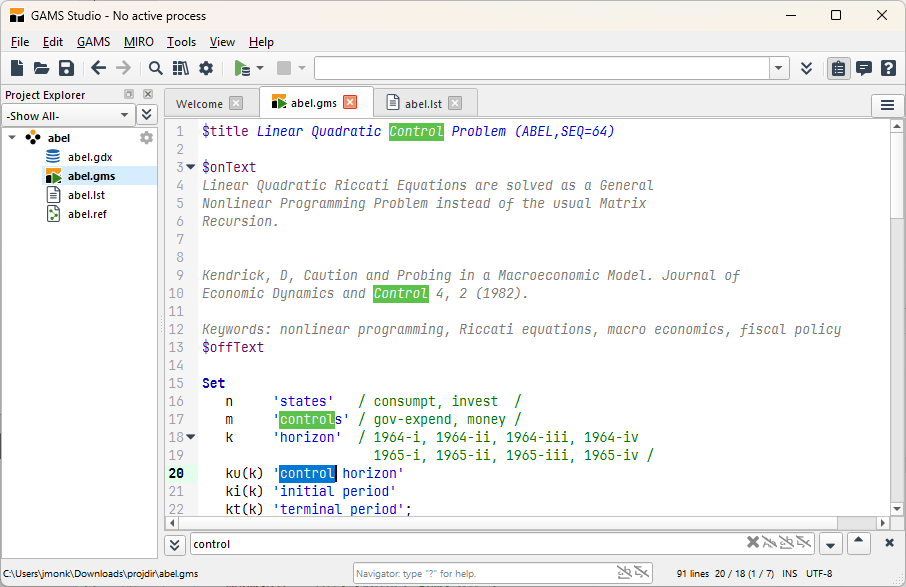
When a text editor or viewer is in focus the quick Find widget can be activated with Ctrl - F. If the editor /viewer has a single line selection, it will be copied to the input as the find term. If no text is selected, Find will take the current word as the find term or stays unchanged. Having a valid term, GAMS Studio will highlight all occurrences. Changing the find term will trigger the find action.
Find provides some options to control the way of processing. These options can be found inside of the find input on the right:
 toggles the case sensitive option
 toggles the whole word option
 toggles the regular expression option (More on Regular Expressions)
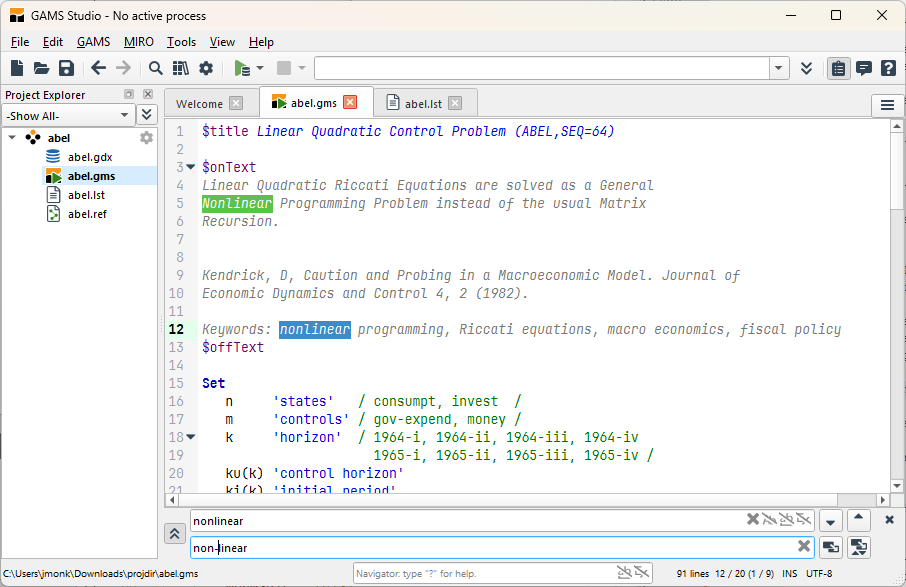
When Find is used used on an editor that isn't readonly, replace can be activated by either hitting Ctrl - R or clicking the down arrow left to the find term. On the right of the replace input there is a button to replace the currently marked finding, and another to replace all occurences in the assigned editor that match the find term.
Quick Find can be used in parallel with the Complex Search. The shortcuts and match highlights don't interfere with each other.
Search and Replace
| Action | Shortcut | macOS | Description |
|---|---|---|---|
| Open/Focus Search Dialog | Ctrl - Shift - F | Command - Shift - F | Opens the search dialog or focuses it if already open |
| Search forward | F4 or Enter | F4 or Enter | Jumps to the next match that fits all search criteria |
| Search backward | Shift - F4 | Shift - F4 | Jumps to the previous match |
| Find All | Shift - Enter | Shift - Enter | Starts a search, opens the search results page, and jumps to the first hit |
| Stop Search & Close Dialog | Esc | Esc | Closes the search dialog and stops any ongoing search. Pressing Esc again removes result highlights |
Pressing Ctrl - Shift - F opens the Search and Replace window, where selected text is pasted into the search field if available. Users can search specific files and perform text replacement operations. The search widget adapts based on the file type open in the editor to show available actions. For technical reasons, .gdx files cannot be searched, and replacing text in read-only files (e.g., .lst or .ref) is disabled. To ensure performance, searches stop upon reaching 50,000 results, indicated by "50000+" in the result count to show that more results may exist.
Search terms and filters inside of the Search dialog are remembered and can be inserted using the drop-down button in each line edit. When Studio is closed, it stores the configuration of the Search dialog including up to 20 entries for recently used search terms and filters.
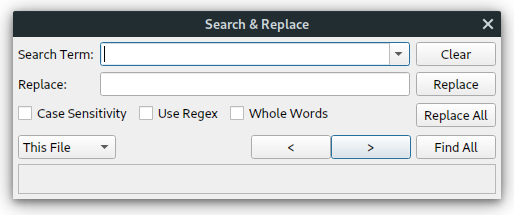
Located at the top, the search field accepts the search term and keeps a list of recent searches. The Clear button removes all search results and clears both search and replace fields. You can also press Esc in the Code Editor to clear results quickly.
Replace Options: Below the search field, these options are mostly disabled for read-only files (e.g., .lst). The replace field accepts replacement text. The Replace button highlights the next match on the first click and replaces it on the second, allowing review before replacing. Undo replacements with Ctrl + Z.
Replace All replaces all matches within the selected scope. A pop-up confirms the total replacements made. Users may also choose to initiate a search instead, showing all occurrences of the intended replacement on the results page.
Options to narrow down a search include:
- Whole Words - Finds only exact word matches (e.g., only finds "in" as a standalone word, not within "information").
- Case Sensitivity - Matches the case exactly.
- Use Regex - Enables advanced searches using Regular Expressions. More on Regular Expressions.
In the next row is the scope selector, which defines where the search or replace action applies, with five options available:
- Selection - Searches only within highlighted text. If no text is selected, a prompt appears. To clear the selection, press
Escor click Clear Selection. Note that starting a new search moves the selection to the currently highlighted text. - This File - Limits the search to the currently active file (default setting).
- This Project - Searches all files in the current project.
- Open Tabs - Searches all files currently open in Studio (excluding GDX files).
- All Files - Searches all searchable files in the Project Explorer.
- Folder - Searches files within a specified folder, regardless of whether it’s open in Studio. When a result is opened, the file is added to the Project Explorer.
Navigation: Find Previous and Find Next buttons, labeled < and >, move between matches. Find All shows all occurrences in the selected scope, displaying results in a table in the output pane. Double-clicking a result or using the up and down arrow keys navigates to the file and highlights the match.
Additional elements appear based on the selected search scope:
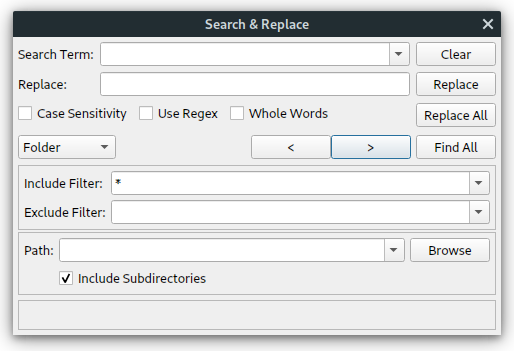
The first section is the "File Filter", shown for all modes except Selection and This File. This filter allows limiting the search to specific files (Include Filter) or excluding certain files (Exclude Filter). Wildcard syntax is supported for file names, with tooltips offering basic examples. Drop-down menus provide default GAMS-specific file types, and custom patterns can also be entered. Comma-separated lists of patterns are accepted.
The second section appears only when the "Folder" scope is selected and allows users to set the search path. This is a drop-down text field that maintains a history of recent entries, with a browse button beside it that opens the operating system’s default folder selection dialog. Tooltips provide additional information and shortcuts for many search window items.
Workflow Tips
- Edit a file, hit
Ctrl - Shift - Fto open the search widget. The search field focuses automatically, so you can type your search term directly. PressEnteras a shortcut for "Find Next", and pressEnteragain orF4to step through matches. PressShift - F4to step backwards. To re-focus the search widget after edits, pressCtrl - Shift - Fagain. - Enter a search term, then use
Shift - Enterto trigger "Find All", which opens a list of results. - Press
Escto close the search widget. PressingEscagain clears all highlighted results. - For projects with many files, use project or file prefixes and search filters to narrow the search scope.
- Regular Expressions offer powerful tools, including capture groups. A capture group saves part of your match using parentheses, referenced in the replacement string. For example, to locate files named
FILENAME_DD_MM_YYYY, use the regular expression(\w+)_(\d\d)_(\d\d)_(\d\d\d\d). To convert these toYYYY-MM-DD_FILENAME, use$4-$3-$2_$1as the replacement string. Each set of parentheses creates a capture group, numbered left to right, starting at 1.- Backreferences let you reference a capture group within the search term itself using
\NUMBER. For example,(\w+)\s*'\1'finds symbols with their own name as descriptive text.
- Backreferences let you reference a capture group within the search term itself using
Model Library Explorer
The Model Library Explorer allows users to search various model libraries provided by GAMS and retrieve their models conveniently. It can be opened by selecting GAMS > Model Library Explorer from the menu, using the shortcut F6, or clicking the icon in the Quick Access Toolbar.
Each library is displayed in a separate tab. The search field in the upper part of the Model Library Explorer enables dynamic filtering across all model libraries simultaneously. As the search string is entered, results update in the tabs representing the different libraries. If no results are found in the currently selected tab, the first non-empty tab is automatically selected, reverting to the original tab once results are found there. Numbers in parentheses show the count of models found per library based on the current search input. More details about filtering can be found in the Filter Section.
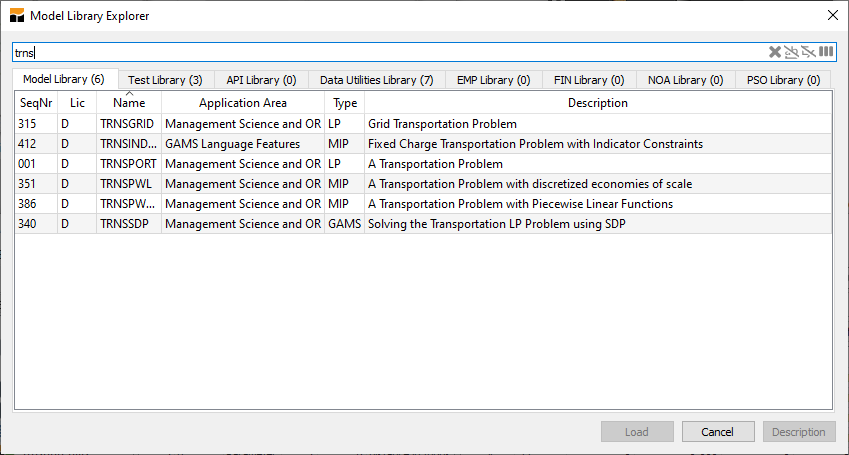
trns in the Model Library ExplorerAlongside a brief description, some models offer a longer, more detailed description. Selecting a model and clicking on the Description button in the lower-right corner opens a dialog with additional information about the model. A model can be opened by clicking the Load button, double-clicking the model, or selecting it and pressing the Enter key.
User Libraries
In addition to the model libraries distributed by GAMS, user-defined model libraries can be accessed by providing a GLB file along with the model files in the library. The Model Library Explorer searches a specific location for these user-defined libraries. This location can be viewed or changed in the Settings dialog (File > Settings) under the Misc. tab. The Arrow button shows the current location, and the Folder button allows changing it. To add a new library, copy the required files into a subdirectory in this location. Refer to Creating a User Library for instructions on creating custom libraries. Restarting the Model Library Explorer is necessary for newly added libraries to appear.
Settings
The GAMS Studio settings dialog is accessible via File > Settings or the F7 hotkey. Users can adjust various Studio settings related to behavior and appearance. Settings are organized across five tabs.
General page
On the "General" tab, users control general settings of Studio. Some additional hints:
- GAMS System Directory - Shows the currently used GAMS system directory. By default this is displayed in gray and is determined dynamically. The system directory can be changed by modifying the path or using the
Browsebutton to overrule the dynamic selection. Keep in mind that the path needs to be updated manually on a GAMS update. Clearing the manual entry switches back to dynamic determination of the GAMS system directory. - Save modified files before running GAMS - When enabled, this option saves all modified files automatically before starting a GAMS run, ensuring that any unsaved changes are included in the execution without the need for manual saving.
- Open .lst file after running GAMS - Automatically brings the generated .lst file to the foreground after each GAMS run, making it easier to review results immediately.
- Jump to first compilation error - Activates an automatic focus on the first compilation error detected. When this option is enabled, both the editor and log view jump to the first error in the code, enhancing debugging efficiency. This also applies when the option Open .lst file after running GAMS is activated. Studio then opens the lst file and highlights the first error. When returning to the GAMS file, the view is also focused on the first error found.
- Open file in current project by default - Switches the menu File > Open (
Ctrl-O) to always open a file in the current project, even if it exists in another project. The alternative open (Ctrl-Shift-O) is changed to File > Open in new project.... - Open file finds or creates new project - Switches the menu File > Open (
Ctrl-O) to find the file in any project and open it. If not found, a new project is created. The alternative open (Ctrl-Shift-O) is changed to File > Open in current project.... - Store options for each ... - Allows to switch the binding of the options between Project / Main File.
- Check "Dynamic main file" in new projects - When this option is enabled, GAMS Studio will automatically activate the "Dynamic main file" setting for any new project you create. This means your new projects will be set up to run the currently active
.gmsfile by default, see Project Options. - The box Backup and Restore allows you to store and restore the Studio settings. Pressing the Export button opens a dialog to save your settings file under a freely chosen name, useful for backups or sharing settings across machines. Once saved, this file can be copied for future use. The button Import allows importing saved settings from a file. The settings apply immediately, and the dialog closes automatically.
- The box Projects allows to adjust the generation of a project file. For further details, refer to the Project Options documentation.
Editor & Log page
The "Editor & Log" tab contains many self-explanatory appearance options. Most notably font settings which are used for all monospace fonts like text editors and logs. The font size is also used to calculate the size of proportional fonts (see Zoom Groups)
- Enable auto-indentation - activates smart line break behavior. When pressing the
Enterkey a line break is inserted and the indentation of the line of origin is copied instead of moving the cursor to the first column. - Highlight word under cursor without selection - changes the highlighting behavior of word occurrences. While the default behavior highlights other occurrences of the same word when double-clicking or selecting a word, activating this option changes the behavior so that every time there is a word under the text cursor, all of its occurrences will be highlighted. Only full words and no partial matches are highlighted.
- Tab stop size - lets the user decide how many spaces will be inserted when pressing the Tab-key. GAMS Studio always replaces inserted tabs with spaces.
- Fold DCO blocks on open - folds all foldable blocks of the types "Text", "Echo", "Put", and "Fold".
- Syntax Highlight max width - stops highlighting lines with more than the given count of characters. Highlighting long lines is a very time-consuming process which can be controlled this way. It's likely that the highlighting will get out of sync for one or more lines. By placing syntax-relevant characters to the next (shorter) line this side effect can be reduced. To switch off highlighting set this value to 0. To always turn on highlighting set it to -1.
- Syntax Highlight max lines - stops highlighting lines after the specified line number. Highlighting many lines is a very time-consuming process which can be controlled this way. When syntax pairs like brackets or dollar command options (e.g., $onText / $offText) are split, this may result in a warning mark at the opening part of the pair. Additionally, the folding of a split pair can be broken. To switch off highlighting set this value to 0. To always highlight all lines set it to -1.
- Clear process log before GAMS execution - empties the log before running a GAMS file. If deactivated, old log output is kept but colored in a lighter gray so users are still able to identify that they are looking at an old run instead of the most current one. One can also decide if the log should be written to disk as well and if so, how many old versions of the same log should be kept on disk as backup. Note, that in addition to this log file written by Studio, one can instruct GAMS itself to write a log file using the GAMS parameter logOption, which could cause a file naming clash.
GDX Viewer
- Symbol View - controls whether the list view or the table view is used as the default view when a symbol is displayed for the first time.
- Attributes - allows control over which of the variable and equation attributes should be visible by default.
- Preferences - controls different default settings for symbol data:
- Squeeze Defaults - affects variables and equations only and can be used to hide all columns that have the default value of the respective variable or equation type.
- Squeeze Trailing Zeroes - allows turning on/off the truncation of trailing zeroes.
- Format - controls the default format of numerical values. For detailed information see the corresponding section in the GDX Viewer documentation.
- Precision - specifies the number of decimals or the number of significant digits depending on the chosen format. For detailed information see the corresponding section in the GDX Viewer documentation.
- Decimal Separator in Copied Data - controls the decimal separator used when copying data from a GDX symbol. Note that this setting affects only the copied data, not the displayed data itself. The following options are available:
- Use Studio default - by default,
.is used as the decimal separator in copied data. - Follow system language - uses the decimal separator from the system language settings.
- Use custom character - allows specifying a custom character.
- Use Studio default - by default,
Colors page
The "Colors" setting tab allows you to select a theme from available built-in themes and to create a custom theme from a built-in theme. Changing a theme refreshes the look of Studio by updating the foreground and background color styles.

Six built-in themes are available:
- Light theme : a neutral gray light theme with clean borders for a highly readable user interface.
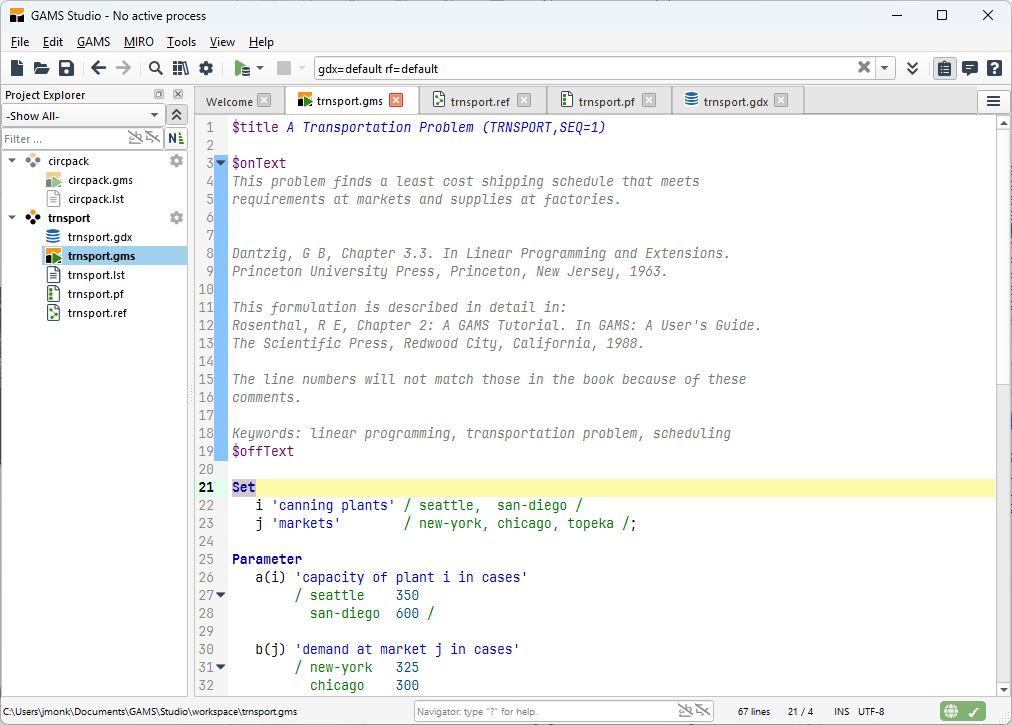 Studio in Light theme
 - Dark theme : a high-contrast charcoal and slate palette with bright highlights for a low-light environment.
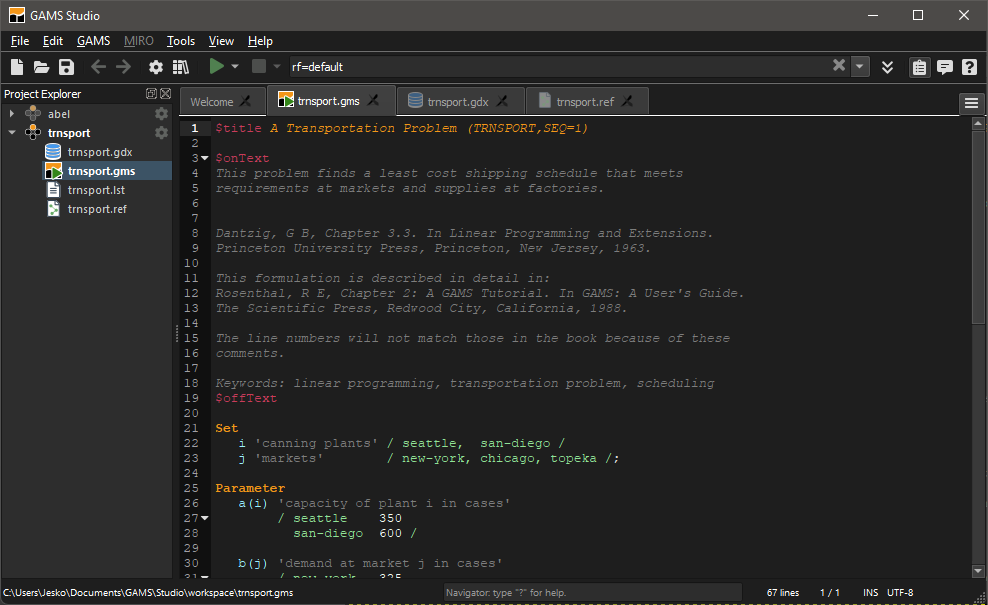 Studio in Dark theme
 - Distinct - light theme : a specialized theme with colorblind-friendly colors for all users.
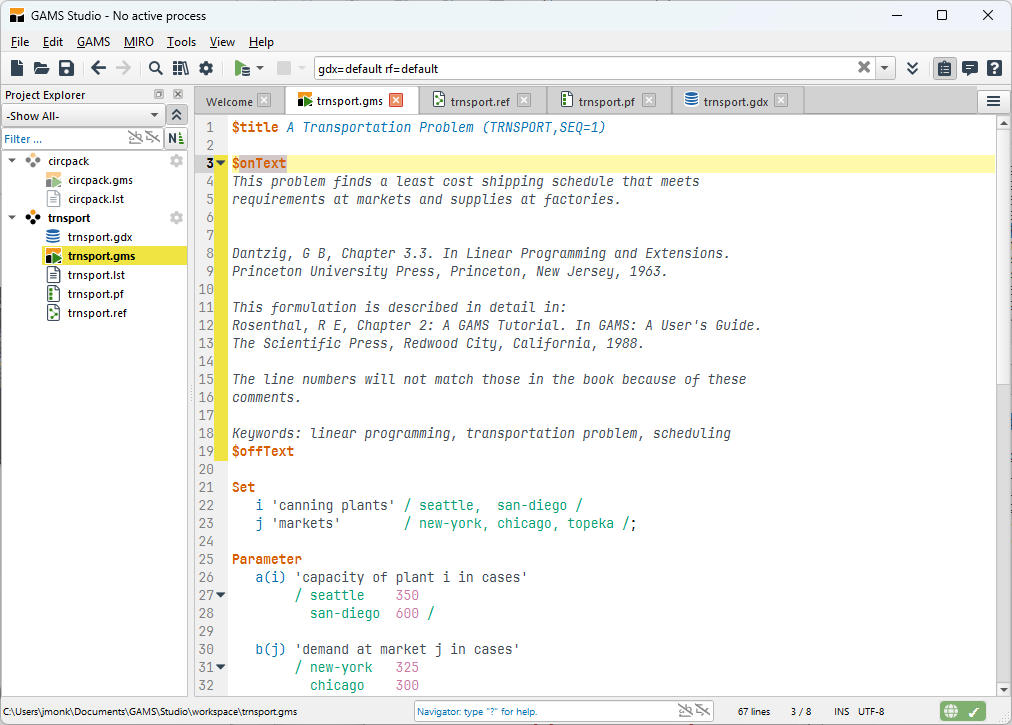 Studio in Distinct-light theme
 - Dracula - dark theme : a high-contrast, dark theme with bright colors for higher readability.
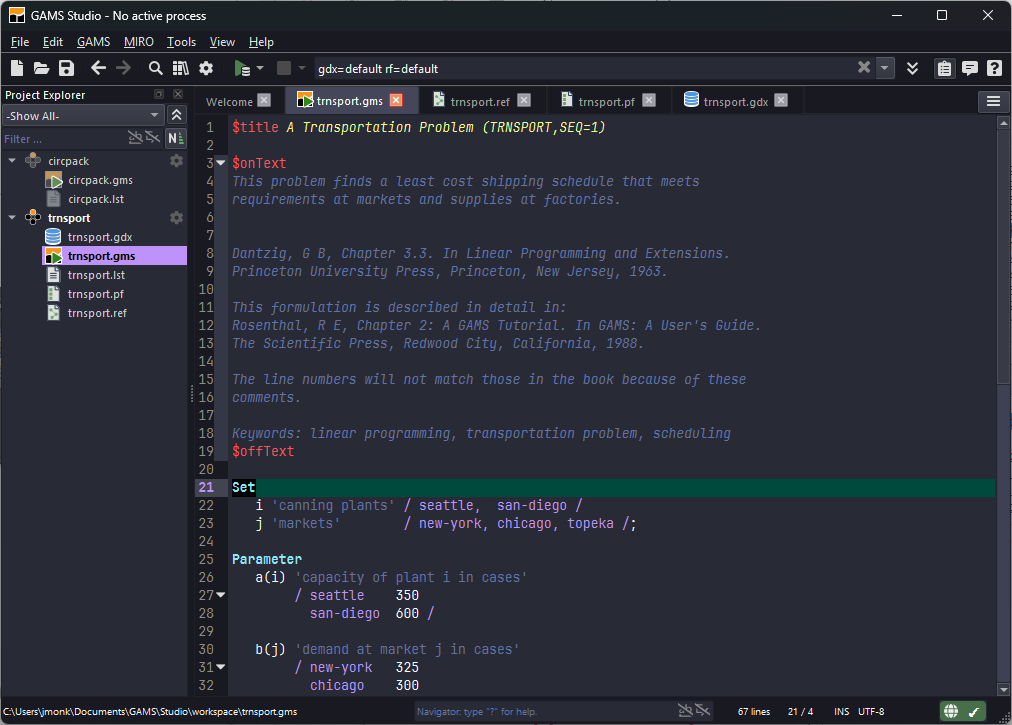 Studio in Dracula-dark theme
 - Solarized - light theme : a low-contrast, eye-friendly light theme for bright environments.
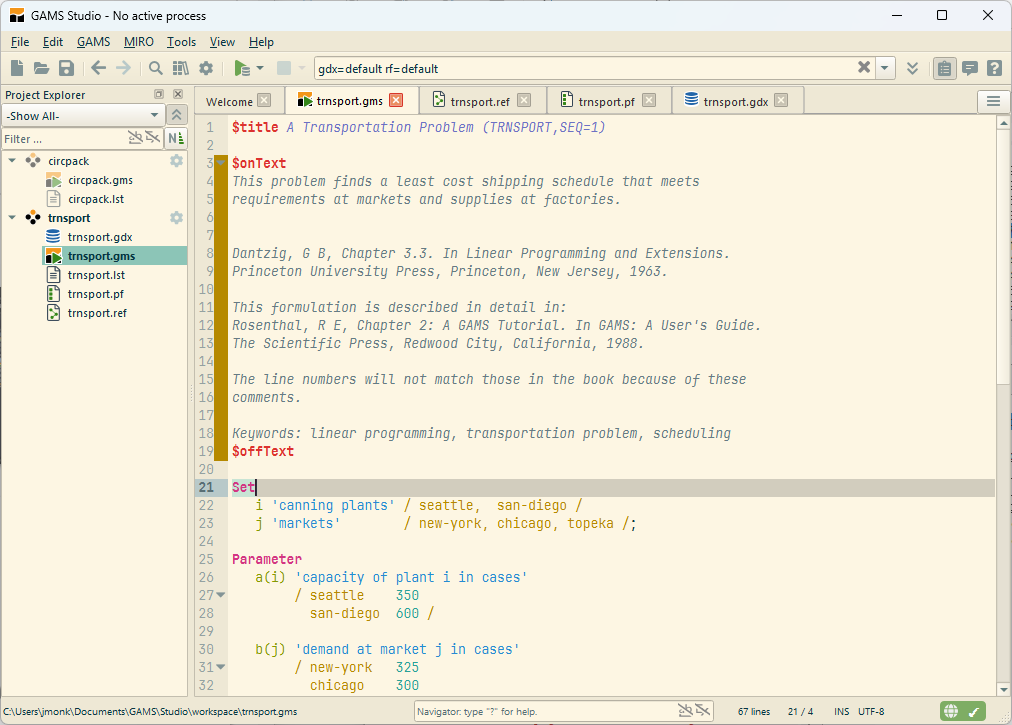 Studio in Solarized-light theme
 - Solarized - dark theme :- a low-contrast, dark background for dim environments.
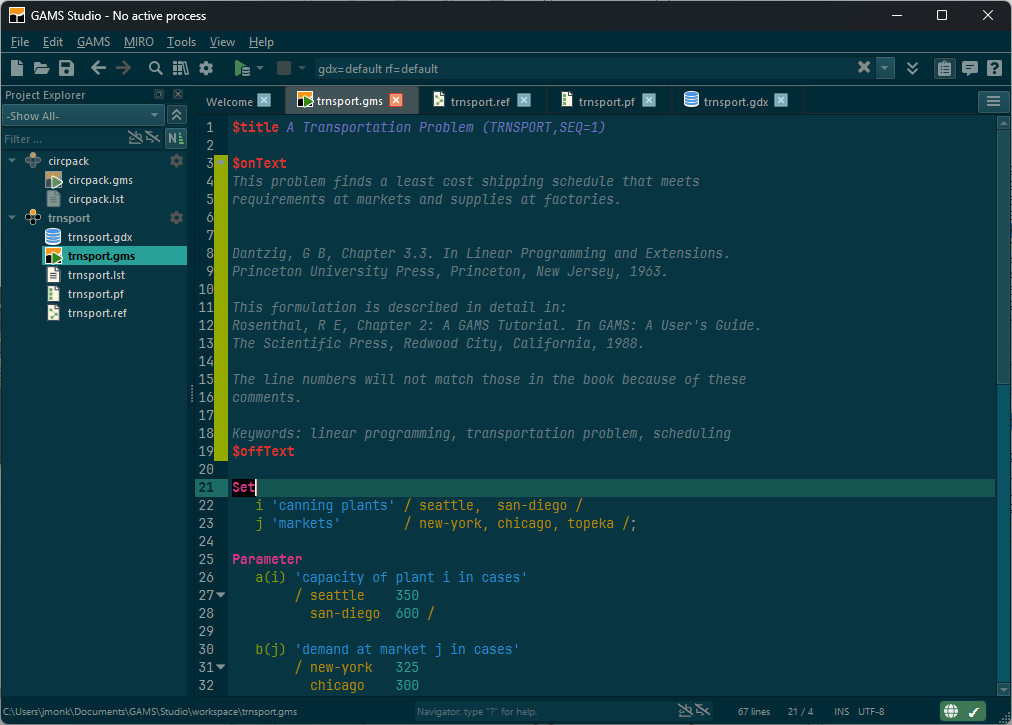 Studio in Soloarized-dark theme
All six built-in themes are fixed and cannot be modified. A built-in theme can be explicitly copied using a Copy button. Modifying a value of a built-in theme implicitly creates a copy of the theme with the new name and the changed value applied. Once copied, the theme can be customized according to your requirements. A custom theme can be renamed using Rename button in addtion to exported into a file using Export buttom and imported from a file using Import button.
The customizable colors and attributes for a theme are divided in three sections:
- General colors - allows to customize foreground and background colors for common user interface elements: window, text, button, selection, tooltip, and label. Including alternate background color, input foreground color, and hyperlinks foreground color.
- Syntax colors - allows to change foreground color, background color, italics attribute, and bold attribute of the syntax highlight elements. The background color can be reset to the default editor background by right-clicking.
- Editor colors - allows to modify foreground, background, and alternate (for blinking effect) colors of editor elements. The very first entry on this section, Default Text, serves as the base for the syntax colors in code editor.
Remote page
The "Remote" tab is used to set various remote settings.
- The MIRO section - allows you to define the location of your local MIRO installation.
- The checkbox "Always agree to NEOS" - allows you to hide the
Terms Of Usein the NEOS submission dialog. - The GAMS Engine section - allows you to store a login token to stay logged in when restarting Studio. The next line allows you to define how long the login remains valid.
- If the dialog has been hidden by clicking
OK, don't ask, the buttonReactivate dialogenables it again.
Misc page
The "Misc" tab contains some less common settings.
- GAMS source file extensions - allows you to add custom file extensions that Studio recognizes as runnable GAMS files. Files with these extensions can be executed, set as the main file, and use the GAMS Syntax Highlighter. The field accepts a comma-separated list of file extensions.
- Auto-reload extensions - allows specific extensions to be reloaded automatically when changed externally. If changes were made internally as well, a dialog asks how to proceed. This field also accepts a comma-separated list of file extensions.
- User model library - displays the folder used to find user-generated model libraries (see User Libraries). You can change this folder to a custom location. Up to 10 locations are stored in history. Use the trash bin button to remove the current entry from history. The arrow button opens the file browser in the current folder.
- Reset History - clears the list of recently used projects and files on the Welcome Page.
- Reset Window - resets Studio’s appearance to default settings if issues arise.
- The final group contains options for the Solver Option Editor.
Update page
The "Update" tab is used to configure the check for update behavior.
- Automatic Check for GAMS Updates - automatically check for GAMS updated on a daily, weekly or monthly basis. The check is performed at the Studio startup.
- Check Now - immediately check for GAMS updates. This is independent from Automatic Check for GAMS Updates.
Workspace page
The "Workspace" tab is used to configure the check for update behavior.
- Default Working Directory - defines the directory where files and projects are saved as well as GAMS models are executed in. This is also the default location for the models imported from the Model Library Explorer.
- Switch default on changing project to the projects Working Directory - when changing the current project, change the
Default Working Directoryto the working directory of the newly selected project. - Clean-up Working Directory - configure which directories should be cleaned during the Studio startup, if Clean-up selected Working Directories on start-up is checked. The directories listed depend on the projects currently opened. Furthermore, file patterns can be specified to define the files to be deleted. It is also possible to clean-up the workspace immediately by pressing the Cleanup now button or to simulate the process via Dry Run.
Recover files
While editing files, GAMS Studio creates a backup of each changed file’s current state every minute. If Studio closes unexpectedly, these files remain in the working directory. Upon restarting Studio, a prompt will ask if the latest state of the files should be recovered. Recovery loads the original files into editors and updates each to the latest content, marking these files with an asterisk (*) as edited. To revert to the previously saved version, use the undo function. Additionally, a backup file with the extension .bk stores a copy of the original content, which will be overwritten during recovery.
Delete scratch directories
GAMS creates temporary folders for running processes in your working directory, which are usually removed upon run completion. However, if a run is interrupted, these folders may remain. To clean up the user workspace, Studio provides an action under GAMS > Delete scratch directories to remove unwanted, auto-generated directories. A confirmation popup will appear, showing the path of the directory to be cleaned. Selecting "Yes" deletes all directories starting with 225 followed by one or two letters within the default workspace. This action is also triggered when GAMS exhausts possible scratch directory names, but not without confirmation. Ensure no GAMS jobs are running before using this feature.
Full Screen & Distraction Free Mode
To optimize screen space, especially on smaller devices, Studio offers Full Screen and Distraction Free modes.
- Full Screen mode is activated by pressing
Alt-Enteron Windows/Linux orCommand-Control-Fon macOS, expanding Studio to cover the entire screen. Press the same shortcut to exit. - Distraction Free mode, activated by
Ctrl-Alt-Enteron Windows/Linux orCmd-Option-Enteron macOS, hides all Studio widgets and enlarges the central widget to the studio window size. Pressing the shortcut again restores the original view. Running a GAMS model in Distraction Free mode automatically opens the log.
| Action | Shortcut | macOS |
|---|---|---|
| Enter/Exit Full Screen | Alt - Enter | Command - Control - F |
| Enter/Exit Distraction Free Mode | Ctrl - Alt - Enter | Command - Option - Enter |
GDX Diff
The GDX Diff dialog provides a graphical interface for the command-line tool GDXDIFF. It compares the data of two GDX files and outputs the differences to a third GDX file. Access this dialog via Tools > GDX Diff in the menu.
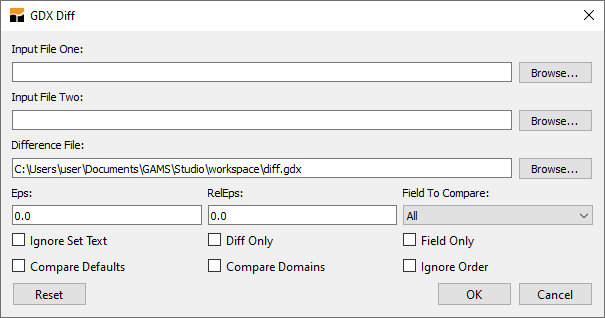
The dialog consists of two parts. The upper section specifies the two GDX files for comparison, while the output GDX difference file is auto-generated unless manually modified. By default, the difference file is named diff.gdx and saved in the same directory as the first input GDX file. The output updates automatically if the first input is changed to an existing file. If the dialog is opened without a valid first input, the most recently used directory is suggested for the difference file.
The lower part of the dialog provides various options to control comparison behavior:
- Eps: Specifies an absolute difference threshold. If the difference between two values exceeds this threshold, it will be reported. Default is
0.0. - RelEps: Sets a relative difference threshold. A difference is reported if this threshold is exceeded. Default is
0.0. - Field To Compare: Specifies the subfield used to determine differences in a variable or equation. Options include:
- All: All fields
- L: Level
- M: Marginal
- Lo: Lower Bound
- Up: Upper Bound
- Prior
- Scale
- Ignore Set Text: Ignores explanatory text of set elements.
- Diff Only: Outputs differences in variables and equations as parameters, adding an index to denote the field name. Only differing fields are recorded. Cannot be combined with
Field Only. - Field Only: When used with
Field To Compare, outputs variables and equations as parameters for the chosen subfield. This cannot be used withDiff Onlyand requiresField To Compareto be set to a specific field (notAll). - Compare Defaults: Determines whether default values, like 0 for parameters, are reported as differences when found in one file but missing in the other.
- Compare Domains: Reports differences if domains differ for the same symbol.
- Ignore Order: Ignores UEL order in input files, which can reduce the output file size.
When the OK button is clicked, the input validation is performed, and the two input files are compared. If the specified difference file is already open in a GDX Viewer, the corresponding tab stays open while the underlying GDX file detaches. Once the file is updated, the GDX Viewer reinitializes. If the GDX file was not open before, it opens in a new tab.
The Cancel button closes the dialog and stops any ongoing process. For lengthy comparisons of large files, the dialog needs to remain open.
The Reset button resets the dialog to its default state, which also re-enables the automatic population of the difference file path if it had been disabled by a manual change.
Additionally, the GDX Diff dialog integrates with the context menu in the Project Explorer. When one or two GDX files are selected, the context menu shows an option to open the GDX Diff dialog with the file(s). If one file is selected, it fills the corresponding empty input field. If both fields are filled, the first input file path is overwritten. For two selected files, both input fields are populated.
Terminal
GAMS Studio can open a native terminal through Tools > Terminal in the main menu or by pressing CTRL - T. A terminal can also be accessed by right-clicking any entry in the "Project Explorer" and selecting Open terminal. The terminal defaults to the workspace of the current project, except on macOS, where it always opens in the user’s home directory.
Command Line Options
GAMS Studio can be started with additional command line options to change behavior or trigger specific functionalities at startup. The syntax for starting GAMS Studio from the command line is:
studio [options] [files]
While files is one or more files to be opened by GAMS Studio, the following options can be supplied:
- -?, -h, --help : Displays the help.
- -v, --version : Displays version information.
- --ignore-settings : Starts Studio with default settings without saving them.
- --reset-settings : Resets all settings to default, loads Studio with these settings, and saves them.
- --reset-view : Resets Studio visually without altering settings; helpful if widgets are misplaced or Studio starts on a disconnected monitor.
- --gams-dir path_to_gams : Specifies a GAMS installation path for Studio.
- --log : Creates a Studio system log at
$HOME/Documents/GAMS/Studio/studio.log. - --no-log : Disables the Studio system log.
- --log-file file : Specifies a custom file for the Studio system log.
- --skip-check-for-update : Disables all online update checks.
- --integrated-help on/off : Switches the integrated help on/off (default: on).
- --network-log log_file_path : Write the network log for the tools used, like check for update (C4U) and gamsgetkey. The log file path may look like
my-studio-net.logor$HOME/Downloads/studio-net.log.
General Shortcuts
This section lists any shortcuts that are global to Studio. Shortcuts for more specific areas are mentioned in their corresponding section.
Studio Workflow Shortcuts
| Shortcut | macOS | Description |
|---|---|---|
| Ctrl - 1 | Command - 1 | Sets focus to the Project Explorer. Use arrow keys for file navigation |
| Ctrl - 2 | Command - 2 | Sets focus to main editor |
| Ctrl - 3 | Command - 3 | Sets focus to the command line option input field |
| Ctrl - 4 | Command - 4 | Opens the tab browser, which has a list of all open tabs. Focus is on an input field that can be used to filter tabs. Pressing Return opens the highlighted file |
| Ctrl - 5 | Command - 5 | Sets focus to log widget |
| Shift - Ctrl - 3 | Control - Option - 3 | Opens and closes extended command line option editor |
| Ctrl - Tab | Toggles through the open tabs of the central widget from left to right | |
| Ctrl - Shift - Tab | Toggles through the open tabs of the central widget from right to left | |
| Alt - Return | Command - Control - F | Enters/Exits Full Screen Mode |
| Ctrl - Shift - T | Command - Shift - T | Restores recently closed tab |
| Ctrl - Shift - W | Command - Shift - W | Closes all tabs |
| Ctrl - W | Command - W | Closes current tab. Alternatively, a tab can be closed by clicking the middle mouse button |
| Ctrl - Q | Command - Q | Closes GAMS Studio |
Studio Dialogs and Actions
| Shortcut | macOS | Description |
|---|---|---|
| F1 | F1 | Opens the GAMS Help. If the word under the cursor is a GAMS keyword, a search in the documentation will be started |
| F6 | F6 | Opens GAMS Model Library Explorer |
| F7 | Command - , | Opens Studio Settings |
| Ctrl - F | Command - F | Opens Quick Find widget |
| Ctrl - Shift - F | Command - Shift - F | Opens search and replace widget |
| Ctrl - G | Command - G | Goes to specific line number |
| Ctrl - N | Command - N | Opens new file dialog |
| Ctrl - O | Command - O | Opens file open dialog |
| Ctrl - Shift - O | Command - Shift - O | Opens file dialog to open the file(s) in the current (or new) project |
| Ctrl - P | Command - P | Opens print dialog |
| Ctrl - S | Command - S | Saves the current file. If the file does not exist on disk, open the save file dialog |
| Ctrl - Alt - S | Command - Option - S | Opens save as dialog |
| Ctrl - Shift - S | Command - Shift - S | Saves all open files. Open save file dialog if needed |
| Ctrl - K | Command - K | Opens Navigator widget |
| Ctrl - T | Command - T | Opens a terminal for the current project location. On macOS, the terminal points to the user’s home directory |
Studio Recovery
| Shortcut | macOS | Description |
|---|---|---|
| Ctrl - F2 | Command - F2 | Resets Studio to default visual settings (window position and -size, widget position and -visibility). Useful when a widget got lost or Studio started on a disconnected monitor |
Zoom Editor and View
All editors and views can be zoomed in and out. To avoid repeating actions, a zoom is applied to all editors and views of the same group. Under the Integrated Help and the Welcome Page, these groups are defined:
- Text: contains all editors and views that show flowing text in monospace fonts and appear as Central Widget, like the Code Editor and the Listing Viewer.
- Log: contains the Process Logs and the System Log.
- Table: contains all editors and viewers that show table and tree elements in proportional fonts as a Central Widget, like the GDX Viewer and the Solver Option Editor. It also includes the Command Line Option Editor.
| Action | Shortcut | macOS | Description |
|---|---|---|---|
| Zoom In | Ctrl - + or Ctrl - = or Ctrl - Wheel Up | Command - + or Command - = or Command - Wheel Up | Zooms in all editors and views of the same group |
| Zoom Out | Ctrl - - or Ctrl - Wheel Down | Command - - or Command - Wheel Down | Zooms out all editors and views of the same group |
| Reset Zoom | Ctrl - 0 | Command - 0 | Resets zoom of all editors and views |
Usage Hints
Filter in Tables and Trees
To find relevant entries in tables and tree views Studio provides a special line edit containing up to four buttons aligned to the right:
- Clear - clears the term in the line edit.
- Exact Match - when active, the filter accepts only rows with one cell matching exactly the term regarding wildcard or regular expression setting.
- Regular Expression - when inactive, the wildcards '*' (any amount of characters) and '?' (one character) can be used. Otherwise, the filter provides full regular expression syntax. Click here for further information about regular expressions.
- All Columns - when inactive, the filter checks only the key column. When active, all cells of the table/tree-view are taken into account.
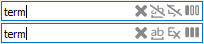
System Requirements
Compared to most of the GAMS system, GAMS Studio has additional system requirements, which vary depending on the platform used.
Linux
The Linux version of GAMS Studio is distributed as an AppImage and requires glibc 2.35, glibcxx 3.4.30, as well as FUSE to be installed.
The GAMS Studio AppImage has been tested and verified to work on the following Linux distributions (all currently maintained). Note that Linux distributions are frequently updated, which may affect the AppImage’s behavior. Please check the Studio issue page if you encounter any issues.
- Fedora 42/43
- openSUSE Leap 16.0
- openSUSE Tumbleweed
- Ubuntu 22.04/24.04 LTS
- Manjaro
Other distributions might work as well, though they were not tested. If you experience problems with a specific Linux distribution, please let us know.
If the Studio AppImage does not run, you may need to extract the AppImage using the command:
$ ./studio.AppImage --appimage-extract
and then start Studio from the extracted directory.
Some Linux distributions use Wayland, which can cause issues. In such cases, try running Studio with the following command:
$ QT_QPA_PLATFORM=xcb ./GAMS_Studio-1.12.1-x86_64.AppImage
macOS
macOS has some specific platform requirements for locating GAMS. The following steps are used to link GAMS Studio to GAMS:
- GAMS Studio will attempt to locate GAMS in
/Applications/**and/Users/username/Applications/**if it is part of a GAMS folder. GAMS Studio needs to be copied viaFinderto its target location, as occurs with the GAMS installer or when GAMS Studio is copied from the DMG file. - If GAMS Studio does not find GAMS as described above, it will search
/Applications/**for a valid GAMS installation, i.e., one with the minimum required GAMS version or higher. - If needed, the path to GAMS can be set explicitly by launching GAMS Studio with the command line argument
--gams-diror by changing the entrySettings>General>GAMS System Directory.
macOS gathers some menu entries in the Studio menu. If an entry can't be found at the original location, these are the entries moved to the Studio menu:
About Studiocaptured from theHelpmenu.About Qtcaptured from theHelpmenu.PreferencesoriginallySettingsfrom theFilemenu.About GAMScaptured from theHelpmenu.Quit StudiooriginallyQuitfrom theFilemenu.
Windows
There are dependencies on certain Visual C++ libraries. These are present on most Windows systems but are missing on some. If you get a complaint about missing libraries on startup of GAMS Studio, please run the appropriate installer for these libraries called vc_redist.x64.exe, which can be found in the GAMS installation folder at [GAMS system]\studio.
GAMS Studio supports the following Windows platforms:
- Windows 11 (all)
Comparing GAMS Studio and GAMSIDE
As mentioned above, the classic GAMS IDE was shipped with the GAMS system for many years and served as the primary development environment for a long time. While it offered some features not initially available in GAMS Studio, it also lacked many capabilities found in modern development tools. With the discontinuation of the GAMS IDE, GAMS Studio is now the sole supported development environment. The following table provides a compact overview of key features in GAMS Studio, including improvements and changes compared to the former IDE.
| GAMSIDE only | GAMS Studio only |
|---|---|
| Supported Platforms | |
| - Windows | - Windows |
| - Linux | |
| - macOS | |
| GDX Viewer | |
| - Creating charts | - Filtering (both, symbols and data, labels and values) |
| - Writing to HTML | - Sorting by numerical value |
| - Heat-map functionality (aka Data Colors) | - Option to change display format of numerical values |
| Editor | |
| - Fixed encoding (ISO 8859-1) | - Allow change of encodings and use UTF-8 by default |
| - Spell checker | - Block edit |
| - Recognize URLs and open them in the browser | - Help integration (pressing F1 on a keyword opens the relevant index page of the documentation) |
| - Different set of keyboard shortcuts | - Tooltips for compilation errors |
| - Navigation history | |
| - Code Completion | |
| - "Smart typing": Automatic insertion of closing character for brackets and quotes | |
| - Distraction Free Mode | |
| - Code Folding | |
- Open $[bat/lib]include files directly from editor | |
| Execution | |
| - IDE Projects | - Studio Projects (see below for details) |
| - Set default options for the IDE only | - Interactive editor for the GAMS User Configuration |
| - Use different GAMS versions | - Interactive editor of GAMS command line parameters |
| - Use alternative license | - Interactive editor for GAMS Connect |
| - Execute program based on extension | - Option to run with GDX and reference file creation automatically (F10 vs. F9) |
| - Solver selection menus | - Integration of GAMS MIRO |
| - Remote execution on NEOS Server for Optimization | |
| - Remote execution with GAMS Engine | |
| - Interactive execution time debugger | |
| - Support of standard locations, e.g., to detect the license file at a standard path | |
| - Support of access code based licenses | |
| - Option to jump to first error automatically | |
| - Option to not write log to disk | |
| Other | |
| - Text Diff | - Welcome page |
| - Script recording | - Project Explorer |
| - Email file | - Navigator |
| - Save test files in UNIX format | - Filtering in Model Library Explorer (all model libraries at the same time) |
| - Allow to switch between light, dark, or custom themes | |
| - Reference File Viewer allows jumping to all references etc., not just the first one | |
| - 32-bit application | - 64-bit application |
From GAMSIDE to GAMS Studio: Understanding Project Behavior
The behavior of projects and file execution has changed significantly from the classic GAMSIDE to GAMS Studio. Understanding these differences is key to a smooth transition.
GAMSIDE Project Behavior
In the GAMSIDE, you always started by creating a "Project," which was essentially a pointer to the file system that defined a single working directory (i.e., it implicitly defined the workDir when starting GAMS). This directory was used to execute all the models added to the project, regardless of where the model files themselves were located. For example, if your project was in directory a, and you added models a/a.gms and b/b.gms, both files would be executed with a as the working directory. This meant all input data was expected in a (or relative to it), and all output files were also generated in a, not necessarily in the file's original location (like b).
When you first launched the IDE, you were prompted to create a new project, establishing this fixed working directory from the start.
GAMS Studio Project Behavior
GAMS Studio operates differently by being more project-centric. When you open a file for the first time, it automatically creates a new project with a working directory set to the location of that file. This means if you open a/a.gms, a project is created with a as the working directory. If you then open b/b.gms, a separate project is created with b as the working directory.
This approach ensures that models are executed within their own directories, which can be more intuitive. However, if your models were structured to rely on the "GAMSIDE way", you can still adjust the working directory for a project within the Project Options.
The Role of the "Main File"
Another crucial difference is the concept of a "main file." While the GAMSIDE always executed the .gms file that was currently active in the editor, GAMS Studio executes the main file of the currently active project.
For example, if you have multiple files in one project and press F9 while viewing an output file like a.lst, GAMS Studio will re-run the project's main file, which might be a.gms (GAMSIDE did not run anything in this case).
This is important to note: if you have a.gms and b.gms in a single project, and a.gms is set as the main file, pressing F9 while viewing b.gms will still run a.gms. To execute b.gms instead, you must first set it as the main file.
You can do this by right-clicking on b.gms in the Project Explorer and selecting "Set as Main File" or by using the keyboard shortcut Ctrl + Shift + m. A green arrow will indicate the newly assigned main file.
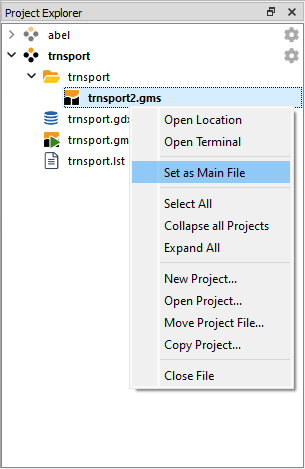
Working in GAMSIDE Mode
If you prefer the GAMSIDE workflow, GAMS Studio can be configured to behave similarly. You can achieve this by activating two settings in the General tab of your Settings:
- "Open file in current project by default": This keeps new files from creating a new project automatically.
- "Check 'Dynamic main file' in new projects": This ensures the main file is always the active file you are working on.
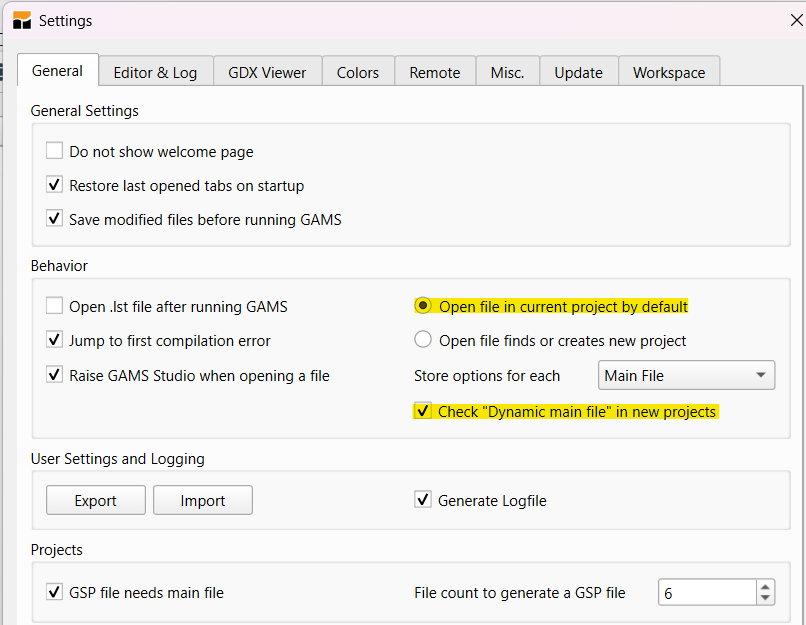
Once these settings are active, you can begin with an empty project (File -> New Project) and explicitly define the working directory, just as you would in the classic GAMSIDE.